• Car enthusiast? Join us on Cars Connected! iOS | Android | Desktop
  • Hint: Use a descriptive title for your new message
    If you're looking for help and want to draw people in who can assist you, use a descriptive subject title when posting your message. In other words, "I need help with my car" could be about anything and can easily be overlooked by people who can help. However, "I need help with my transmission" will draw interest from people who can help with a transmission specific issue. Be as descriptive as you can. Please also post in the appropriate forum. The "Lounge" is for introducing yourself. If you need help with your G70, please post in the G70 section - and so on... This message can be closed by clicking the X in the top right corner.

Fog Lamps- Part __?__

genesis@genesisworld.com

Registered Member
Joined
Oct 29, 2008
Messages
298
Reaction score
3
Points
0
Location
Tyler, Texas
A LOOOONG time ago, Pingolf and others found a really nifty and bright bulb to replace the stock fog lamp bulb. It was awesome. And.... way too hot. A few of us (Pingolf included) found that the plastic housings began to melt with the new bulbs. So... like the others, I bought new fog lamp housings and had the dealer install them when he fixed a little self inflicted bumper rash I caused.

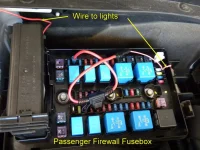
But before the housings were installed, I put them on my work bench and spent a lot of time studying them. Then, to Pep Boys to purchase their thin flexible white LED strips. They have a bluish tint (5500K??) but the look nice. I'll confirm, but I think they are 18" long. I snapped off the chrome rings from the front and nestled in the LED strips between the chrome and the clear front of the light housing. I had the dealer route the wires into the engine comprtment. I used high temp wires and made solid, insulated connections. I then found a fuse under the hood that goes hot as soon as the engine starts (no matter the headlight condition).

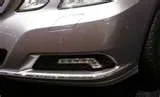
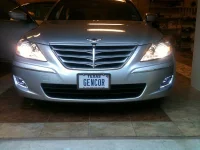
It gets lots of looks!
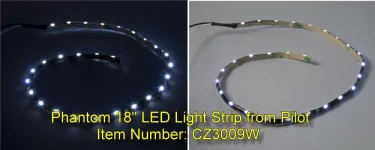
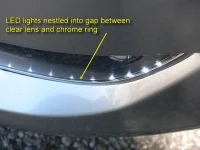
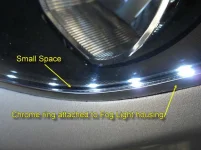
 

Attachments

  • GennyLights1.webp
    GennyLights1.webp
    57.7 KB · Views: 166
  • GennyLights2.webp
    GennyLights2.webp
    45.5 KB · Views: 213
Looking to update and upgrade your Genesis luxury sport automobile? Look no further than right here in our own forum store - where orders are shipped immediately!
I really like this A LOT. Sorry but i'm going to say this I'm am Definitely going to be copying you on this
 
I'm sorry too. Sorry to say that I'm jealous of you guys that have the talent to do stuff like this. I tend to set things on fire or blow it up when I endeavor stuff like this. I winterized my boat last year and after the worst winter North Alabama has seen in 20 years the engine still cracked and cost me 6-grand!! I'm not going to touch the Genny with nothing but a rag and car wax!
;)
 
Looks good. Nice touch.
 
can you give a close up of one of the fog lamps? Get a visual of what you did. The LEDs are on the outside?
 
Can you also give us a picture of where/what you connected to in the engine compartment?

Bernie
 
Can you also give us a picture of where/what you connected to in the engine compartment?

Bernie

I'll work on that Bernie.

Also- I've tried to take a couple of pics to better show how I nestled the lights between the chrome bezel and the clear light, but none of the pics, post installation, tell the story. It may be this weekend, but I'll get my good digital camera out to the garage and see if I can load several more detail pics.
 
I think lots of other folks will be interested in your pics and hear more on how you went about installing the LEDs onto/into the fog lamps, route the wiring and connect up to power.

Since you posted, I started looking for web sites who sell AUDI style LED flexible light strips. I'm half-thinking of installing a set on the outside top-half portion of each fog light. This would imitate the LED arrangement on the Mercedes E-series. I would need a 12" flexible white LED strip. Any ideas as to the brightness rating and color (temperature) in order to mimic AUDI or Mercedes LED lighting accents.

Bernie
 

Attachments

  • thumbnailCAAD24Z9.webp
    thumbnailCAAD24Z9.webp
    2.5 KB · Views: 103
A couple of months ago I saw a Mercedes coming towards me. I really like the running LED daytime lights they have. Do they act as fogs as well? I didn't see any fogs on it. They look just like the picture posted above.
 
I think lots of other folks will be interested in your pics and hear more on how you went about installing the LEDs onto/into the fog lamps, route the wiring and connect up to power.

Since you posted, I started looking for web sites who sell AUDI style LED flexible light strips. I'm half-thinking of installing a set on the outside top-half portion of each fog light. This would imitate the LED arrangement on the Mercedes E-series. I would need a 12" flexible white LED strip. Any ideas as to the brightness rating and color (temperature) in order to mimic AUDI or Mercedes LED lighting accents.

Bernie

Bernie- I'd be concerned about putting them on the outside of the fog lights. Mainly due to the rough treatment they'll get close to the road. And, the surface area of the flex lights is pretty small so the sticky surface area may be small.

I didn't take pics of how I took apart the fog housing and slipped in the LED strips and that's really the tricky bit. If anyone has a detail drawing of the fog light assembly, that would help. I can photochop instructions on to it. As to the hookup under the hood- that's easy and I'll get pics of that by the weekend.
______________________________

Help support this site so it can continue supporting you!
 
Pics and instructions:

1. I purchased the LED lights at PepBoys, but they're also available online from several places. As the picture says, they are 18" flexible LEDs, 12VDC. They have double sided tape on the back that I really only rely on while mating the parts.

2. Remove the fog lights (NOT for the faint of heart due to the position of a couple of the nuts).

3. Carefully snap off the chrome ring (bezel) that surrounds the front of the housing. It is very tight.

4. You'll notice from the shape of the chrome ring vs the clear housing that there is a small gap between them. Experiment with the LED strip to make it fit nicely in that gap. It WILL fit. I snuck the wires out near the top of the housing. Then take off the protective strip from the lights and stick them to the chrome. The lights I bought came with a battery & switch. I placed the lights and then lit them several times before I was happy.

5. There is no right or wrong way to get the lights in the gap. They will reflect nicely off the bezel and/or the clear housing. When you're happy with the placement, snap the chrome ring back on.

6. Extend the wires from the LEDs using good wire splicing techniques that will withstand high temps. I crimped them and then coated with Scotch 33 tape.

7. I routed the driver side wires under a couple of covers to keep them out of sight and brought them to the passenger side light wires.

8. Find a good spot to connect the negative light wires. This can be anything that is connected to the metal frame of the car. Again, use good techniques to make sure it lasts.

9. I joined the 2 light positive wires into one wire. They draw VERY little current so this is easy to do. Route the positive to the back passenger side fuse box.

10. You'll see in the picture that to the end of the LED positive wire, I connected a fuse for good measure. It's the lowest rating I could find (10 amps??). I had to do a little cutting on a 'spade crimpon lug' to make it fit in the fusebox slot, but it works and is solid.

11. I might recommend filing a small notch in the fusebox to allow the wire to come out easier. I'm going to go back and do that to relieve the stress on my wiring.

That's it!
 

Attachments

  • LED-LightsForFog.webp
    LED-LightsForFog.webp
    33.5 KB · Views: 103
  • FogLightCU2.webp
    FogLightCU2.webp
    64.9 KB · Views: 112
  • FogLightCU.webp
    FogLightCU.webp
    93.5 KB · Views: 102
  • FuseBoxConnection.webp
    FuseBoxConnection.webp
    112.3 KB · Views: 105
Back
Top