mch4424
New member
- Joined
- Sep 30, 2021
- Messages
- 18
- Reaction score
- 7
- Points
- 3
- Genesis Model Year
- 2011
- Genesis Model Type
- 1G Genesis Sedan (2009-2014)
I was struggling to find any good information on how to fix the cooled seats in the 2009-2014 vehicles other than some vague photos/descriptions from years ago. I decided to dive in and make a guide for anyone who may want to have clear instructions on how to fix the cooling or heating functions of their seat. The cooling function on the back is specifically what I'll be addressing, as mine was very weak and I couldn't feel it 90% of the time. This fix is cheap, not too difficult labor wise, and uses methods approved by the Hyundai dealership.
The cooling function works by an air vent under the seat blowing cooled air into a peltier unit (small cooling fan) that splits the air into 2 flat ducts. One duct delivers air to the bottom of the seat, and one to the back. The ducts enter into the seat by a foam inlet (which tends to cut off a substantial amount of airflow) and then into the perforations of the seat leather.
What you will need:
3-5 compression springs (size around 1"x3") about $1 each at my local hardware store
Velcro stick on strips cut to size
First steps:
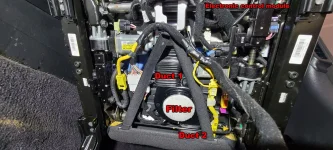
First of all, you will want to check your system to make sure everything is working. Check to make sure when you switch on your seats you can hear the peltier unit running. If it is not running, you will want to check the fuses or the switch. Second, make sure your air conditioning is cool. If your A/C isn't blowing cold air, the seat will not be running efficiently as it will be moving warmer air. Third, check the filter underneath the seat. There is a small filter that can be clogged up that is removed by turning it under the center of your seat. Some people have replaced these, however I found that blowing compressed air or gently washing it with dish soap works just fine as long as it isn't completely destroyed. Replace the clean filter. It is possible that your control module is bad as well, although I believe that is a rarer problem. If so, a new module can run you somewhere around $100 in which case I would suggest finding a replacement seat for marginally more money. (If your heat/cooling functions don't work well at all the module can be bad.)
Second Steps:
Make sure your leather is clean! This might seem obvious, but your perforations can be gunked up and prevent air flow entirely. I used a steam cleaner (GENTLY!) and then a leather cleaner that evaporates and does not leave a residue. Spray it on a rag, wipe down the seats. For bad areas, use a dental pick to clean the perforations manually. This can make a difference believe it or not. My seats were clean, but I still cleaned with a rag anyways seeing as you never know if something has worked its way into the perforations.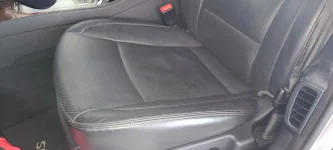
Third steps:
This is the most impactful fix if your cooling function is not working. You want to remove the back of your seat which will be the most difficult part of this process. The back is held on by two metal clips at the top of the seat. These require a BRUTAL amount of force to remove. I had to use steady force backwards and then used a needle nose pliers to help the last clip out. The good news is that the seat goes back together very well with these heavy duty clips provided you don't break anything. Once the clips are removed, lift up on the seat to remove the clips at the bottom. I left the back attached while doing this, but you could remove it from under the seat if you'd like.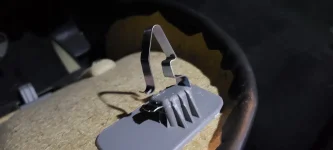
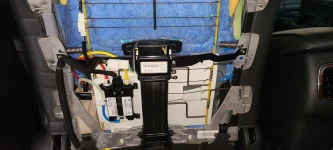
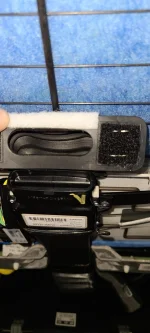
Once the back is removed, you can check the duct for any leaks. Mine had none and the quality seemed good as well. The duct feeds into a foam inlet where two pieces of velcro on the left and right help it stay in place. There are two issues with this that I found. The first is the foam inlet gets crushed and air does not move through it, this is the fix some dealerships used PVC pipe for (however, springs work much better.) The second issue is the duct itself does not get a good, flat connection to the inlet from only 2 velcro pieces. As you can sort of see, my duct did not seal against the inlet and leaked air from the bottom due to the angle of the hose.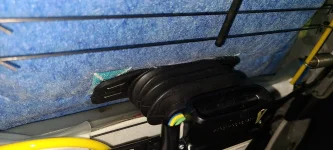
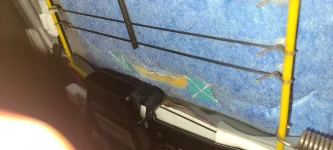
The first fix will be using springs to keep open the foam inlet and allow air to move to the back of the seat. I removed the duct hose to do this. I made an "H" shape with 3 of the springs. Some dealerships were using PVC pipe, however using a spring works better as it cuts off much less air flow than PVC pipe does. Simply insert the springs one at a time with two of them on the left and right of the opening, and the last one just below the opening. This should prop open the inlet enough to provide adequate airflow.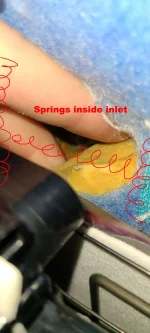
Finally, attach a piece of velcro strip below the air inlet and it's sister piece on the duct itself as pictured. This will help the duct make a full seal to the rear inlet.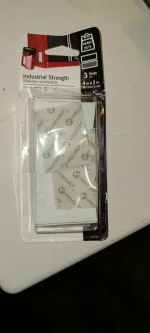
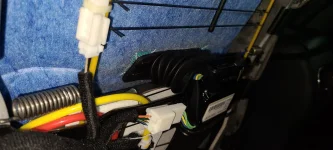
Re-attach the ducts and make sure everything is seated correctly. The back of the seat should go back on quite easily. You can also do this spring fix on the bottom seat cushion, however I have not been able to find a simple way of taking the seat leather off and accessing the foam inlet. However, this made a HUGE difference to the airflow to the back of my seat and works incredible well for under $10 in materials. Hopefully this guide helped as I couldn't find any other guide on this forum that really laid it all out.
The cooling function works by an air vent under the seat blowing cooled air into a peltier unit (small cooling fan) that splits the air into 2 flat ducts. One duct delivers air to the bottom of the seat, and one to the back. The ducts enter into the seat by a foam inlet (which tends to cut off a substantial amount of airflow) and then into the perforations of the seat leather.
What you will need:
3-5 compression springs (size around 1"x3") about $1 each at my local hardware store
Velcro stick on strips cut to size
First steps:
First of all, you will want to check your system to make sure everything is working. Check to make sure when you switch on your seats you can hear the peltier unit running. If it is not running, you will want to check the fuses or the switch. Second, make sure your air conditioning is cool. If your A/C isn't blowing cold air, the seat will not be running efficiently as it will be moving warmer air. Third, check the filter underneath the seat. There is a small filter that can be clogged up that is removed by turning it under the center of your seat. Some people have replaced these, however I found that blowing compressed air or gently washing it with dish soap works just fine as long as it isn't completely destroyed. Replace the clean filter. It is possible that your control module is bad as well, although I believe that is a rarer problem. If so, a new module can run you somewhere around $100 in which case I would suggest finding a replacement seat for marginally more money. (If your heat/cooling functions don't work well at all the module can be bad.)

Second Steps:
Make sure your leather is clean! This might seem obvious, but your perforations can be gunked up and prevent air flow entirely. I used a steam cleaner (GENTLY!) and then a leather cleaner that evaporates and does not leave a residue. Spray it on a rag, wipe down the seats. For bad areas, use a dental pick to clean the perforations manually. This can make a difference believe it or not. My seats were clean, but I still cleaned with a rag anyways seeing as you never know if something has worked its way into the perforations.

Third steps:
This is the most impactful fix if your cooling function is not working. You want to remove the back of your seat which will be the most difficult part of this process. The back is held on by two metal clips at the top of the seat. These require a BRUTAL amount of force to remove. I had to use steady force backwards and then used a needle nose pliers to help the last clip out. The good news is that the seat goes back together very well with these heavy duty clips provided you don't break anything. Once the clips are removed, lift up on the seat to remove the clips at the bottom. I left the back attached while doing this, but you could remove it from under the seat if you'd like.


Once the back is removed, you can check the duct for any leaks. Mine had none and the quality seemed good as well. The duct feeds into a foam inlet where two pieces of velcro on the left and right help it stay in place. There are two issues with this that I found. The first is the foam inlet gets crushed and air does not move through it, this is the fix some dealerships used PVC pipe for (however, springs work much better.) The second issue is the duct itself does not get a good, flat connection to the inlet from only 2 velcro pieces. As you can sort of see, my duct did not seal against the inlet and leaked air from the bottom due to the angle of the hose.


The first fix will be using springs to keep open the foam inlet and allow air to move to the back of the seat. I removed the duct hose to do this. I made an "H" shape with 3 of the springs. Some dealerships were using PVC pipe, however using a spring works better as it cuts off much less air flow than PVC pipe does. Simply insert the springs one at a time with two of them on the left and right of the opening, and the last one just below the opening. This should prop open the inlet enough to provide adequate airflow.

Finally, attach a piece of velcro strip below the air inlet and it's sister piece on the duct itself as pictured. This will help the duct make a full seal to the rear inlet.


Re-attach the ducts and make sure everything is seated correctly. The back of the seat should go back on quite easily. You can also do this spring fix on the bottom seat cushion, however I have not been able to find a simple way of taking the seat leather off and accessing the foam inlet. However, this made a HUGE difference to the airflow to the back of my seat and works incredible well for under $10 in materials. Hopefully this guide helped as I couldn't find any other guide on this forum that really laid it all out.
Last edited:


