• Car enthusiast? Join us on Cars Connected! iOS | Android | Desktop
  • Hint: Use a descriptive title for your new message
    If you're looking for help and want to draw people in who can assist you, use a descriptive subject title when posting your message. In other words, "I need help with my car" could be about anything and can easily be overlooked by people who can help. However, "I need help with my transmission" will draw interest from people who can help with a transmission specific issue. Be as descriptive as you can. Please also post in the appropriate forum. The "Lounge" is for introducing yourself. If you need help with your G70, please post in the G70 section - and so on... This message can be closed by clicking the X in the top right corner.

So, I did a thing.

Nameneeded

SUSTAINING MEMBER
Joined
Feb 22, 2023
Messages
117
Reaction score
60
Points
28
Location
Calgary Alberta Canada
Genesis Model Year
2023
Genesis Model Type
Genesis G70
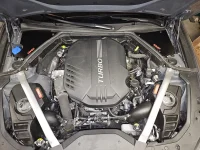
Spent some time today installing the AFE Takeda intake and a JB4 w. EWG.

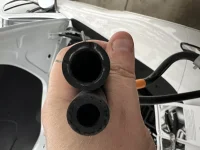
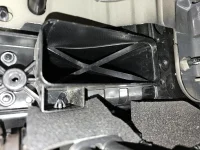
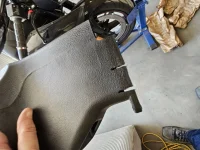
The takeda fit perfect on the driver's side but some minor modification was needed for the passenger side. The plastic molding on the side on the air inlet prevents the intake from mounting properly. I used a multi tool to cut some slots and voila! Perfect fit. Also had to cut one of the tubes short. These use parts from the original hardware.

I'll be installing the Lozic TCU once I get through the 1/2 tank of 91 and go 93.
 

Attachments

  • 20230429_222719.webp
    20230429_222719.webp
    383.3 KB · Views: 119
  • 20230429_141048.webp
    20230429_141048.webp
    253.6 KB · Views: 116
  • 20230429_141022.webp
    20230429_141022.webp
    201 KB · Views: 120
Last edited:
Here are some Draggy sheets. Not sure why they show invalid (limited datilite connection) but it's what I have for now. All runs in sport mode with launch control. Stock, 0 map, map 1 (91). Note the temp change and grade. Calgary is about 1050m above sea level.
 

Attachments

  • Screenshot_20230430_010149_dragy.webp
    Screenshot_20230430_010149_dragy.webp
    50.7 KB · Views: 71
  • Screenshot_20230429_230134_dragy.webp
    Screenshot_20230429_230134_dragy.webp
    52.7 KB · Views: 67
  • Screenshot_20230429_225955_dragy.webp
    Screenshot_20230429_225955_dragy.webp
    50.8 KB · Views: 66
Just want to say thanks for this post because I saw it before I bought my AFE intakes and had the same problem needing to cut out the passenger side. I knew about it ahead of time because of your pictures here, super helpful. Should sticky this post to be honest, because the AFE intakes are a Stinger variant, all of the install docs and video are on a Stinger, and nothing mentions this issue. I had to use the video a couple of times because the pictures in the instructions are kind of hard to tell what's going on in a couple of steps. Also, I'd do a few things in reverse from how the instructions are.

1) On the removal, reverse steps 17 and 16. It's easier to pull the hose off the valve cover if you already unscrewed the mount to the engine.

2) You can put the rubber plugs on the intake boxes before you put them in the car, not sure why they waited until the end to do this.

3) Reverse the steps for the intake installation. Tighten down the air intake box before you use the screw on the air snorkel on the front of the car. It's hard to line up the bolts for the air intake and if you have the snorkel section already tightened down it makes it unnecessarily difficult. Also, there's no reason to screw in the front snorkel part first.

4) It doesn't mention it, and once you're in there it's a little bit of common sense, but don't tighten the clamp on step 28 since you're going to need to move the inlet tube to put it all together.

5) Connect the blow off valve hoses from steps 38-40 before you put the large inlet pipes on. Once they're on you won't be able to get the blow off hoses on the car, I had to take both of the inlet pipes off and redo it.

6) Reverse steps 41 and 43. Put the hose on the valve cover first since that's the harder part to do. You don't want it binding up on the air inlet pipe while you're trying to jam this small hose over the connecting barb. It's already a PITA getting it on the valve cover, don't make it harder on yourself by restricting how much you can control the hose.

All in all, it seems like a lot to do differently, but it was a pretty easy install. I just had to redo some of the steps as shown above to get everything to fit properly.
 
Just want to say thanks for this post because I saw it before I bought my AFE intakes and had the same problem needing to cut out the passenger side. I knew about it ahead of time because of your pictures here, super helpful. Should sticky this post to be honest, because the AFE intakes are a Stinger variant, all of the install docs and video are on a Stinger,

I just had to redo some of the steps as shown above to get everything to fit properly.

Glad it helped. In hindsight I should have documented my install but your write up is great!
 
Looking to update and upgrade your Genesis luxury sport automobile? Look no further than right here in our own forum store - where orders are shipped immediately!
I sent this post to AFE and they got back to me, apparently they started making the change a couple of weeks ago and the intakes will come with the notches pre-cut into the passenger side box. Pretty cool they're making the change, wonder if they saw it from here or not.
 
Any tips on how to get the 3/8" silicone hose over the valve cover barb (step 43)? The hose that came off was much larger interior diameter, probably 1/2" or 5/8". All other steps were easy thanks to this post (minus missing two hose clamps).

Edit: picture attached. The hose on the top is stock and the bottom is AFE.
 

Attachments

  • IMG_1982.webp
    IMG_1982.webp
    95.7 KB · Views: 12
Last edited:
Any tips on how to get the 3/8" silicone hose over the valve cover barb (step 43)? The hose that came off was much larger interior diameter, probably 1/2" or 5/8". All other steps were easy thanks to this post (minus missing two hose clamps).

Edit: picture attached. The hose on the top is stock and the bottom is AFE.
Get a little lube on the hose end helps. Most auto mechanics use a water-soluble dry-without-a-trace all-purpose lube, otherwise known as, uh... spit. You laugh, but it works like a charm.

If all else fails, you can always get a hose barb adapter. Either auto parts store or even Home Depot will have them.
 
Any tips on how to get the 3/8" silicone hose over the valve cover barb (step 43)? The hose that came off was much larger interior diameter, probably 1/2" or 5/8". All other steps were easy thanks to this post (minus missing two hose clamps).

Edit: picture attached. The hose on the top is stock and the bottom is AFE.
It was a pain, I think you asked on my Reddit post about this too. This is why I swapped the steps and didn't attach it to the intake pipe first (as the instructions show to do). Leave the hose loose and you can use the hose itself to push it onto the barb, and then whatever bit of your hand you can get to the valve cover you can assist getting it on there.

Like Volfy said too, use some kind of lubrication which will help for sure.
 
Perhaps I'm just dumb but where's the link to the install steps or video?
My Takeda comes tomorrow.
Thanks much!
 
Perhaps I'm just dumb but where's the link to the install steps or video?
My Takeda comes tomorrow.
Thanks much!
Most interested in this intake. Who did you order from? Part #? Thanks brother
 
Back
Top