An in-depth guide to replace an alternator on a Hyundai Genesis R-Spec sedan. I followed the guide above & it is missing a few steps... My Genesis is a 2013.
1. Engage the parking brake and disconnect the negative terminal from the battery in the trunk.
2. Remove the intake airbox and the hard tubing (10mm bolts). To avoid removing the soft curvy hose connected to the valve cover, I just rested the intake stuff on top of the engine. **two bolts are located under the shroud (see step 3)
3. Remove the plastic intake shroud by popping off the clips & left front bolt (10mm).
4. Slide out tubing from the 2 clips on radiator fan & move tubing aside.
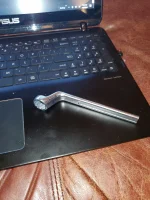
5. With a big wrench - release the pressure on the belt tensioner pulley and remove the belt around the idler pulley, then the alternator.
6. Top left front corner of the alternator: remove 10mm bolt bracket holding an alternator wire.
7. Remove 2x14mm mounting bolts from front (top right & bottom right) of alternator,
8. Jack up car & rest framerails on jack stands. Grab your safety glasses too - things are about to get sandy.
9. Drop down 2 both front plastic 'skid plates' (10mm bolts).
10. Disconnect alternator power (10mm) by moving round boot. Slide this cable forward & out of the way.
11. Remove 12mm bolt on bottom of alternator bracket.
12. Seriously, take a break now - the next part requires patience and a bit of force. Find your calm persistence here.
13. Unplug wire connector on back of alternator by squeezing, it should come out easily.
14. The alternator is currently blocking 4x14mm bolts holding the alternator's bracket to the engine. With a flashlight, look at the space that you have to move the alternator forward & away. Your goal is that there needs to be enough room to fit a wrench on the recessed bracket bolts (between alternator and alternator bracket) for removal. Carefully wiggle the alternator (with force) forward. This takes time.
15. Keep face/body clear of falling heavy metals. This next step involves dropping the alternator + bracket.
16. Remove 4x14mm bolts on alternator bracket. **double check step 11' success before removing bracket
17. With bracket loose, feel how it slides into place; on step 19 - it's going to be heavier.
18. Attach new alternator to alternator bracket via 1 finger-tight mounting bolt.
19. Get a bracket bolt ready in hand. Slide bracket (with alternator) back home. Tighten 2x14mm bracket bolts.
20. Remove alternator from bracket & carefully force it forward again in the engine bay.
21. Insert & tighten the 2x14mm remaining recessed bracket bolts. (reference step 14)
22. Attach alternator to bracket & tighten alternator's 2x14mm mounting bolts on the front of the bracket.
23. Tighten alternator power (10mm) & secure black rubber round boot.
24. Insert power connector to back of alternator until it 'clicks'.
25. Re-attach 2 front 'skid plates' via 10mm bolts.
26. Remove jack & jack stands.
27. Re-attach serpentine belt via belt tensioner (alternator 1st, then idler pulley).
28. Re-attach plastic intake airbox, tubing & intake shroud.
29. Re-connect negative terminal battery.
30. Have a fun & nice drive!
I talked this job today and this thread was a lifesaver as I would have never found those 2 bolts. What a crazy design. I followed these steps, but would add some comments where I was hung up or what made it easier.
First, I had a little issue with the jack location in step 8. Jacking at the framerails meant I didn't have enough room for a stand, and my 2 ton jack couldn't reach all the way under the car to the front location where I could jack it up and then place the stands at the sides. So I jacked up on one side, dropped down the skid plates in step 9 and set a jack stand under the frame. I then jacked at the other side and set another jack stand under the frame.
The stands were set pretty low, and it ended up being a blessing as getting the alternator out was a lot easier by having access both above and below. I would assume you could just drive up on some ramps as step one and do everything after.
Step #13 was a bit of a pain as I couldn't get my hand in there. I ended up doing it after moving the alternator.
In step #14, I would recommend loosening the 2 bolts you can access before moving the alternator. I took the top one out and the dipstick was in the way. Getting it started from below wasn't too bad, but once I did the hidden bolts, this was easily accessed from above for hand removal.
Some wires at the front of the alternator were also in the way. These were the same wires that plugged in to the alternator in #13 as well as another spot. There was a bracket attached with 2 10 mm bots and taking those out from the top were a must.
Moving the alternator forward and removing the other 2 bolts ended up not being that bad. At first it seemed impossible, but I got a pry bar and from above placed it near where the top right bolt that was removed that connected the alternator to the alternator frame and pried a little. Then got underneath and pushed up. Then back above and I just grabbed it and wiggled a few tames and it moved forward. I could then access the 2 bolts from where the air cleaner was removed with a socket and extension. I just let it all drop down as I could access all 4 bolts from above.
In 19, Tightened the bottom bolt and just started the top one as it was too difficult to thread from below and it was much easier to tighten as part of step #20.
Overall, being able to work both top and bottom and removing and replacing from the bottom would be my recommendation.