Rey
Registered Member
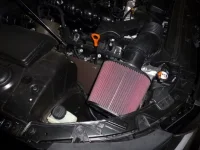
The R-Spec air filter box is fairly restrictive, even with a K&N filter.
So far, no one has offered an aftermarket cone filter; and it seems unlikely that anyone will do so. The market is very small.
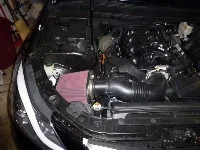
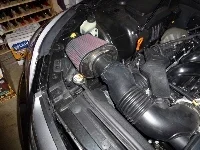
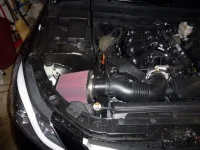
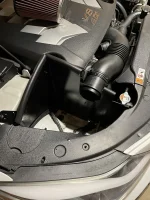
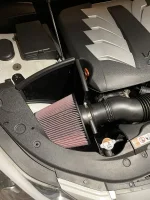
I adapted a K&N model RF1040 filter to my R-Spec. This is a large filter with a 4" (102mm) opening flange. I had previously had this same filter on my '05 Cadillac CTS-V, which is 5.6 liters. It was part of a Lingenfelter kit.
Filter size is everything. Do not buy one of those cute little cone filters offered at parts stores. Think big.
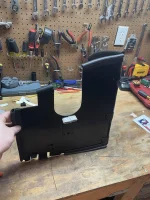
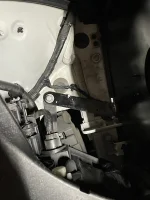
The install on a R-Spec is incredibly simple, and can be reversed to stock in a few minutes. The air box itself is held by three 10 mm bolts and is easily removed complete with an entry cone from the front of the radiator. You will first have to remove the decorative flange around the front of the hood. It is simple to do.
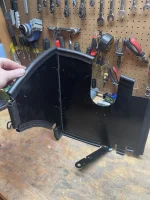
Just unbolt the exit flange from the air box. You will mount the filter on the interior side of this flange. It is just a bit loose, and you may want to try another K&N that has a 99 mm opening flange. Just choose one with the largest filter area.
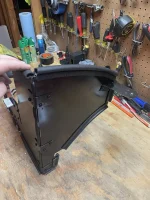
The K&N filter can hang without support. You will want to remove the entry cone from the OEM air box. It has three clips - one of which is hidden. This cone fits loosely without connection to the air intake near the top of the radiator. It will not stay in place unsupported, so I suggest duct taping it to the air intake.
O.K. what is the result? There is a material power increase. By my measurements intake air temperature is reduced a couple of degrees. Pumping losses are reduced, and gas mileage is improved slightly on light throttle cruise. There is absolutely no noise increase under light acceleration or cruise. When you step on it you will hear a motor now.
Cost, about $50 plus shipping and an hour or so of your time. Have fun.
So far, no one has offered an aftermarket cone filter; and it seems unlikely that anyone will do so. The market is very small.
I adapted a K&N model RF1040 filter to my R-Spec. This is a large filter with a 4" (102mm) opening flange. I had previously had this same filter on my '05 Cadillac CTS-V, which is 5.6 liters. It was part of a Lingenfelter kit.
Filter size is everything. Do not buy one of those cute little cone filters offered at parts stores. Think big.
The install on a R-Spec is incredibly simple, and can be reversed to stock in a few minutes. The air box itself is held by three 10 mm bolts and is easily removed complete with an entry cone from the front of the radiator. You will first have to remove the decorative flange around the front of the hood. It is simple to do.
Just unbolt the exit flange from the air box. You will mount the filter on the interior side of this flange. It is just a bit loose, and you may want to try another K&N that has a 99 mm opening flange. Just choose one with the largest filter area.
The K&N filter can hang without support. You will want to remove the entry cone from the OEM air box. It has three clips - one of which is hidden. This cone fits loosely without connection to the air intake near the top of the radiator. It will not stay in place unsupported, so I suggest duct taping it to the air intake.
O.K. what is the result? There is a material power increase. By my measurements intake air temperature is reduced a couple of degrees. Pumping losses are reduced, and gas mileage is improved slightly on light throttle cruise. There is absolutely no noise increase under light acceleration or cruise. When you step on it you will hear a motor now.
Cost, about $50 plus shipping and an hour or so of your time. Have fun.
")