

4.6Guy
New member
- Joined
- Apr 22, 2022
- Messages
- 1
- Reaction score
- 1
- Points
- 1
- Genesis Model Year
- 2009
- Genesis Model Type
- 1G Genesis Sedan (2009-2014)
May 12, 2022
Today I replaced the horizontal travel “limit switch” which is notorious for malfunction after which you can’t adjust the driver seat horizontal travel, or it will travel only in one direction. A major problem when it occurs.
In summary, if this happens you will need to replace the “limit switch” which is located underneath the seat and near the center console underneath side. It’s held in place by two philips head machine screws.
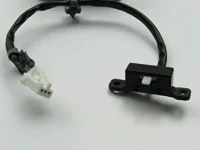
But the only way you’re going to be able to gain access is to REMOVE the driver seat from the floor, held down by four 14mm head bolts, two in front and two in the rear. There just is no other way to gain sufficient access to the subject “limit switch”, which is part number “H 88533 3M900” and is described as “Slide Limit Switch”, pictures of which are shown below.
To further explain the procedure you’ll have to do, after removing the four 14mm bolts that hold the seat to the floor, you will meed to lift the front of the seat off of the front bolts so that you can slide the seat assembly back and forth as necessary to gain access to the underside of the seat. After that all of your work will be done from the back seat, directly behind the driver seat. You will need to tilt the top of the driver seat forward so as to expose the underside of that seat, which is where you’ll find the limit switch located on the right side of the underside. It will be roughly 1/3rd of the way forward as view from the back seat. Once you find it remove the two small machine screws that hold it in place. Then trace it’s wire to where it plugs into a connector that’s located about 10 inches to the left
and plug the new limit switch into that connector. I left the old limit switch hanging under the seat but if you don’t chose that I suggest that you use wire cutters to cut the wiring of the old switch as it’s attached in such a manner that you can’t otherwise remove it. Make certain your new switch works before you cut any wires.
You will find it challenging to get the driver seat sufficiently upended to where you can remove the old switch. I found that lowering the driver seat headrest and tilting the seat back way forward was needed to tilt the seat sufficiently. Work those two items as necessary and aggressively wrestle the seat until you have the underside well exposed for your work.
Replacing the two machine screws that hold the new limit switch will be tedious and requires patience. Be certain that you don’t strip their threads when you replace them.
Once you’ve done all of the above you are ready to put the front of the seat back onto its “in floor” bolts and then put those 14mm nuts back on which reattaches the seat to the floor. JOB DONE.
Today I replaced the horizontal travel “limit switch” which is notorious for malfunction after which you can’t adjust the driver seat horizontal travel, or it will travel only in one direction. A major problem when it occurs.
In summary, if this happens you will need to replace the “limit switch” which is located underneath the seat and near the center console underneath side. It’s held in place by two philips head machine screws.
But the only way you’re going to be able to gain access is to REMOVE the driver seat from the floor, held down by four 14mm head bolts, two in front and two in the rear. There just is no other way to gain sufficient access to the subject “limit switch”, which is part number “H 88533 3M900” and is described as “Slide Limit Switch”, pictures of which are shown below.
To further explain the procedure you’ll have to do, after removing the four 14mm bolts that hold the seat to the floor, you will meed to lift the front of the seat off of the front bolts so that you can slide the seat assembly back and forth as necessary to gain access to the underside of the seat. After that all of your work will be done from the back seat, directly behind the driver seat. You will need to tilt the top of the driver seat forward so as to expose the underside of that seat, which is where you’ll find the limit switch located on the right side of the underside. It will be roughly 1/3rd of the way forward as view from the back seat. Once you find it remove the two small machine screws that hold it in place. Then trace it’s wire to where it plugs into a connector that’s located about 10 inches to the left
and plug the new limit switch into that connector. I left the old limit switch hanging under the seat but if you don’t chose that I suggest that you use wire cutters to cut the wiring of the old switch as it’s attached in such a manner that you can’t otherwise remove it. Make certain your new switch works before you cut any wires.
You will find it challenging to get the driver seat sufficiently upended to where you can remove the old switch. I found that lowering the driver seat headrest and tilting the seat back way forward was needed to tilt the seat sufficiently. Work those two items as necessary and aggressively wrestle the seat until you have the underside well exposed for your work.
Replacing the two machine screws that hold the new limit switch will be tedious and requires patience. Be certain that you don’t strip their threads when you replace them.
Once you’ve done all of the above you are ready to put the front of the seat back onto its “in floor” bolts and then put those 14mm nuts back on which reattaches the seat to the floor. JOB DONE.
Attachments

Last edited:


