HateiLove
Registered Member
- Joined
- Oct 13, 2019
- Messages
- 27
- Reaction score
- 2
- Points
- 3
- Genesis Model Type
- 1G Genesis Sedan (2009-2014)
Hello guys
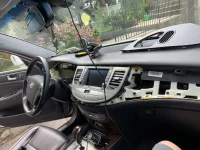
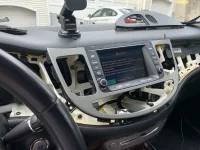
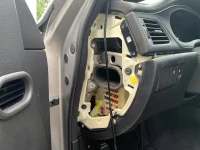
My lazy ass finally decided to fix my backup camera on my 2010 Hyundai Genesis Sedan 3.8L. My info screen is the touch screen w/ nav and I would assume it will be roughly the same process for the DIS. Anyways I used the 2 reference videos below to get access to change out the display screen and long and behold it worked sort of because LKQ part doesn't work. Now I'm waiting for the replacement part. The touch screen doesn't work but I confirmed that it was not my backup camera that was broken but my screen that was broken. I had replaced the camera last year and that didn't fix it but replacing the screen did. Looking at the washed-out screen for so long I don't even remember how it was originally supposed to look like.
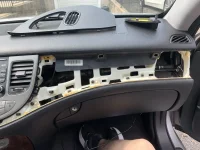
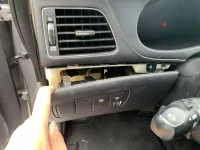
Alright, all you need is a pry tool and maybe 2 Philips head screwdrivers and some elbow grease. It took me like 1.5 hours because I was fumbling around like an idiot but now I reckon I can do it in 30 min. Some tips are that the screw under the left side of the steering wheel is a pain the ass and that's where the 2 screwdrivers come in so you can stick one inside and provide leverage as the screw is on a floating piece so very hard to unscrew. Also, make sure when you're on the passenger side taking off the trim you have to take the air vent with the trim off I was struggling as I ripped the trim off the air vent but was suppose to take it all out.
Sorry, this isn't the most informative guide but ill try to take more pics when I do the second process and maybe a video if yall interested and I have a spare hand to help me film. All in all, not the worse "fix" the replacement screen was around 90 so that's the price to pay to stare at something that actually works. I would say it's easier to replace the screen than the backup camera. I got access to the backup camera like 3 times and boy it was no fun. Those clips are a pain in the ass to remove the trunk whatever you call it don't remember but check my other post to see the troublesomeness.
Longer Reference video
Short Overview Reference video
My lazy ass finally decided to fix my backup camera on my 2010 Hyundai Genesis Sedan 3.8L. My info screen is the touch screen w/ nav and I would assume it will be roughly the same process for the DIS. Anyways I used the 2 reference videos below to get access to change out the display screen and long and behold it worked sort of because LKQ part doesn't work. Now I'm waiting for the replacement part. The touch screen doesn't work but I confirmed that it was not my backup camera that was broken but my screen that was broken. I had replaced the camera last year and that didn't fix it but replacing the screen did. Looking at the washed-out screen for so long I don't even remember how it was originally supposed to look like.
Alright, all you need is a pry tool and maybe 2 Philips head screwdrivers and some elbow grease. It took me like 1.5 hours because I was fumbling around like an idiot but now I reckon I can do it in 30 min. Some tips are that the screw under the left side of the steering wheel is a pain the ass and that's where the 2 screwdrivers come in so you can stick one inside and provide leverage as the screw is on a floating piece so very hard to unscrew. Also, make sure when you're on the passenger side taking off the trim you have to take the air vent with the trim off I was struggling as I ripped the trim off the air vent but was suppose to take it all out.
Sorry, this isn't the most informative guide but ill try to take more pics when I do the second process and maybe a video if yall interested and I have a spare hand to help me film. All in all, not the worse "fix" the replacement screen was around 90 so that's the price to pay to stare at something that actually works. I would say it's easier to replace the screen than the backup camera. I got access to the backup camera like 3 times and boy it was no fun. Those clips are a pain in the ass to remove the trunk whatever you call it don't remember but check my other post to see the troublesomeness.
Longer Reference video
Short Overview Reference video