Ok Boys,
I got a warm day to go after this...
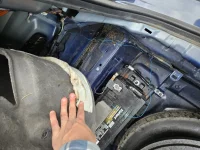
First thing I'd like to say, these wires remind me of my '62 VW Bug I had.....if you wiggle a wire, the insulation is going to break.
Don't know if there's a chemical incompatibility in materials/adhesives used in this harness or what....but as you see in the pictures, the insulation just cracked....then the wires bent enough in that point to eventually 'work harden' and break.
DON'T get me wrong...the workmanship in this harness is TOP NOTCH! It's BEAUTIFUL! Except for the wires breaking....lol
Note that I removed the factory attachment point at the special/purpose built bracket. I think this exacerbated the flexing, by making it shorter. Also gave me more slack for soldering....
I did NOT re-attach it when I was done... (note in the final video)
I put a meter one EVERY broken/cut wire....I had ZERO voltage on ANY of them!
Yeah....weird... (Ignition OFF, obviously)
So, I didn't bother disconnecting the battery.
I stripped the factory wrap up to the second attachment point on the hinge arm, if that makes sense. To give me room to park the shrink tube while I soldered. Cut around the first point...DON'T try to pull ANY of these 'snap-in' items, if you can help it. They ALL broke...
The trunk interior panels are held by clips like on a 'door card'... The part attached to the panel, that holds the clips, broke! not the little replaceable bit/dick thing. I re-installed by running a screw through the panel, into the clip that was still in place. (I didn't take a picture of that....sorry. LMK if you need one.)
Pretty straight forward/self explanatory repair...look at the pix.
I cut/stripped (both ends), in MY case, 5- 1.5" wire extension pieces.
Soldered to the high/long end first...put the heat shrink tube on (don't forget)....soldered the lower end.
I had TWO broken solid black wires...I looked at where the wire was on each end still tight in the loom, and one black wire was touching the orange wire on both ends...
Guess I got THAT right......???
Tested it before I went any further.
Note, the shielded gray 'cable' with 2 wires is for the camera I'm assuming. I didn't bother trying to shield it with foil or anything, because the picture was fine when I tested it.
Wrapped the remaining broken insulation wires, just to be safe..
Then, instead of wrapping them all back together in tape, which I think helped stress the wires, I used a piece of tubing that I had laying around...it's pretty thick walled/rigid, and it fit under the cowling piece.
I suppose something like garden hose would work too.....maybe some factory type loom, but I kinda think that would be TOO flexible.....maybe if you wrapped it in electrical tape really tight to 'firm' it up?
Secured it to that first attachment point... the gray plastic piece.
Then my 'over-engineering' gene kicked in...I played around with using a spring to pull the harness from the middle of the slack area, toward the front of the car, to keep it from flexing in any one place more than the rest.
I ended up bailing on the idea.
I included the videos I took of closing the boot all the way down on my arm, holding the camera on the harness.
Think the spring made it flex a little more at the bottom than w/out it. You be the judge...
I left the video in there so maybe someone else might come up w/ something better.
I can NOT imagine NOT trying THIS, over buying a complete new harness and removing the whole interior/console/dash of the car to replace it....Imagine how many things will break ALL over the car, when you're taking ALL of that shit apart...
That's just idiotic!
Probably why the one guy was w/out his car for 60 days....Because they had to keep special ordering crazy obscure shit direct from Korea, that broke along the way...
If anything, I'd buy the ass end of that harness, from a junk yard, cut that 2 foot bit out of it, and solder the WHOLE thing/every wire, up close to where I did the repair, and solder it to the other end, giving you 2 extra feet of flex/slack....but THAT might cause even MORE problems with pinching/rubbing on the body/hinge or something?
Hope this wasn't TOO long winded and rambly....And I write things down like how I talk....
I'm SURE my wife would FLUNK me for my sentence structure. (a writing Teacher)
That's just how I am...lol
Hope this helps!
Shared album · Tap to view!

photos.app.goo.gl