• Car enthusiast? Join us on Cars Connected! iOS | Android | Desktop
  • Hint: Use a descriptive title for your new message
    If you're looking for help and want to draw people in who can assist you, use a descriptive subject title when posting your message. In other words, "I need help with my car" could be about anything and can easily be overlooked by people who can help. However, "I need help with my transmission" will draw interest from people who can help with a transmission specific issue. Be as descriptive as you can. Please also post in the appropriate forum. The "Lounge" is for introducing yourself. If you need help with your G70, please post in the G70 section - and so on... This message can be closed by clicking the X in the top right corner.

Creaking dash under climate controls

AceRimmer

Registered Member
Joined
Jun 30, 2023
Messages
31
Reaction score
18
Points
8
Genesis Model Year
2019
Genesis Model Type
Genesis G70
Has anyone else experienced this? Depending on the temperature (of course), my 2019 creaks and groans right around/under the climate controls. I have ventilated seats FWIW, as I know it's a little different if you don't. You can press on the underside, just above the USB ports, and replicate the noise. Tried somehow getting felt tape in there between plastic but everything is so tight there was no chance.

I'm taking in my car for the starter recall next week and will have them check it, but you know how these things are. "Couldn't replicate customer concern." Has anyone fixed this? Or have an idea how to remove that part to get some felt tape or something on it?
 
Looking to update and upgrade your Genesis luxury sport automobile? Look no further than right here in our own forum store - where orders are shipped immediately!
I'd like to know the same thing. Mine will make noise when it's cool outside in the mornings and is quite annoying. Does anyone know how to remove the climate controls so I can add some anti-friction tape?
 
Came to this section looking for this. I have a creaking noise that I noticed 1 to 2 summers ago. It only happens when it is hot outside and it is a creaking in the front of the vehicle interior. I am not sure where the hell it is coming from but I have noticed I can replicate a similar sound when I press the the driver side door panel on the side of the window controls.

It sounds like it could be coming from the dash by the windshield when driving though. I have no clue.

How do you even go about fixing something like this?
 
I took it to the dealer and thankfully they were able to replicate the creaking. Unbelievable I know! It actually made the noise when they drove it. Anyways, the dealer replaced the lower portion of the HVAC controls. It's hard to say this has fixed the problem as the noise was SIGNIFICANTLY worse in the cold weather, particularly the 40-60* F temps and now it's summer. It does seem to still creak occasionally, but that might be the screen area which has always creaked and groaned but the dealer could never replicate. I'll try to keep posted if anything pops up.

Still, like the others, I would love to know how to remove the climate controls just in case, as my warranty expires end of July. If anyone knows, please help!
 
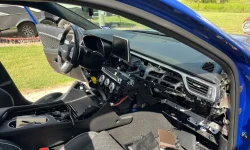
Well, I decided to dive in head-first on this one and figure it out once and for all. I was going off of instructions to remove the instrument cluster so, in the end, I ended up removing a lot more than I needed to but I did figure out how it all goes together. To remove the HVAC controls you need to remove the trim around the shifter, then the leather covered piece just to the right of that. That will expose the right side screw for the HVAC controls as well as two of the bolts holding the center console in. Next, there are four more bolts for the console (one in each foot-well hidden behind a pop-out cover and two in the bottom of the console storage) and the console will slide backward revealing the left side screw for the HVAC control head. I pulled mine apart and added Tesa tape until I couldn't make it squeak anymore. Put everything back together (after adding more Tesa tape to other areas I thought could make noise) and it's quiet as a church mouse now! Here's a scary pic to show how far I went with it...

G70 Console.webp
 
This is great stuff! The dealer replaced my entire climate control setup and the squeak went away.... for 2 days. Now it's back as bad as ever. I'm tired of the dealership. When I get the chance I'll give it a shot. Thanks for the info.
 
Well, I decided to dive in head-first on this one and figure it out once and for all. I was going off of instructions to remove the instrument cluster so, in the end, I ended up removing a lot more than I needed to but I did figure out how it all goes together. To remove the HVAC controls you need to remove the trim around the shifter, then the leather covered piece just to the right of that. That will expose the right side screw for the HVAC controls as well as two of the bolts holding the center console in. Next, there are four more bolts for the console (one in each foot-well hidden behind a pop-out cover and two in the bottom of the console storage) and the console will slide backward revealing the left side screw for the HVAC control head. I pulled mine apart and added Tesa tape until I couldn't make it squeak anymore. Put everything back together (after adding more Tesa tape to other areas I thought could make noise) and it's quiet as a church mouse now! Here's a scary pic to show how far I went with it...

View attachment 59940

I've seen how to remove some of the dash trim from other sources, but how do you remove the trim around the shifter along w/ that leather piece on the side? Thanks in advance.
 
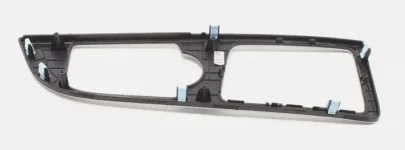
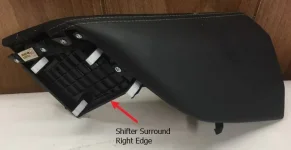
The piece around the shifter just lifts out (and is the first part that needs to be removed). Use a plastic pry tool to lift it on the front-right edge first and work around it counter-clockwise. The leather piece to the right of that will lift from the left edge first (closest to the shifter surround), then it will pull straight back. I pulled up some pictures of new parts to get an idea of how they all install.

Shifter Surround:

1726664016576.webp

Right Side Console Cover:

Console.webp
 
The piece around the shifter just lifts out (and is the first part that needs to be removed). Use a plastic pry tool to lift it on the front-right edge first and work around it counter-clockwise. The leather piece to the right of that will lift from the left edge first (closest to the shifter surround), then it will pull straight back. I pulled up some pictures of new parts to get an idea of how they all install.

Shifter Surround:

View attachment 60134

Right Side Console Cover:

View attachment 60136
Thanks so much! I wish I didn't mind squeaks and rattles. Complete pains in the ass to remedy.
______________________________

Help support this site so it can continue supporting you!
 
Thanks so much! I wish I didn't mind squeaks and rattles. Complete pains in the ass to remedy.
I'm with you 100%, but it is so satisfying when they're gone! Good luck with yours!
 
Well, I decided to dive in head-first on this one and figure it out once and for all. I was going off of instructions to remove the instrument cluster so, in the end, I ended up removing a lot more than I needed to but I did figure out how it all goes together. To remove the HVAC controls you need to remove the trim around the shifter, then the leather covered piece just to the right of that. That will expose the right side screw for the HVAC controls as well as two of the bolts holding the center console in. Next, there are four more bolts for the console (one in each foot-well hidden behind a pop-out cover and two in the bottom of the console storage) and the console will slide backward revealing the left side screw for the HVAC control head. I pulled mine apart and added Tesa tape until I couldn't make it squeak anymore. Put everything back together (after adding more Tesa tape to other areas I thought could make noise) and it's quiet as a church mouse now! Here's a scary pic to show how far I went with it...

View attachment 59940
You're a legend.
 
You're one brave dude to try that. There was a time I'd probably do it myself, but those days are gone. LOL. Nice work, nice fix, and nice write-up. Too bad you couldn't do a video. I know a Mustang guy who has a ton of YT videos that detail all kinds of repairs and mods. They're very well done and really helpful to those less inclined to easily follow written instructions. But again, thanks for the great write-up. I'm sure more than one member here will benefit going forward.
 
I thought about doing a video... after the fact. I'm not good at stopping to explain things as I'm doing them so a YT video would likely be a monumental failure LOL! I've just got one of those "reverse engineering" types of brains so looking at raw parts helps me figure out how they go together. A good friend of mine has always referred to me as a "tinker gnome" :ROFLMAO:
 
Here it is! And it went incredibly smooth. That almost never happens w/ cars. And just like anytime you work w/ plastic, doing on a warm day really helps.

Special thanks to 19 G70 3.3T ! Couldn't have done it without their initial instructions.​


TOOLS:
Felt tape or Tesa tape (I had a big roll of felt tape lying around),
Plastic trim tool
Phillips screwdriver
10mm socket and wrench w/ extension (6" works perfect). IT WILL BE DIFFICULT WITHOUT A WRENCH EXTENSION


1) Use plastic pry tool to pop out the shifter bezel. I just went down the right side and it all popped out. Disconnect the wiring, it's a simple press tab.

O78476F.jpeg


2) Remove the right side leather console cover by popping up the left side using pry tool, then pull back and it will slide out. The right side HVAC screw is now visible.

eykb2Yl.jpeg
mRXNwpc.jpeg

M9oy3gp.jpeg


3) You will have 6 bolts, to remove, all 10 mm, which will allow the center console to move backwards. This will allow you to get to the left side HVAC screw.

Two are next to the shifter in the console housing

Just below shifter: ignore the silver screws, you only need the bronze one

bnY6kY2.jpeg


Just above shifter: again ignore the silver screws, you only need the bronze one

2CTqQSB.jpeg


Two bolts in the center console compartment: first remove the felt

imeO58I.jpeg


Here's the bolts

cwaTP8d.jpeg


Bolts on each side footwell. Pop out the covers using trim tool

Driver side

tHohVOs.jpeg


Passenger side

T4c8Xxu.jpeg


4) Now you can slide the console back to reveal the left side HVAC screw. Needs a moderate pull but was simple

ecvw1wu.jpeg

There it is!

5) Now you can unscrew it. I didn't want to pull the console back too much, so I just pushed it to the side and unscrewed it. MAKE SURE YOU DON'T LET THE SCREW FALL INTO THE ABYSS. (Like the cheap screwdriver I got as a kid? Still does a great job!)

ZzCF6I0.jpeg


6) Now you can pull the HVAC out. Takes a moderate pull. You will hear/feel a pop, but that's ok, it's totally fine. It has 2 connections.

Just like the shifter trim, disconnect the simple press tab
CJs1OIr.jpeg


This one I kept connected as I couldn't see how to undo it and didn't want to mess w/ it

Wqs7snN.jpeg


7) You're ready to apply tape! I just placed it a wherever I felt there could be contact w/ the dash.

QrhxREW.jpeg


wrgCyLs.jpeg


8) I popped the HVAC controls in/out 3x to make sure I got it as squeak free as possible. Finally, put it all back together in the reverse order and drive off squeak free!
 
@AceRimmer , absolutely great write-up! This will come in handy for many people in the future and the pictures are awesome! I'm glad my verbal instructions were a help since I don't have the wherewithal to be able to both complete a project as well as document it at the same time. Again, great job!
 
PART 2
My initial how-to post only took ~70% of the squeak away. The actual HVAC module was still frustratingly squeaking away, so it was time to dive into that.

Follow all the steps from PART 1 to gain access to the HVAC controls.

1) Completely disconnect the HVAC by disconnecting the wires, per pt.1. To disconnect the hose, all you have to do is give a firm pull and it slides right off

mH6nUsC.jpeg


38ZJ5Ih.jpeg


2) Now that you have full access it's time to open it up. There are 4 screws on the back to remove

UPc20d1.jpeg


kgcIYxz.jpeg


Then you have 3 tabs on top. Just slide a flat-head screwdriver to pop those up

EC4UMn7.jpeg


go7Q7AU.jpeg


Now the hardest part of the job (at least for me). It wasn't terribly difficult, more annoying, just be patient. AND BE CAREFUL, there are small electronics inside.
There is 1 tab on each side. Even pressing down hard w/ a flat-head wasn't depressing the tab. What I had to do was get a pretty small flat-head screwdriver to try and pop up the tab surround, rather than depressing the tab. It did some gouging/scraping, but it's in a spot you'll never see again so I didn't care.

4yyO9Qh.jpeg


jHVBrUv.jpeg


bvhtbN9.jpeg


Once off, you can start to apply your tape around the edges. I put mine on the inside edges of the matte front-trim piece, but I'm sure you could put it on the outside edges of the gloss piece. I put it back together twice and would squeeze and gently twist the device to find any squeaks. The corner on the drivers side was extra squeaky, so I put felt-tape all round inside that corner.

SXahkyg.jpeg


Once you've tried it and feel satisfied then put everything back together and VOILA! No more squeaks! Hopefully forevermore (at least from the HVAC controls).
 
Very nice! I actually ended up doing the exact same thing to mine. Once I pulled the HVAC unit out and started messing with it, I figured out that it was the majority of the noise and not the way it was mounted in the dash. I also added some Tesa tape to most of the "pins" that mount everything to the dash. Now, If I can just figure out how to take the rear view mirror apart I can solve the last of the squeaks in the cabin!

Thank you again for the incredible documentation!
 
@AceRimmer, - Thank you for the Amazing write up, and for taking the time to do this mate!
 
Last edited:
Really appreciate the walkthrough on this. I just performed this fix on my HVAC controls. Stuffed the inside with a fair amount of foam, and also along all touch surfaces behind and around the housing. So far so good. I used to be able to push on the controls and have it make a creaking noise, but now it is SOLID no matter where i push on the HVAC module. It was dead quiet on the trip to work this morning, so hopefully it's fixed.

Now just need my headliner fixed...
 
Back
Top