

kaigoss69
Hasn't posted much yet...
- Joined
- Dec 17, 2017
- Messages
- 89
- Reaction score
- 33
- Points
- 18
- Location
- JAX
- Genesis Model Type
- 2G Genesis Sedan (2015-2016)
I have been upgrading audio systems in virtually every car I have owned for over 30 years. Some cars you have to do a lot (if you are picky like me), others not so much. When I bought this car I was fully aware that the 17-speaker Lexicon system is one of the better ones in the market and that my aging ears would perhaps accept this one for what it is. While I have pretty much accepted the mid- and high range frequencies to be of acceptable quality, I was not satisfied with the bass in this car. It was inadequate for me and I had to do something to help bring the bass frequencies to the level of the rest of the system, both in quality and volume.
I consider myself to have above average experience with subwoofers in sedans, as I have lost count of the various different types of bass drivers and enclosures I have tried over the years, none of which have really satisfied my quench for almost "perfect" bass until I discovered the infinite baffle concept in my last car, a 3-series BMW. Infinite baffle is the most basic subwoofer mounting solution using a large baffle to mount the driver and to separate the sound waves coming from the front and back sides of the subwoofer. The most common/known application for this type of set-up would be a subwoofer mounted in a wall or ceiling of home theatre space. The front waves of the subwoofer are generated in the listening space, while the back waves are easily passed off into the attic (and never to be heard again). The key is to have two separate rooms or spaces where the sound waves from the front and the back of the cone are not allowed to interact (=cancel).
In the car the infinite baffle concept can also be implemented, as long as there are two separate but adjacent cabins, which are separated by a stable baffle, and which a large enough volume that does not cause too much pressurization of the air in each space. In a sedan, it just so happens that the passenger cabin and the trunk qualify as suitable cabins, separated by a usable baffle called the back seat. In fact, Hyundai already implemented the IB concept in our cars, however they used the hat shelf instead of the back seat as the baffle, and they did a poor job selecting the type and size of subwoofer and that's why it underwhelms.
As far as the hardware is concerned, for infinite baffle to work properly in cars (as well as in home theaters or anywhere else), you must have:
a) Large surface area subwoofer(s), or
b) Large displacement subwoofers, or both.
c) A subwoofer that has the correct specs for the application
d) Sufficient amplification
In our OEM systems, neither a) or b) (and probably c)) are provided, so no chance whatsoever to have decent bass in our cars.
So how can you add bass to the Genesis OEM system? - There are many aftermarket choices, and most involve a subwoofer enclosure in the trunk driven by an aftermarket amplifier, and most will give the average consumer at least acceptable results. In my case however, I am cursed with a healthy dose of ADHD and the knowledge of what a well integrated subwoofer system should sound like, and absolutely cannot settle for anything but excellent results, and my choices were to accept what the OEM system provides, or come up with a solution that will be fully satisfactory to my ears. Luckily, I was able to achieve that in my last car, and besides being a little bigger, the Genesis checks off in all the required boxes, so it was not a far stretch to get that achieved.
This time around however, I wanted to keep it simple, because the days where I could stick my head into the trunk of a car and tinker around for a couple of days without "consequences" are surely over. At the same time, I did not want to spend nearly as much money as I had in the past. Therefore, I tried to use some parts I already had, and purchased the type of hardware that would give me the quality and power level I required, all while keeping it as simple as possible. Here is the list of hardware I used:
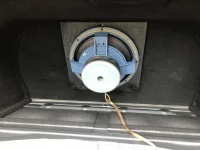
Subwoofer: Soundstream Reference SS12R (12") - This is an "old school" subwoofer that I had collecting dust in the closet, but I knew was almost perfect for this job. Cost: $0
Subwoofer mounting plate: I had this from a previous install. Cost $0
Wiring: Again, I had a box full of it. Cost $0
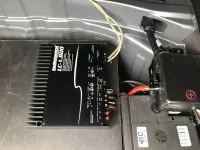
Amplifier/ Line output converter: AudioControl LC-1.800. Cost $300 (open box). This unit has a built-in LOC (line output converter) meaning you can feed the subwoofer signal from the OEM amp directly into this amp. Also, it has enough power for the job (500W for my 4ohm Sounstream).
That's it! Now for the process:
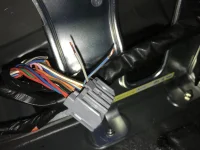
Audio signal input connections: It has already been documented on this forum which wires to tap from the OEM amp output harness. In my case I did not want the OEM subwoofer to keep playing and interfere with the other subwoofer, so I cut the lines, soldered the connections to speaker cable, and ran the wires into the AudioControl amp.
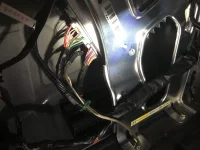
Power and ground connections: 8-gauge power cable run to the battery positive terminal and fused within 4" of battery. 8 gauge ground wire connected to batter grounding point, near battery.
Remote turn on for amp: This is the pink wire in the white amplifier harness. Tapped it and ran new wire to amp.
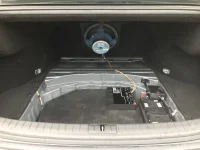
Amp mounting: After some thought, I got rid of the styrofoam piece that sits on top of the spare tire and holds the tire-changing tools, and fabricated a simple plywood board that sits on top of the spare tire. I have not secured the board yet but I am thinking about using a long threaded bolt with washers and nuts to connect it to one of the spare tire mounting holes. Just need to make it to Ace in the next few days. The amp is mounted on top of the board in close proximity to the battery, to keep the power and ground wires as short as possible.
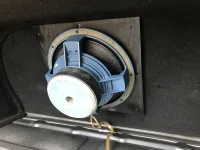
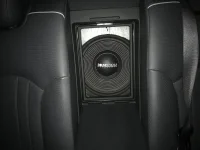
Subwoofer mounting: The adapter plate, roughly 14"x14"x0.75", bolts right into the back seat with sheet metal screws (back seat has metal wall), and placed to completely cover the ski-hole opening.
That's it!")
Everything fired right up as it should, no problems whatsoever. A few adjustments on the amp and off we go...
How does it sound? - Just as I expected, loud enough to give me a back massage if I want to, but mostly very subtle, warm and neutral sounding, and fully integrated into the OEM sound meaning you cannot tell there is an aftermarket subwoofer system there at all.
The other benefit of the IB install is that I only lost a small amount of trunk space, and the wife will be happy that I can still fit her "coffin" suitcase the next time we go on a trip.")
I consider myself to have above average experience with subwoofers in sedans, as I have lost count of the various different types of bass drivers and enclosures I have tried over the years, none of which have really satisfied my quench for almost "perfect" bass until I discovered the infinite baffle concept in my last car, a 3-series BMW. Infinite baffle is the most basic subwoofer mounting solution using a large baffle to mount the driver and to separate the sound waves coming from the front and back sides of the subwoofer. The most common/known application for this type of set-up would be a subwoofer mounted in a wall or ceiling of home theatre space. The front waves of the subwoofer are generated in the listening space, while the back waves are easily passed off into the attic (and never to be heard again). The key is to have two separate rooms or spaces where the sound waves from the front and the back of the cone are not allowed to interact (=cancel).
In the car the infinite baffle concept can also be implemented, as long as there are two separate but adjacent cabins, which are separated by a stable baffle, and which a large enough volume that does not cause too much pressurization of the air in each space. In a sedan, it just so happens that the passenger cabin and the trunk qualify as suitable cabins, separated by a usable baffle called the back seat. In fact, Hyundai already implemented the IB concept in our cars, however they used the hat shelf instead of the back seat as the baffle, and they did a poor job selecting the type and size of subwoofer and that's why it underwhelms.
As far as the hardware is concerned, for infinite baffle to work properly in cars (as well as in home theaters or anywhere else), you must have:
a) Large surface area subwoofer(s), or
b) Large displacement subwoofers, or both.
c) A subwoofer that has the correct specs for the application
d) Sufficient amplification
In our OEM systems, neither a) or b) (and probably c)) are provided, so no chance whatsoever to have decent bass in our cars.
So how can you add bass to the Genesis OEM system? - There are many aftermarket choices, and most involve a subwoofer enclosure in the trunk driven by an aftermarket amplifier, and most will give the average consumer at least acceptable results. In my case however, I am cursed with a healthy dose of ADHD and the knowledge of what a well integrated subwoofer system should sound like, and absolutely cannot settle for anything but excellent results, and my choices were to accept what the OEM system provides, or come up with a solution that will be fully satisfactory to my ears. Luckily, I was able to achieve that in my last car, and besides being a little bigger, the Genesis checks off in all the required boxes, so it was not a far stretch to get that achieved.
This time around however, I wanted to keep it simple, because the days where I could stick my head into the trunk of a car and tinker around for a couple of days without "consequences" are surely over. At the same time, I did not want to spend nearly as much money as I had in the past. Therefore, I tried to use some parts I already had, and purchased the type of hardware that would give me the quality and power level I required, all while keeping it as simple as possible. Here is the list of hardware I used:
Subwoofer: Soundstream Reference SS12R (12") - This is an "old school" subwoofer that I had collecting dust in the closet, but I knew was almost perfect for this job. Cost: $0
Subwoofer mounting plate: I had this from a previous install. Cost $0
Wiring: Again, I had a box full of it. Cost $0
Amplifier/ Line output converter: AudioControl LC-1.800. Cost $300 (open box). This unit has a built-in LOC (line output converter) meaning you can feed the subwoofer signal from the OEM amp directly into this amp. Also, it has enough power for the job (500W for my 4ohm Sounstream).
That's it! Now for the process:
Audio signal input connections: It has already been documented on this forum which wires to tap from the OEM amp output harness. In my case I did not want the OEM subwoofer to keep playing and interfere with the other subwoofer, so I cut the lines, soldered the connections to speaker cable, and ran the wires into the AudioControl amp.
Power and ground connections: 8-gauge power cable run to the battery positive terminal and fused within 4" of battery. 8 gauge ground wire connected to batter grounding point, near battery.
Remote turn on for amp: This is the pink wire in the white amplifier harness. Tapped it and ran new wire to amp.
Amp mounting: After some thought, I got rid of the styrofoam piece that sits on top of the spare tire and holds the tire-changing tools, and fabricated a simple plywood board that sits on top of the spare tire. I have not secured the board yet but I am thinking about using a long threaded bolt with washers and nuts to connect it to one of the spare tire mounting holes. Just need to make it to Ace in the next few days. The amp is mounted on top of the board in close proximity to the battery, to keep the power and ground wires as short as possible.
Subwoofer mounting: The adapter plate, roughly 14"x14"x0.75", bolts right into the back seat with sheet metal screws (back seat has metal wall), and placed to completely cover the ski-hole opening.
That's it!
Everything fired right up as it should, no problems whatsoever. A few adjustments on the amp and off we go...
How does it sound? - Just as I expected, loud enough to give me a back massage if I want to, but mostly very subtle, warm and neutral sounding, and fully integrated into the OEM sound meaning you cannot tell there is an aftermarket subwoofer system there at all.
The other benefit of the IB install is that I only lost a small amount of trunk space, and the wife will be happy that I can still fit her "coffin" suitcase the next time we go on a trip.
Attachments
Last edited:

 . My build would be similar to the ultimate build with the false floor design so the subs and amps will be out of site and out of mind.


