

veratrize9
New member
- Joined
- Feb 15, 2021
- Messages
- 8
- Reaction score
- 2
- Points
- 3
- Genesis Model Type
- 1G Genesis Sedan (2009-2014)
First off, please make sure that this is legal in your state/country. I am not responsible for laws that you break, or for any damage that you do to your car in the process ") . Also, I'm not positive that the wiring on your car follows the same color scheme as mine, just to be sure, get to know your multimeter well before doing anything.
. Also, I'm not positive that the wiring on your car follows the same color scheme as mine, just to be sure, get to know your multimeter well before doing anything.
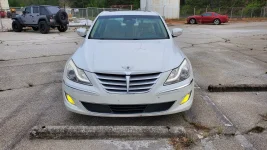
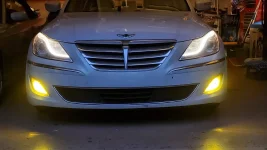
Like many others, I really don't like the yellowish light that comes from the stock incident DRL's on my first generation genesis. For the longest time now, I've just left my headlights in the ON position because I think it looks better than the DRL's. That being said, a week ago one of my ballasts failed and I got an idea of how to remedy this aesthetic affront to all genesis owners; just add an additional on/off switch/relay to the low beams. The benefit to this approach is that it leaves everything essentially stock in terms of the lighting behavior of the car. I've attached pictures below so that you can see the results. I also apologize for the lack of images during the wiring process: this is my first guide and was an after thought.
The How To:
1) Purchase two 14VDC SPDT or SPST relays (I bought 5 from Amazon for ~$25 that can handle 40AMP; more than enough to run a head light from), a DPST switch, and a bunch of two conductor 18g wire. You need two relays because there are two separate low beam circuits in the car.
2) Disconnect the battery and then remove the passenger side of the bumper or the hole thing, and the passenger side head light.
3) Locate the large wiring harness that sits below the passenger head light inside the bumper. Pull back the electrical tape that covers the input side of the harness (the side that goes toward the car, I'll call this 'supply side').
4) Next from inside of the car, find a way through the firewall; I used the hole that the hood release cable goes through. Run two pairs of the 18g wire through the firewall, along the driver side, across the bumper and to the headlight harness area, leaving plenty of length on both inside and outside.
5)On the headlight harness, locate the two thicker 14-16g wires that are at the top of the harness (green and orange) and the main ground at the bottom (black)
6) Point of no return: cut the two top wires leaving enough on both sides of each wire to fit a crimp into.
From this point on I'll just focus on one half of the circuit:
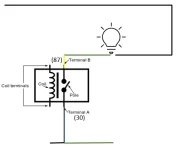
7) Picking one of the two wires (we'll use the green for now), crimp on a butt splice to the side that comes from the supply side of the harness and then crimp in one of the wires that goes into the cabin along with the wire from your relay harness that goes to terminal 30 on the relay.
8) Next, add a butt splice between the relay out put (87) to the headlight harness side wire. Your wiring should look similar to the diagram below:

9) Next crimp in the other half of the pair to terminal 85 of your relay harness.
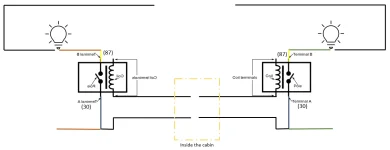
10) Duplicate steps 7-9 with the orange wire and the other pair that comes from the cabin. Your wiring should look like this now:

11) Now you need to tap into the Black ground with some sort of vampire splice or another butt splice and connect both wires from terminal 86 to ground:

12) Finally, connect each pair of the cabin wires to separate sides of the DPST switch:

13) Now, if you did everything correctly, you should have a secondary means of turning on/off your low beam headlights, leaving you with the ability to run just your swooshes (secondary switch OFF, headlight switch ON) or you can run you swoosh with the fog lights, or you can just run stock by leaving the secondary switch ON. All that's left is to test everything out, mount your new switch somewhere inside you car, perform some cable management and put everything back together!
Just remember to put the secondary switch to ON when it gets dark. This setup will totally bypass the AUTO/ON functions of your car. I suppose it'd be possible to add a photoelectric switch in place of the toggle switch which would allow you to run swoosh only during the day and have the low beams come on automatically when it dark. Let me know what you think or any recommended edits. Thanks!
. Also, I'm not positive that the wiring on your car follows the same color scheme as mine, just to be sure, get to know your multimeter well before doing anything. Like many others, I really don't like the yellowish light that comes from the stock incident DRL's on my first generation genesis. For the longest time now, I've just left my headlights in the ON position because I think it looks better than the DRL's. That being said, a week ago one of my ballasts failed and I got an idea of how to remedy this aesthetic affront to all genesis owners; just add an additional on/off switch/relay to the low beams. The benefit to this approach is that it leaves everything essentially stock in terms of the lighting behavior of the car. I've attached pictures below so that you can see the results. I also apologize for the lack of images during the wiring process: this is my first guide and was an after thought.
The How To:
1) Purchase two 14VDC SPDT or SPST relays (I bought 5 from Amazon for ~$25 that can handle 40AMP; more than enough to run a head light from), a DPST switch, and a bunch of two conductor 18g wire. You need two relays because there are two separate low beam circuits in the car.
2) Disconnect the battery and then remove the passenger side of the bumper or the hole thing, and the passenger side head light.
3) Locate the large wiring harness that sits below the passenger head light inside the bumper. Pull back the electrical tape that covers the input side of the harness (the side that goes toward the car, I'll call this 'supply side').
4) Next from inside of the car, find a way through the firewall; I used the hole that the hood release cable goes through. Run two pairs of the 18g wire through the firewall, along the driver side, across the bumper and to the headlight harness area, leaving plenty of length on both inside and outside.
5)On the headlight harness, locate the two thicker 14-16g wires that are at the top of the harness (green and orange) and the main ground at the bottom (black)
6) Point of no return: cut the two top wires leaving enough on both sides of each wire to fit a crimp into.
From this point on I'll just focus on one half of the circuit:
7) Picking one of the two wires (we'll use the green for now), crimp on a butt splice to the side that comes from the supply side of the harness and then crimp in one of the wires that goes into the cabin along with the wire from your relay harness that goes to terminal 30 on the relay.
8) Next, add a butt splice between the relay out put (87) to the headlight harness side wire. Your wiring should look similar to the diagram below:
9) Next crimp in the other half of the pair to terminal 85 of your relay harness.
10) Duplicate steps 7-9 with the orange wire and the other pair that comes from the cabin. Your wiring should look like this now:
11) Now you need to tap into the Black ground with some sort of vampire splice or another butt splice and connect both wires from terminal 86 to ground:
12) Finally, connect each pair of the cabin wires to separate sides of the DPST switch:
13) Now, if you did everything correctly, you should have a secondary means of turning on/off your low beam headlights, leaving you with the ability to run just your swooshes (secondary switch OFF, headlight switch ON) or you can run you swoosh with the fog lights, or you can just run stock by leaving the secondary switch ON. All that's left is to test everything out, mount your new switch somewhere inside you car, perform some cable management and put everything back together!
Just remember to put the secondary switch to ON when it gets dark. This setup will totally bypass the AUTO/ON functions of your car. I suppose it'd be possible to add a photoelectric switch in place of the toggle switch which would allow you to run swoosh only during the day and have the low beams come on automatically when it dark. Let me know what you think or any recommended edits. Thanks!
")


