• Car enthusiast? Join us on Cars Connected! iOS | Android | Desktop
  • Hint: Use a descriptive title for your new message
    If you're looking for help and want to draw people in who can assist you, use a descriptive subject title when posting your message. In other words, "I need help with my car" could be about anything and can easily be overlooked by people who can help. However, "I need help with my transmission" will draw interest from people who can help with a transmission specific issue. Be as descriptive as you can. Please also post in the appropriate forum. The "Lounge" is for introducing yourself. If you need help with your G70, please post in the G70 section - and so on... This message can be closed by clicking the X in the top right corner.

HID kit install DIY

I think part of the issue is how you are taking the pics - they look underexposed - its almost better to take a pic at dusk when you can get a better idea for the light spread.

I definitely underexposed the shots a bit. Need to be about two f-stops brighter. I will equalize these in photoshop but also retake them.

Either way, the HIDs in the Genesis look much brighter than those in the other cars, even with hot spots.

I don't mind the spots being a tiny bit hot...but if they are too hot compared to the sides, it will hurt side vision. It will be easier to compare when I use the proper exposure and a bigger wall (will try to find a building with no lights in the back that I can move 25 feet from.)

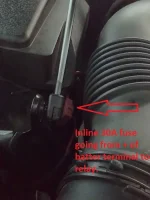
Also, maybe you have the lights inserted upside down? Don't know if that makes a difference, but when I inserted mine, I had the 90° plug perpendicular to the ground and twisted it down as I locked the bulbs to the assembly.

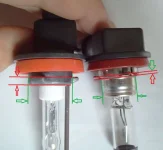
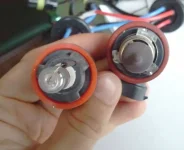
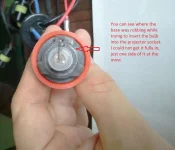
It isn't possible to insert them upside down. One notch is bigger than the others. I wonder, however, if it is possible for the bulbs to be installed upside down in the H11 harness? One thing I noticed. The stock halogens had a metal fitting, vs. the plastic prongs on the HID kit. I wonder if the Chinese HID kit is a bit less precise in bulb placement. I also noticed I could rock the HID bulb a bit, after it is inserted.

Headlights in general should illuminate from ~10' to 350' in front of the car. The light pattern should drop 2" every 25'. I think the Genesis headlights should cast light up to 150°, to the pattern should be wide. I will take some pics of my headlights tonight and show my patterns.

The requirement is 2.1 inches, 25 feet in front of the car, but it varies depending on how high the headlights are mounted on the vehicle. If I recall, the Genesis lights measured about 26 and 1/2 inches high.

http://www.danielsternlighting.com/tech/aim/aim.html

One thing you should see is constant light on the ground from about 10' out. Fog lights typically illuminate 0-25' out and up to 180° - the purpose is low speed, low visibility, so they are to help focus on the road right in front of you.

That is one of the differences you can see with halogens vs. HID's. I notice a lot of the halogens have more flood closer to the car. Also, the yellow tint is more "visible." If you have too much flood close to the car it can give you the illusion of better lighting while you actually miss stuff further away. That is just one reason it is bad to run HID's in halogen housings.
 
Thanks to all the great info on the forum, I did my HID conversion this morning. Completely plug-n-play, and the complete install took all of 35 minutes. Am anxious to see what they look like tonight, but they appear much brighter than the stock halogens in the garage. Thanks again to all who posted the great instructions.
 
What kit did you use Deltarat? Did everything have a proper connector? What temp bulbs did you use?
 
Looking to update and upgrade your Genesis luxury sport automobile? Look no further than right here in our own forum store - where orders are shipped immediately!
What kit did you use Deltarat? Did everything have a proper connector? What temp bulbs did you use?

Used the kit you recommended from DDM (http://www.ddmtuning.com/index.php?p=product&id=101&parent=85) along with 4500 kelvin bulbs.
Everything had proper plugs and connectors. Was a simple matter of plugging everything in and placing all the electronics in the light housing, testing, then slapping the lids back on... Quick and painless..

Thanks again for your initial post, as that's what got me going..
 
Last edited:
Used the kit you recommended from DDM (http://www.ddmtuning.com/index.php?p=product&id=101&parent=85) along with 4500 kelvin bulbs.
Everything had proper plugs and connectors. Was a simple matter of plugging everything in and placing all the electronics in the light housing, testing, then slapping the lids back on... Quick and painless..

Thanks again for your initial post, as that's what got me going..

Welcome to the club. Pretty simple with no drilling or modding involved. Did your kit come with a real light connector or just the prongs?
 
Which models have HIDs and which dont?
 
Thanks for all the good info here; great writeup.

I have a 2012 and ordered up an HID kit this week. My car has daytime running lights (low power to the high beams when the lights are off) and a bulb out indicator. I'm not sure if the older models have these features as well. If they do, I guess there is no problem with a plug and play installation. If they do not, I will be testing this. I wasn't sure if I needed the wiring relay and load resistors to make everything function correctly as I was told.

Either way I ordered all the parts, but was hoping not to use the relay or load resistors if they are not needed. I figure the simpler the better less connections and things to go wrong.

Can anyone advise if the have bulb out indicators and day time running lights on their Genesis and if everything works without a relay and resistors when they upgraded to HIDs.

Thanks!
 
Has anyone else had an issue getting the bulbs to seat properly? I just got my kit in from DDM and I cannot get the bulbs to seat properly on my 2012 Genesis Sedan. The plastic tabs on the HID bulb are alot thicker than the regular bulbs. I can force them into the slots, but I can't turn them to tighten them.
 
Guys,
I'm going to do an HID kit install within the next few days, possibly even today. I was wondering how you hooked up the relay to battery power source and where did you hide the wiring from the relay to the ballasts. A picture would be appreciated if you have one. Also, did any of you secure the ballasts with brackets rather than 3M tape, I'm afraid the tape will not hold out that well in the long term due to cold temperature exposure and all the vibrations that happen under the hood. If you used brackets, what did you secure them to? Thanks!
 
Has anyone else had an issue getting the bulbs to seat properly? I just got my kit in from DDM and I cannot get the bulbs to seat properly on my 2012 Genesis Sedan. The plastic tabs on the HID bulb are alot thicker than the regular bulbs. I can force them into the slots, but I can't turn them to tighten them.

I feel your pain, I think the 2012 may be more sensitive to the bulb type. I bought an H11 kit based on what people stated here on the forum only to find out that the bulb will not lock in my Genesis. The bulb engagement mechanism looks almost identical, but the section between the tabs and the base of the glass bulb is thicker on the H11 than the H11b, hence they will not fully seat in the projector socket. My bulbs had ceramic bases, so grinding them down would most likely result in me breaking the bulb or not getting proper alignment. There may be H11 bulbs with plastic bases that may compress under pressure and fit, but I will try to find H11b HID bulbs for my kit. So 2012 owners beware, ceramic based H11 do not seem to fit.

PS. I bought my H11 kit from www.theretrofitsource.com, and the bulbs in that kit do not fit. In the attache photos, the OEM bulb is on the right and I believe it is H11b, although it clearly says H11 on it.
http://www.genesisowners.com/hyunda...ment.php?attachmentid=2123&stc=1&d=1346458430
http://www.genesisowners.com/hyunda...ment.php?attachmentid=2124&stc=1&d=1346458430
http://www.genesisowners.com/hyunda...ment.php?attachmentid=2125&stc=1&d=1346458430
 

Attachments

  • side.webp
    side.webp
    37.9 KB · Views: 1,426
  • 2012-08-31 17.06.19.webp
    2012-08-31 17.06.19.webp
    41.7 KB · Views: 2,246
  • hid.webp
    hid.webp
    52.9 KB · Views: 938
Last edited:
Just an update for those thinking about getting an HID kit for their 2012 Genesis. I incorrectly thought that our cars have the H11B low beam headlight bulbs, and I do not think that is the case anymore. The Osram bulbs that we have in our cars from the factory clearly state H11 on their backs, and are listed as H11 when you search for them. The fitment issue seems to be caused by the flange (tabs) of the replacement HID bulb you get. I've been working with www.theretrofitsource.com people and they are sending me another pair of H11 bulbs that are supposed to have a thinner flange, than the ceramic based ones I tried before. I will report back on how it fits, but the flange thickness between the different H11 HID bulb manufacturers seems to be the issue. That is why some people have no problems fitting them, while others can't turn and secure them in place.
 
Guys,
I got the replacement H11 bulbs (not H11b as I thought I needed previously) with a thinner grommet (tabs) and all is well. While they did not fit as easily as the OEM bulbs, once I was sure that I got the tabs aligned I was able to turn them and get them engaged. I have to say the difference in light output is amazing. Definitely worth the money. The ones I got are 5500K and when they warm up are the same color as the LED strip. Now I just have to make sure my bulbs are pointed correctly, but there was a thread somewhere on the forum about adjusting the height.
 
Here are some photos of where I hooked up the various parts of the HID kit for those that are thinking of doing the same to their cars.

I drilled small openings to secure the ballasts since I did not think securing them with double sided tape would work over the cold winters, hot summers, and all the vibration the engine bay is exposed to. I used the touch up paint to make sure the small holes I drilled would not corrode over time. I also put some adhesive tape on the bottom of the ballast to make sure that they would not rub the paint off any other painted area when being exposed to vibration.

I hooked up the positive relay harness wire to the battery connection point on the left upper side of the engine bay, the negative I connected under one of the screws that secures some of the sheet metal on the left side.

I mounted the relay to one of the exposed threaded posts by the passenger side headlight. There were at least three posts, so I just used one of them. They are almost below the air filter box.

The wiring going from the relay to the driver side ballast I routed under the grill, behind the airbox. I fell that it was secure enough that I did not need to tie it down to anything.

I needed to cut the access covers a little bit more than on the pictures earlier in this thread. I cut the two plastic strengthening ridges and made a hole roughly 1.25 " to make sure the grommet from the bulbs fitted nicely.

I also needed to change one of the HID bulb gaskets to those that were on the OEM bulbs since I would notice that the light would wobble when I drove over bulbs. The securement mechanism must have been a little looser on one side than the other, since the other bulb did not have the same issue. After I changed the gasket, the bulbs stay in place very well.
 

Attachments

  • 2012-09-15 13.30.39.webp
    2012-09-15 13.30.39.webp
    39.1 KB · Views: 275
  • 2012-09-15 13.30.57.webp
    2012-09-15 13.30.57.webp
    56.8 KB · Views: 259
  • 2012-09-15 13.31.38.webp
    2012-09-15 13.31.38.webp
    44.1 KB · Views: 268
  • 2012-09-15 13.29.59.webp
    2012-09-15 13.29.59.webp
    120.1 KB · Views: 226
  • 2012-09-15 13.30.27.webp
    2012-09-15 13.30.27.webp
    78.6 KB · Views: 244
  • 2012-09-15 13.30.13.webp
    2012-09-15 13.30.13.webp
    117.1 KB · Views: 238
about 1 1/2 years ago I purchase on line a HID kit for my 2013 Genesis and boy was I happy. Bought a kit- 55W and 5000k that was to fit my car. Took it by a car radio shop and the guy installed both lights in UNDER 5 minutes - They worked perfectly and it was the best $36 I have spent in some time

My brother has the same car but has all the upgrade packages including the HID lights and mine are just as good. One of my lights just went out and I was looking for a bulb when I ran across this post - I HIGHLY recommend the upgrade - make sure you get the kit for YOUR GENESIS not a generic and it is a simple snap out- unplug -replug new light- mount ballast - snap new light into existing headlamp assembly- be aware it takes the lights a few seconds to warm up to get the full lighting effect
 
make sure you get the kit for YOUR GENESIS not a generic and it is a simple snap out- unplug -replug new light- mount ballast - snap new light into existing headlamp assembly- be aware it takes the lights a few seconds to warm up to get the full lighting effect

They are ALL generic. They are also illegal in all 50-states. You cannot properly run HID bulbs in halogen housings. The light spread is not correct and you will have glare making the car a mobile road hazard. We've already done picture comparisons of Genesis halogen headlights with an improper HID kit vs OEM HIDs that show the results on your care are actually quite bad.
 
Quick question for the guys that have installed H11 hid bulbs in the halogen housings, do you get an electrode shadow in the center beam? H11B rotates the electrode 180 degrees to eliminate electrode shadows if this is the case with H11 in the halogen housing.
 
Quick question for the guys that have installed H11 hid bulbs in the halogen housings, do you get an electrode shadow in the center beam? H11B rotates the electrode 180 degrees to eliminate electrode shadows if this is the case with H11 in the halogen housing.

Here is my experience with hids - H11B is the correct bulb size for our Genny.
My experience has been excellent with TRS (The Retrofit Source). The H11B Morimitos fit perfect with no issues at all. My car car with some cheap hids that were installed professionally but the color was off. The morimotos does not have like a shadow or anything from my experience. I lined my car up with a 300 series benz and the cutoff and color were very similar. Dont go cheap!!

Just my 2 cents.
 
Back
Top