

Phastroh
Registered Member
- Joined
- Feb 20, 2020
- Messages
- 329
- Reaction score
- 124
- Points
- 43
- Genesis Model Type
- Genesis G70
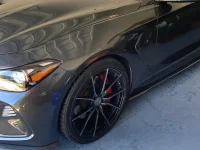
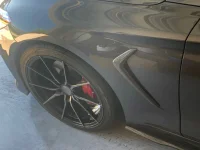
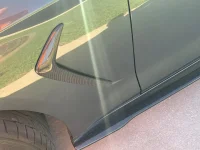
Hello to anyone that wants to know how to remove and/or replace the side vents of their 19-21 G70. I believe those years are correct but look at the photos and you will know if you have it or not.
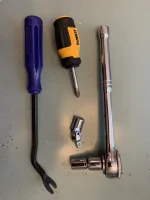
The first thing you will need is the tools.
Standard Clip remover
Small phillips head
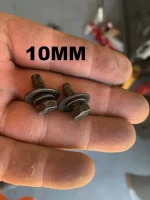
10MM socket and I suggest a small swivel depending on you.
I did the drivers side first so I will explain that however the passenger side while identical for the vent, there was a surprise over there.
I am not a professional instructional writer so I m going to try to explain the process while referring to the photos.
REMOVING FENDER TRIM
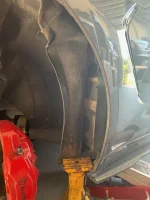
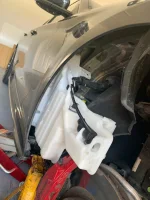
I used my floor jack to lift the car and remove the rim/tire.
Next I took out one screw using the phillips, 2 push clips using the clip remover and there is one plastic nut you can easily remove by hand power.
After that I pulled back the fender trim and used my yellow jack stand to hold it back while working. It wants to just fold back into place but you will have to hold it back somehow. I also put a small screwdriver on the top to help keep it out of the way.
REMOVING THE FENDER VENT
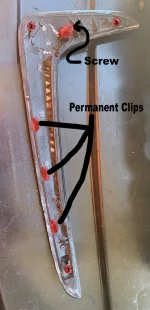
The first thing was to get the short phillips in there and sorry but this is tedious and annoying but you must get that screw loosened and out. It really is not hard but it is annoying. You must remove the screw inside the big round clip. Like I said it is not too bad but it is like hanging a fan in that your arm can get tired unless you get a nice fast removal.
Keep the screw just incase you drop the other and you need another.
The Next thing I did was manually push on the 3 clips running along the long side of the vent. They are permanent clips maybe 1/4’ wide each. In the photo I have labeled them. Do not press too hard just try to push them over and out gently, however if they break I do not know if it matters since you are replacing it.
Mine did not break, in fact to get the piece off I had to pop it off and no clips broke. I had to because the 3 removable clips labeled 1, 2 and 3 need to be squeezed with pliers and from this angle and tight space it was not possible for me.
So once you have those 3 moved the vent will no longer be against the car so that is part one. There will be enough room to get the clip remover under it and do not worry since the area if scratched is not seen anyway. I did not even get a scratch.
So I carefully pryed on it and the entire vent flew off LOL The reason for the prying is that the 3 removable clips I just could not reach at the right angle with pliers and if they break who cares, the new piece has its own clips.
Clip number 2 on both sides had to be removed afterward with pliers. Not sure why but this is not issue, it just stayed on the car.
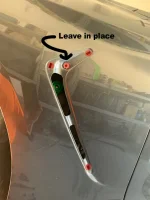
Now look at the photos and you will see that the big round clip remains the fender. This is a good thing. Just leave it there.
On the new piece remove that screw in the big round clip and just slide off that clip. It is the same piece still left in the fender so why bother with the hassleof removing it. It is fine to reuse it and not have to do anything.
Now the easy part.
INSTALLING THE NEW FENDER VENT
Just line up the piece that fits inside the large round clip and line up the 3 clips and carefully press it into place. It will have that satisfying pop and you will be ready to just do one last thing. Just be careful the 3 permanent clips are inside the cutout or you will snap them of likely when you press it into place.
Reinstall that screw into that hole inside the fender for the big round clip. I highly suggest using your hand to get it started and in as far as possible to avoid it falling down into the bottom of the fender.
It is easy to see that it is held in place by a total of 7 clips. 3 removable, 3 permanent and the 2 piece big round clip held together by that screw. I am positive that screw is not even needed but put it anyway.
THE LAST STEPS
Now make sure it sits flat and put the fender lining back on with ease and reinstall your tire and lower it back down and do not forget to torque your rims and however you do it and enjoy.
NEXT PASSENGER SIDE
I started drivers side by chance.
PASSENGER SIDE VENT REMOVAL
Everything is exactly the same as the drivers side except for one thing.
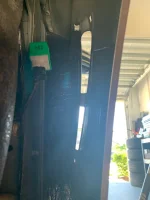
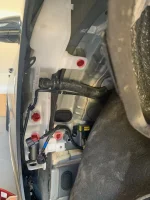
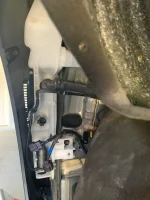
The Windshield Wiper Fluid Tank is in your way. I did not even know it until I took the fender lining out of the way.
So in the photos you will see I marked the 2 bolts you must remove to take the tank out of the way. It is just 2 10mm bolts and 2 clips for the little pumps and you can pull the tank forward and get to the screw just like the other side. The screw in the big round clip.
NOTE: If your tank has fluid in it, it will spill on the floor and will only stop when it is almost completely empty. I considered removing the hoses to be able to remove it completely but taking them off was too much to do to save the fluid. It sucks but it is just washer fluid.
This option is your choice. Maybe wait until your washer light pops on to do the work. I know after I drove the car and used it once to test it was working because my clip got wet, the light came on so that is about the time it would stop spilling.
I was really caught off guard when I saw the tank but it was simple to do and yes annoying to spill all of it but it is what it is.
I originally considered driving with only one installed LOL Well until I took it somewhere.
CONCLUSION
The overall job is identical with regard to the vent, however the passenger side has the Windshield fluid tank.
On a scale of 1 to 10, I have to say this is a 3 for how hard it was, meaning it wasn’t hard. More annoying lol that tank.
It is better than removing the fender and taking a chance you cannot line it up properly and just overall less work.
Gave me a chance to clean my brakes and inner rims, oh and part of my garage floor lol.
I had the removable clip number 2 on my driver side not go in right and sit flat. I checked it and it looked ok but not perfect.
I believe the place that made this Carbon Fiber vent did not notice it was not right, so since I have like 5 of the original ones I am going to quickly redo the drivers side. The clips easily slide in and out so putting a new one is a simple thing. I did not realize that until I was working on the passenger side which sucks.
While visually nobody would ever notice, I know it is not sitting flat and well, if you are like me that shit kills me LOL
I hope this thread helps out the many, many who like me could not find much information out there or a guide. It can be worrisome to try things on your car, especially when the are expensive.
Ok time to relax and soon my Reflective Red Emblems will be here. They told me they are being polished and cleared now.
The first thing you will need is the tools.
Standard Clip remover
Small phillips head
10MM socket and I suggest a small swivel depending on you.
I did the drivers side first so I will explain that however the passenger side while identical for the vent, there was a surprise over there.
I am not a professional instructional writer so I m going to try to explain the process while referring to the photos.
REMOVING FENDER TRIM
I used my floor jack to lift the car and remove the rim/tire.
Next I took out one screw using the phillips, 2 push clips using the clip remover and there is one plastic nut you can easily remove by hand power.
After that I pulled back the fender trim and used my yellow jack stand to hold it back while working. It wants to just fold back into place but you will have to hold it back somehow. I also put a small screwdriver on the top to help keep it out of the way.
REMOVING THE FENDER VENT
The first thing was to get the short phillips in there and sorry but this is tedious and annoying but you must get that screw loosened and out. It really is not hard but it is annoying. You must remove the screw inside the big round clip. Like I said it is not too bad but it is like hanging a fan in that your arm can get tired unless you get a nice fast removal.
Keep the screw just incase you drop the other and you need another.
The Next thing I did was manually push on the 3 clips running along the long side of the vent. They are permanent clips maybe 1/4’ wide each. In the photo I have labeled them. Do not press too hard just try to push them over and out gently, however if they break I do not know if it matters since you are replacing it.
Mine did not break, in fact to get the piece off I had to pop it off and no clips broke. I had to because the 3 removable clips labeled 1, 2 and 3 need to be squeezed with pliers and from this angle and tight space it was not possible for me.
So once you have those 3 moved the vent will no longer be against the car so that is part one. There will be enough room to get the clip remover under it and do not worry since the area if scratched is not seen anyway. I did not even get a scratch.
So I carefully pryed on it and the entire vent flew off LOL The reason for the prying is that the 3 removable clips I just could not reach at the right angle with pliers and if they break who cares, the new piece has its own clips.
Clip number 2 on both sides had to be removed afterward with pliers. Not sure why but this is not issue, it just stayed on the car.
Now look at the photos and you will see that the big round clip remains the fender. This is a good thing. Just leave it there.
On the new piece remove that screw in the big round clip and just slide off that clip. It is the same piece still left in the fender so why bother with the hassleof removing it. It is fine to reuse it and not have to do anything.
Now the easy part.
INSTALLING THE NEW FENDER VENT
Just line up the piece that fits inside the large round clip and line up the 3 clips and carefully press it into place. It will have that satisfying pop and you will be ready to just do one last thing. Just be careful the 3 permanent clips are inside the cutout or you will snap them of likely when you press it into place.
Reinstall that screw into that hole inside the fender for the big round clip. I highly suggest using your hand to get it started and in as far as possible to avoid it falling down into the bottom of the fender.
It is easy to see that it is held in place by a total of 7 clips. 3 removable, 3 permanent and the 2 piece big round clip held together by that screw. I am positive that screw is not even needed but put it anyway.
THE LAST STEPS
Now make sure it sits flat and put the fender lining back on with ease and reinstall your tire and lower it back down and do not forget to torque your rims and however you do it and enjoy.
NEXT PASSENGER SIDE
I started drivers side by chance.
PASSENGER SIDE VENT REMOVAL
Everything is exactly the same as the drivers side except for one thing.
The Windshield Wiper Fluid Tank is in your way. I did not even know it until I took the fender lining out of the way.
So in the photos you will see I marked the 2 bolts you must remove to take the tank out of the way. It is just 2 10mm bolts and 2 clips for the little pumps and you can pull the tank forward and get to the screw just like the other side. The screw in the big round clip.
NOTE: If your tank has fluid in it, it will spill on the floor and will only stop when it is almost completely empty. I considered removing the hoses to be able to remove it completely but taking them off was too much to do to save the fluid. It sucks but it is just washer fluid.
This option is your choice. Maybe wait until your washer light pops on to do the work. I know after I drove the car and used it once to test it was working because my clip got wet, the light came on so that is about the time it would stop spilling.
I was really caught off guard when I saw the tank but it was simple to do and yes annoying to spill all of it but it is what it is.
I originally considered driving with only one installed LOL Well until I took it somewhere.
CONCLUSION
The overall job is identical with regard to the vent, however the passenger side has the Windshield fluid tank.
On a scale of 1 to 10, I have to say this is a 3 for how hard it was, meaning it wasn’t hard. More annoying lol that tank.
It is better than removing the fender and taking a chance you cannot line it up properly and just overall less work.
Gave me a chance to clean my brakes and inner rims, oh and part of my garage floor lol.
I had the removable clip number 2 on my driver side not go in right and sit flat. I checked it and it looked ok but not perfect.
I believe the place that made this Carbon Fiber vent did not notice it was not right, so since I have like 5 of the original ones I am going to quickly redo the drivers side. The clips easily slide in and out so putting a new one is a simple thing. I did not realize that until I was working on the passenger side which sucks.
While visually nobody would ever notice, I know it is not sitting flat and well, if you are like me that shit kills me LOL
I hope this thread helps out the many, many who like me could not find much information out there or a guide. It can be worrisome to try things on your car, especially when the are expensive.
Ok time to relax and soon my Reflective Red Emblems will be here. They told me they are being polished and cleared now.
Attachments
-
 Clips-1.webp156.1 KB · Views: 36
 -
 Driver-Fender-2.webp50.3 KB · Views: 38
 -
 Driver-Fender-3.webp44.4 KB · Views: 35
 -
 Driver-Fender.webp78.3 KB · Views: 35
 -
 Remove-1.webp114.8 KB · Views: 36
 -
 Tools.webp46.2 KB · Views: 35
 -
 Windshield-1.webp79.5 KB · Views: 38
 -
 Windshield-Bolts-2.webp63.1 KB · Views: 36
 -
 Windshield-Bolts-3.webp72.6 KB · Views: 35
 -
 Windshield-Bolts.webp68.9 KB · Views: 31
Last edited:


") I just got in new scoops myself and had no idea on how to change them.
I just got in new scoops myself and had no idea on how to change them.


