Zapps
New member
- Joined
- Jul 12, 2025
- Messages
- 1
- Reaction score
- 6
- Points
- 3
- Genesis Model Year
- 2024
- Genesis Model Type
- Genesis GV60
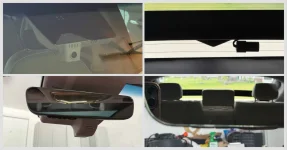
I decided to install both a front and rear dash cam on our 2024 Genesis GV60. The camera comes with a replacement (OEM-like) housing for the rear-view mirror with an embedded camera and a long cord to connect a rear dash camera. I couldn't find any information online on how to install with the rear camera, so I decided to try it myself and document it here to help people in the future!
I was able to do it with minimal tools. It was not very difficult to install overall, and I was able to get it done in a couple of hours in the garage.
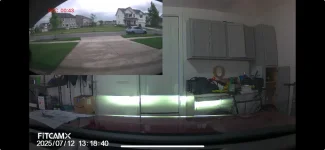
I chose to install the rear camera on the bottom rear window and raise the middle head-rest to completely hide the camera when driving.
Tools needed:
- Twine
- Pry tool (included with product)
- Small zip ties
- Pipe-cleaner type of device (something to grab and pull wires/string with)
- Phillips screw driver
1. Feed twine through hatch
Create a loop on some twine, string, or something that you can push through the wire harness cover. Use the pry tool to disconnect the wire harness cover from both the body and hatch. Insert one end of twine through body and into the car. You will need to use the pry tool to slightly lift the headliner and reach in and grab an end of the twine. Pull female end (one that connects to rear-view housing) through headliner.
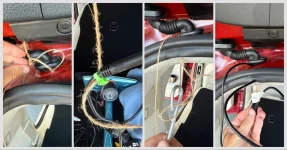
2. Insert male end through wire harness cover
First, take a zip tie or something stiffer (that can be attached to a twine knot) and thread it through the harness cover. Then, attach one end to some more twine. Then, pull through and attach twine to male end. Then, pull male end through wire harness cover (make sure that it is going towards the hatch). I had to use a good amount of force to pull it through since the angle is a bit weird and also had to massage it through the middle section.
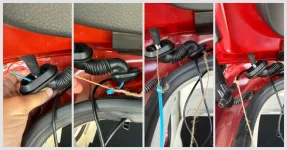
3. Pull more wire through harness until you have ≈29 inches of wire on the male end
Pull the wire through until you have around 29-32 inches going towards the hatch. This is how much you need if you want to have a similar set up of the rear camera like I included in the example photo at the top. If you don't want to estimate and just finish the rear part first, then skip to step 9 in this post and attach the rear camera first. Then, return to step 4 to finish wiring to the front.
4. Guide wire of female end into weather stripping
Follow the weather stripping down towards the rear plastic panel. You should be able to push it in with just your finger or the pry tool. Then, use pry tool to pull side panel from side. Then, remove bottom section (with metal plates) by prying from its side. It shouldn't be too hard to pull completely off once pried from its side. After removing, take out all bottom liners and covers until you see the 2 exposed screws on the side panels. Remove screws.
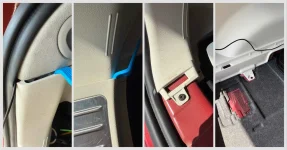
5. Partially separate side panel and fish wire under clips
Start on the side closest to the hatch and pull apart until 2 green clips seen in 2nd photo release. Then, pull along edge until reach passenger door. Push cord below clips and then clip back into place making sure to fish the wire out the side and up the weather stripping as seen in 4th photo
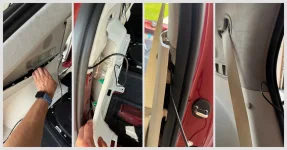
6. Feed wire through B-pillar
Feed wire with finger/pry tool up weather stripping towards ceiling. Go across door weather stripping. Connect at B-pillar headliner and carefully use finger/pry tool to push between seam (BE CAREFUL to not pull part apart as there is an airbag here). Continue to connect to weather stripping above driver's door.
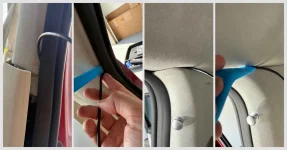
7. Feed wire to windshield
Feed wire through weather stripping until it meets seam in A-pillar headliner. Stretch wire over seam, then use finger/pry tool to push it into the seam. It should go all the way in. For the corner by the window, it's quite tight so I just pushed it as best as I could into the corner (it's not visible so I didn't really care if it was hanging out a little bit).
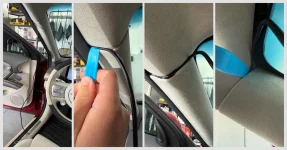
8. Feed wire to rear-view mirror
Feed remaining wire along headliner by window all the way to rear-view mirror. Congrats! You're done with the first part!
9. Remove plastic from hatch
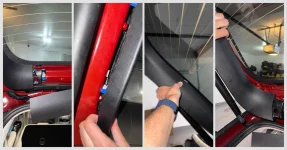
Begin by removing middle piece on top (1st pic) and bottom (not pictured). You should be able to get a pry bar started by an edge and then pull it off. Twisting will help. Then, remove left-side panel along big rear window. Start by loosening around blue clip in 1st photo, then pry long side away from outer edge of hatch. Then, continue to twist and pull until it fully removes. This part was a bit tough.
10. Guide wire towards camera location
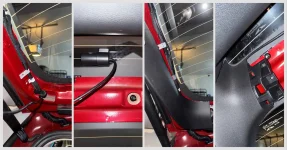
Ensure that camera is pointing in UP position (there is sticker to show which way; be careful as it can be a bit confusing with the hatch in the air. Cord should go into the right side of the camera when looking at it from below with the hatch open (see picture 2). Use tape or something to tie wire to other wire harness. Make sure you have enough cord (if you measured according to the instructions at the beginning, it should reach). At this point, you can stick camera directly to window in the placement you want (don't worry about the x-axis rotation as the camera can rotate in the housing after sticking to the window. Replace plastic panel and make sure wire is placed in the corner (like photo 4).
11. Put everything back together
At this point, you should be able to follow the instructions from the manufacturer on installing the front piece (much easier). Make sure to connect the rear camera wire to the one you just threaded through.
12. Finish setting up through the app
Now you're DONE!
If you have any questions or need some clarifications, please comment on this discussion post and I will try to answer them!
I was able to do it with minimal tools. It was not very difficult to install overall, and I was able to get it done in a couple of hours in the garage.
I chose to install the rear camera on the bottom rear window and raise the middle head-rest to completely hide the camera when driving.


Tools needed:
- Twine
- Pry tool (included with product)
- Small zip ties
- Pipe-cleaner type of device (something to grab and pull wires/string with)
- Phillips screw driver
1. Feed twine through hatch
Create a loop on some twine, string, or something that you can push through the wire harness cover. Use the pry tool to disconnect the wire harness cover from both the body and hatch. Insert one end of twine through body and into the car. You will need to use the pry tool to slightly lift the headliner and reach in and grab an end of the twine. Pull female end (one that connects to rear-view housing) through headliner.

2. Insert male end through wire harness cover
First, take a zip tie or something stiffer (that can be attached to a twine knot) and thread it through the harness cover. Then, attach one end to some more twine. Then, pull through and attach twine to male end. Then, pull male end through wire harness cover (make sure that it is going towards the hatch). I had to use a good amount of force to pull it through since the angle is a bit weird and also had to massage it through the middle section.

3. Pull more wire through harness until you have ≈29 inches of wire on the male end
Pull the wire through until you have around 29-32 inches going towards the hatch. This is how much you need if you want to have a similar set up of the rear camera like I included in the example photo at the top. If you don't want to estimate and just finish the rear part first, then skip to step 9 in this post and attach the rear camera first. Then, return to step 4 to finish wiring to the front.
4. Guide wire of female end into weather stripping
Follow the weather stripping down towards the rear plastic panel. You should be able to push it in with just your finger or the pry tool. Then, use pry tool to pull side panel from side. Then, remove bottom section (with metal plates) by prying from its side. It shouldn't be too hard to pull completely off once pried from its side. After removing, take out all bottom liners and covers until you see the 2 exposed screws on the side panels. Remove screws.

5. Partially separate side panel and fish wire under clips
Start on the side closest to the hatch and pull apart until 2 green clips seen in 2nd photo release. Then, pull along edge until reach passenger door. Push cord below clips and then clip back into place making sure to fish the wire out the side and up the weather stripping as seen in 4th photo

6. Feed wire through B-pillar
Feed wire with finger/pry tool up weather stripping towards ceiling. Go across door weather stripping. Connect at B-pillar headliner and carefully use finger/pry tool to push between seam (BE CAREFUL to not pull part apart as there is an airbag here). Continue to connect to weather stripping above driver's door.

7. Feed wire to windshield
Feed wire through weather stripping until it meets seam in A-pillar headliner. Stretch wire over seam, then use finger/pry tool to push it into the seam. It should go all the way in. For the corner by the window, it's quite tight so I just pushed it as best as I could into the corner (it's not visible so I didn't really care if it was hanging out a little bit).

8. Feed wire to rear-view mirror
Feed remaining wire along headliner by window all the way to rear-view mirror. Congrats! You're done with the first part!
9. Remove plastic from hatch
Begin by removing middle piece on top (1st pic) and bottom (not pictured). You should be able to get a pry bar started by an edge and then pull it off. Twisting will help. Then, remove left-side panel along big rear window. Start by loosening around blue clip in 1st photo, then pry long side away from outer edge of hatch. Then, continue to twist and pull until it fully removes. This part was a bit tough.

10. Guide wire towards camera location
Ensure that camera is pointing in UP position (there is sticker to show which way; be careful as it can be a bit confusing with the hatch in the air. Cord should go into the right side of the camera when looking at it from below with the hatch open (see picture 2). Use tape or something to tie wire to other wire harness. Make sure you have enough cord (if you measured according to the instructions at the beginning, it should reach). At this point, you can stick camera directly to window in the placement you want (don't worry about the x-axis rotation as the camera can rotate in the housing after sticking to the window. Replace plastic panel and make sure wire is placed in the corner (like photo 4).

11. Put everything back together
At this point, you should be able to follow the instructions from the manufacturer on installing the front piece (much easier). Make sure to connect the rear camera wire to the one you just threaded through.
12. Finish setting up through the app
Now you're DONE!
If you have any questions or need some clarifications, please comment on this discussion post and I will try to answer them!
Last edited:


