blnewto
SUSTAINING MEMBER
- Joined
- Nov 10, 2023
- Messages
- 457
- Reaction score
- 252
- Points
- 63
- Location
- Roswell, NM
- Genesis Model Year
- 2021
- Genesis Model Type
- Genesis G70
This is done WITHOUT removing the intake manifold!
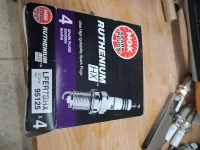
At 46k miles, ended up using NGK Ruthenium 95125 plugs from a recommendation from a couple guys on the Stinger site. They have different conductor tops (VW/Porsche/Audi type) but pre-gapped to .032 and exact length (from end of bottom conductor to the top end of conductor as well as the threaded section) as the OEM NGKs that came out of it. Ruthenium is supposed to be ideal for Turbo/Supercharged motors, will be interesting to see how they compare to the OEM, Rockauto has them for 10.50/ea (4) for $41.12
NGK 95125 Spark Plug | Shop Now at RockAuto
Here's more info on advantages of Ruthenium vs. Iridium
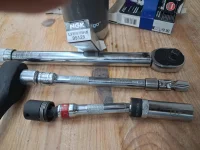
I Was dreading that diabolical spark plug #5 but with the right tools and a little different twist this was simple. Got all 6 done in an hour with only one scuff/cut on my finger, lol. These are the tools you need~


Start with the drivers side, do 1 at a time and spray the area around each coil pack w/ compressed air or one of those keyboard dusting cans just to get any debris away from the coil packs. The 3/8" wobble extension on a 10mm socket gets to all the coil pack bolts. Wobble extension connected to the 5/8" magnetic spark plug socket w/ swivel extension makes it easy to get to all the spark plugs. The coil wire connector is simple to remove, just pull the gray tab straight back to unlock, once it's unlocked push the gray tab down to release the connector and just pull connector back from the boot top.
I use a light (very light) coat of antiseize on the spark plug threads, making sure to only coat the threads, none on the area that's flat close to the conductor, if you get any on that very bottom area just clean off w/ a paper towel. Keep the wobble extension as straight as possible to get the torque to 20 ft. lbs. The torque is 15-20, but I used 22 ft lbs since w/ the antiseize added you should increase torque a bit.
If you want to coat the inner part of the boot where it contacts the white ceramic of the spark plug w/ dielectric grease that's up to you, also a light coat on the spark plug ceramic is what some recommend. I've never done it so it's really up to you. There's some on youtube that put a blob of the stuff on the end of the boot, definitely DON'T do that, too easy to get it on the top plug conductor and may effect the electric transfer.
On the passenger side I used the 1/4" swivel joint on a 10mm short socket to get the 10mm coil pack bolts off, was able to get to all of them that way. I removed spark boot #4 (closest to the grill), removed and replaced spark plug 4 but left the boot off. You only need the spark plug socket w/ wobble extension and a normal wobble extension to get to the 4 & 6 plugs.
Removed boot 6 (closest to firewall), removed and replaced spark plug 6 but leave the boot off. You want to put new plugs 4 & 6 back in rather than leaving any chance of something to fall into an open spark plug hole while you're messing with spark plug 5.
Now you're ready for the dreaded middle 5 plug, it's really not bad at all. Get the boot bolt off, then you lift boot up a bit and rotate the boot so the bolt hole is in back toward the firewall and the pin connector is now in front toward the grill. This will allow you to easily remove the boot w/ an easy bend rather than trying to get it out the back with the manifold overhead.
Once the boot is out you need to use that 5/8"spark plug socket w/ swivel attached to a u-joint type swivel or that black one in my pic above (that black one is much better to turn). It takes a bit of contortion using one hand behind the socket and one in front to get the socket down into the hole and on the spark plug, after that it's easy to remove, just keep all those angled sections as straight as possible. Getting the new plug in wasn't bad but you may have to remove one of the extensions to have better room to get it in there. Once you get it in and seating and threading properly do your best to keep all the angles to a minimum, mine wanted to bind just a bit when I didn't support it w/ my hand behind the socket extensions. Once I got it seated and hand tight I really made the best effort to keep all the angles to a minimum to get that final torque.
You then install boot 5, keeping the pins to the front and the bolt hole to the rear, then once you get it down in the hole (not down all the way) twist it back to it's mounted position, then tighten the boot bolt connect the coil wires and then do the same for boot 4 & 6.
Just on a test run it seems to be running very well, will repost if any issues turn up.
At 46k miles, ended up using NGK Ruthenium 95125 plugs from a recommendation from a couple guys on the Stinger site. They have different conductor tops (VW/Porsche/Audi type) but pre-gapped to .032 and exact length (from end of bottom conductor to the top end of conductor as well as the threaded section) as the OEM NGKs that came out of it. Ruthenium is supposed to be ideal for Turbo/Supercharged motors, will be interesting to see how they compare to the OEM, Rockauto has them for 10.50/ea (4) for $41.12
NGK 95125 Spark Plug | Shop Now at RockAuto
Here's more info on advantages of Ruthenium vs. Iridium
I Was dreading that diabolical spark plug #5 but with the right tools and a little different twist this was simple. Got all 6 done in an hour with only one scuff/cut on my finger, lol. These are the tools you need~


Start with the drivers side, do 1 at a time and spray the area around each coil pack w/ compressed air or one of those keyboard dusting cans just to get any debris away from the coil packs. The 3/8" wobble extension on a 10mm socket gets to all the coil pack bolts. Wobble extension connected to the 5/8" magnetic spark plug socket w/ swivel extension makes it easy to get to all the spark plugs. The coil wire connector is simple to remove, just pull the gray tab straight back to unlock, once it's unlocked push the gray tab down to release the connector and just pull connector back from the boot top.
I use a light (very light) coat of antiseize on the spark plug threads, making sure to only coat the threads, none on the area that's flat close to the conductor, if you get any on that very bottom area just clean off w/ a paper towel. Keep the wobble extension as straight as possible to get the torque to 20 ft. lbs. The torque is 15-20, but I used 22 ft lbs since w/ the antiseize added you should increase torque a bit.
If you want to coat the inner part of the boot where it contacts the white ceramic of the spark plug w/ dielectric grease that's up to you, also a light coat on the spark plug ceramic is what some recommend. I've never done it so it's really up to you. There's some on youtube that put a blob of the stuff on the end of the boot, definitely DON'T do that, too easy to get it on the top plug conductor and may effect the electric transfer.
On the passenger side I used the 1/4" swivel joint on a 10mm short socket to get the 10mm coil pack bolts off, was able to get to all of them that way. I removed spark boot #4 (closest to the grill), removed and replaced spark plug 4 but left the boot off. You only need the spark plug socket w/ wobble extension and a normal wobble extension to get to the 4 & 6 plugs.
Removed boot 6 (closest to firewall), removed and replaced spark plug 6 but leave the boot off. You want to put new plugs 4 & 6 back in rather than leaving any chance of something to fall into an open spark plug hole while you're messing with spark plug 5.
Now you're ready for the dreaded middle 5 plug, it's really not bad at all. Get the boot bolt off, then you lift boot up a bit and rotate the boot so the bolt hole is in back toward the firewall and the pin connector is now in front toward the grill. This will allow you to easily remove the boot w/ an easy bend rather than trying to get it out the back with the manifold overhead.
Once the boot is out you need to use that 5/8"spark plug socket w/ swivel attached to a u-joint type swivel or that black one in my pic above (that black one is much better to turn). It takes a bit of contortion using one hand behind the socket and one in front to get the socket down into the hole and on the spark plug, after that it's easy to remove, just keep all those angled sections as straight as possible. Getting the new plug in wasn't bad but you may have to remove one of the extensions to have better room to get it in there. Once you get it in and seating and threading properly do your best to keep all the angles to a minimum, mine wanted to bind just a bit when I didn't support it w/ my hand behind the socket extensions. Once I got it seated and hand tight I really made the best effort to keep all the angles to a minimum to get that final torque.
You then install boot 5, keeping the pins to the front and the bolt hole to the rear, then once you get it down in the hole (not down all the way) twist it back to it's mounted position, then tighten the boot bolt connect the coil wires and then do the same for boot 4 & 6.
Just on a test run it seems to be running very well, will repost if any issues turn up.
Last edited:


