• Car enthusiast? Join us on Cars Connected! iOS | Android | Desktop
  • Hint: Use a descriptive title for your new message
    If you're looking for help and want to draw people in who can assist you, use a descriptive subject title when posting your message. In other words, "I need help with my car" could be about anything and can easily be overlooked by people who can help. However, "I need help with my transmission" will draw interest from people who can help with a transmission specific issue. Be as descriptive as you can. Please also post in the appropriate forum. The "Lounge" is for introducing yourself. If you need help with your G70, please post in the G70 section - and so on... This message can be closed by clicking the X in the top right corner.

Question re: Steering Wheel Control Module(s) fuses.

RollingStone

Registered Member
Joined
Sep 5, 2023
Messages
30
Reaction score
19
Points
8
Genesis Model Year
2013
Genesis Model Type
1G Genesis Sedan (2009-2014)
Greetings. I've examined the fuse diagram in my owners manual (2013 Genesis 3.8), but still haven't a clue as to which fuse(s) affect the two steering wheel-mounted control modules (left: radio/mode/voice/phone — and right: cruise/smart cruise/trip/display).

Hoping a fuse box Jedi might help point the way.

FWIW, the controls work just fine, but the backlighting is sporadic. Removing and reinserting the fuse probably won't do anything… but when in doubt, figured try the simple solution first.

Thanks and cheers.
 
There's not going to be a fuse just for that. The car has enough fuses without adding them for specific instrument lights.
The button lights on the steering wheel are driven from the same source as much of the other button backlighting. You don't mention any of them flickering, so it's not going to be that. If the only backlighting that is flickering is on the steering wheel and if all the steering buttons flicker at the same time, it is probably going to be that the clockspring is starting to fail or there is a loose connection to it.
 
Thank Jedi joegr. The lights aren't flickering, several are just out (attached pic) — which is why suspicious fingers point to some bulbs having failed. I've heard of lights occasionally going out, then magically coming back, so was hoping it might be something simple (a fuse or loose harness connection). But since the controls themselves are fine, probably the bulb.

I believe the clockspring was addressed by its prior caretaker, but I'll check the records. Certainly worth a look — thanks for the tip.

I've looked into replacement OEM control modules, but one in particular seems tricky for places to get (according to them — not readily available, but not discontinued either).

All said, it's far from the worst problem to have. More of a pesky detail. But since having the power folding mirrors fixed, this is the last little gremlin before any goblin-sized issues kick in.
 

Attachments

  • GEN_SteeringControls.webp
    GEN_SteeringControls.webp
    83.9 KB · Views: 4
Yeah, that's just individual LEDs failed in the switch pods. "sporadic" implied to me that they were sometimes working.
 
Ha ha! Totally understand... My vocabulary is generally sporadic on a good day, which implies my brain is only sometimes working. If only I could reset my erratic encephalon control module!
 
Following up my own question with some exploration into the burned bulbs behind several buttons. Just thought I'd share some pics of what was found.

NOTE: While the (cashmere) radio pod is still available, the matching (cashmere) smart-cruise pod is seemingly on "permanent backorder" or possibly discontinued. I would otherwise happily fork over good money for new OEM replacements.

So instead… I picked up a used cashmere steering wheel on ebay, complete with the control modules I needed. While I could just replace the whole wheel, I was only after the two pods. And while the wheel from ebay was in pretty good shape overall, the two pods had wear issues.

Since the ebay wheel was inexpensive, I figured I'd try breaking down the pods… And that if I literally broke them, no big deal.

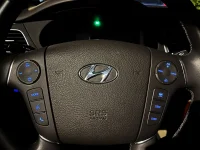
Removing the pods on a Gen-1 wheel is easy… There are two screws for each pod (left and right) on the back of the steering wheel — and one inside (see pics). Once removed the pod just pops out, and you can easily unclip the wire housing.

SW_Controls_2.jpgSW_Controls_1.jpg

Once removed, I realized it was possible to disassemble them… First pressing off the two plastic chrome bits, and then using a micro-screwdriver to gently pry the tabs on the housing layers apart (first the cover plate, then separating the button housing from the circuit housing… This inspired a new plan to take the existing plastic chrome trim bits and button housing from my wheel (in perfect shape) — and use them on the ebay-sourced circuit/tech base.

It didn't take long to break it all down… And also learn that the micro-small LED lights (circled in pic) are likely not a "user-servicable" element — at least not by this user. (Another Gen-1 owner had asked in another thread if the LEDs could simply be replaced. My guess based on this is "no" — but it's also not impossible to maybe source a few bits and rebuild a good unit for a fraction of the cost of new OEM replacements — if you can even find them.)

SW_Controls_3.jpg
SW_Controls_4b.jpg

NOW… I won't know if the new/used ebay pod lights work until I try them… So to be continued…

That's all… For now. Will report on results at some point. But I'm slow about these things.

Cheers!
 
Those are fairly standard SMT LEDs, maybe 0603 size. They can be replaced if you have any SMT hand soldering experience.
 
Hmm... Thanks, that's good to know. While I personally don't have SMT soldering experience, I do wonder if a car audio or electronics specialist would?

Is there a way to visually tell if a LED like this is burned or otherwise inoperable? (Without having to hook it up?)

Otherwise, I feel "Frankensteining" the pieces together would work. I don't think I'd be messing any electronics up, as I'm simply caerfully swapping bits and pieces. That said, cars can be fussy and I'd hate suddenly having working lights (cool), but non-working buttons (bummer). If replacement OEM pieces were more readily available, I'd be more comfortable.

My only other hesitation is the airbag. But the airbag doesn't need to be fully removed or even unhooked for access, so would hope that just disconnecting the battery properly and letting the car sit for a bit would be fine.

Thnaks again, Joegr, for your input! I'd never have guessed they were replacable.
 
... I do wonder if a car audio or electronics specialist would?

Is there a way to visually tell if a LED like this is burned or otherwise inoperable? (Without having to hook it up?)
...
Probably. Maybe even someone at one of those phone fixit places?
Yes. Most multi-meters have a diode check function that sources enough current to dimly light the LED in-circuit.
 
Cool! Time to dust-off the muti-meter… At least to test the ebay-sourced pods before committing to disassembling everything. If more desperate measures are required, I'll start calling around. (hah)

I find it odd that these parts are no longer available. I mean, I understand the 1st-Gen Genesis is aging-out, but since they were manufactured through 2014 there should be still a year left in the typical 10-year parts pipeline.

I'd even go so far as to get a complete OEM wheel setup, but that's already marked discontinued (at least cashmere).

Cheers.
______________________________

Help support this site so it can continue supporting you!
 
Thanks again, Joegr, for the inside scoop on testing LEDs with a multi-meter! Your suggestion — and a YouTube video on how to check a variety of LEDs — helped a ton.

I was able to confirm each little blue LED on the pods removed from the ebay steering wheel DO illuminate! So at least I'm confident in the parts on that level.

I'll be curious to test the ones I remove from the car, just to see if how they react—or don't—to the same test.

Cheers!
 
This thread has moved into pre-execution stage, and I want to be certain I make smart decisions. Any guidance or confirmation from those who have undertaken something similar is welcome and appreciated.

I'll be replacing both the left and right steering wheel-mounted control buttons. This will require removing the airbag — or perhaps tilting it out of the way to access screws and clips.

Questions for experts:

1. Discconnect battery — 1st negative, then 2nd positive.
- Question: Do I need to let the car rest for 30 minutes before addressing airbag?

2. Airbag "removal" — Remove the T-40 screws and gently lift, tilt, and remove airbag.
- Question: Do I need to actually remove/unclip the airbag, or can it just be moved for access (but left attached).
And will there be potential for an airbag warning light either way?


3. Parts Replaced — then…

4. Reconnect battery — 1st positive, then 2nd negative (reversal of order).
- Question: I'd like to check to see if the lights work before screwing it all back together… (Though I'll need a road test for cruise function). Can I reconnect the battery before putting the airbag back in place — or is it best and safest to put everything back first.

Thank you all for your knowledge and patience with my obtuse posts.
 
1 - negative only is required, positive optional. 30 minutes is 29.99 minutes overkill.
2 - Once the torx bolts are removed, pull it toward you about an inch then rotate toward you downward. You may need to remove the connector by sliding the yellow retainer first before unplugging (the wires in the vid below are longer than I remember).

Video:

3 - reconnect airbag*
4 - just reconnect the negative.

* As to whether you want power to the car with the airbag unbolted, that risk/reward is entirely up to you. But most folks will say just remount the bag with the two torx bolts before connecting power ... it only takes a moment. Better safe than sorry, etc. etc.
 
Thanks Gunkk — especially for the clarification on the negative terminal and humor regarding wait-time.

Love the video. I've seen a couple from Generation Garage, and am certainly hoping the guts of my wheel look nothing like theirs (ha ha). But it does seem straightforward.

What's the phrase, "May fortune favor the foolish…"

Yep, that's my motto. (And safer is alway better than sorry.)

Cheers!
 
To close this dramatic saga… Originally, my steering wheel control modules had a few burned LED backlights — as shown in an earlier pic. While the functions worked, at night it was annoying to see several black holes of darkness where there should otherwise be nice, blue-glowing buttons.

A local garage quoted almost $1,300. to fix the controls! (The new controls accounting for just over 900.– of the cost.) Worse yet, the "smart cruise" module was on "indefinite backorder" with not ETA. (i.e., essentially discontinued).

Long story short, I picked up a used cashmere steering wheel with both control modules I needed for just $69. bucks (free delivery).

With great advice from members Joegr and Gunkk, I learned to test the used parts with a multi-meter to ensure they worked before taking things apart — and then how safely to do it! (Thanks again you two!)

So $69 buck and the cost of a new T-40 torx screwdriver later (and a cost savings of 1,200.–)…

"Let there be lights, and there were lights." And they were blue. And it was good.
 

Attachments

  • LetThereBeLights.webp
    LetThereBeLights.webp
    100.4 KB · Views: 4
Looking to update and upgrade your Genesis luxury sport automobile? Look no further than right here in our own forum store - where orders are shipped immediately!
Well done! (y)
 
...

1. Discconnect battery — 1st negative, then 2nd positive.
- Question: Do I need to let the car rest for 30 minutes before addressing airbag?

...
The RCM has a capacitor for backup power so that the air bags still work, even if the battery connection is destroyed early in the crash, before the airbags deploy. While 30 minutes is excessive, the cap could stay charged for way more than a second, at least a minute or two. Fortunately, unless you are really crazy careless, the odds of setting off an airbag even with the battery still connected are very very low.
 
Back
Top