• Car enthusiast? Join us on Cars Connected! iOS | Android | Desktop
  • Hint: Use a descriptive title for your new message
    If you're looking for help and want to draw people in who can assist you, use a descriptive subject title when posting your message. In other words, "I need help with my car" could be about anything and can easily be overlooked by people who can help. However, "I need help with my transmission" will draw interest from people who can help with a transmission specific issue. Be as descriptive as you can. Please also post in the appropriate forum. The "Lounge" is for introducing yourself. If you need help with your G70, please post in the G70 section - and so on... This message can be closed by clicking the X in the top right corner.

Adding bass to your 17 speaker Lexicon with new amplifier

kocyk123

Registered Member
Joined
Feb 1, 2016
Messages
519
Reaction score
341
Points
63
Location
Gilberts, IL
Genesis Model Type
2G Genesis Sedan (2015-2016)
Hi All,

This mod has been performed on 2015 Genesis 3.8 AWD Ultimate with 17 speaker Lexicon system

I wanted to improve the bass without adding new subwoofer in the trunk for my 17 speaker Lexicon sound system. I was able to do it simply by adding amplifier to stock subwoofer speaker. Thanks to carguy75, dfyffe and arcman for your assistance! What you will need:

- Mono amplifier. I got the following:
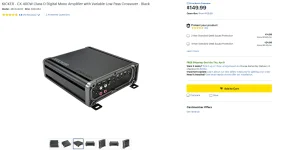
kicker.PNG


- amp wiring kit 8AWG (I got 6awg since they only had that available in the store)

- RCA female to RCA 2 male adapter:
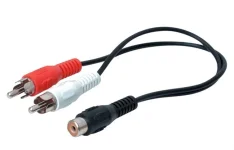
rca.jpg


- speaker wires
- soldering iron
- heat gun
- heat shrinks

Step 1.

DISCONNECT NEGATIVE WIRE FROM YOUR BATTERY

Remove everything from your trunk. Remove the floor cover. Remove black plastic cover that goes along the bumper (where the latch is). Remove screws holding the carpet on the driver’s side where the oem amp is hidden. I didn’t remove it completely. I removed only the screws that allowed me to have opening big enough so I can fit both of my hands in there (sorry I didn’t take pics of that).

Step 2.

Unplug the three connectors (big white, big gray and small black(be careful with this one because it is fiber-optic)).

Step 3.

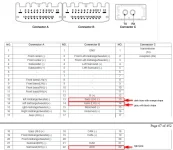
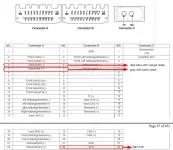
Locate your rear subwoofer + and – wires and ACC on connector B.
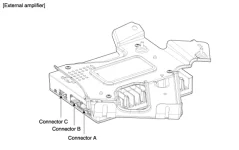
1586276768527.png
1586277076979.png

Step 4.

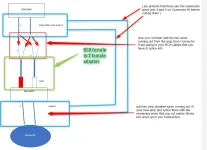
Once you locate both + and - cut them. Grab both ends from the plug side and and splice them into rca connector:
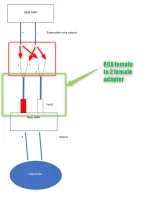
1586277200472.png

Once you have spliced them into RCA adapter, connect the adapter to your new amp input:

1586277331889.png

Step 6.

Grab your new speaker wires, grab the remaining + and - wires from the plug you cut (the ones that go to the subwoofer) and connect them accordingly to the amp:
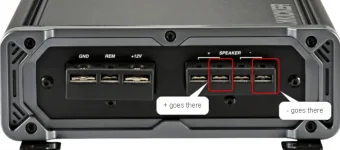
1586277672561.png

Step 7.

Locate ACC wire on the plug (light pink - see chart in previous step). Grab new wire and splice it with the ACC. Run the new wire to the REM on the amplifier (this will turn on and off your new amp):
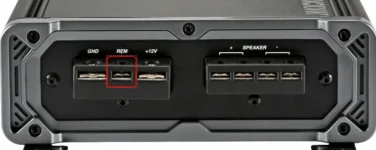
1586277799180.png

Step 8.

Add + from the battery using 8awg or 6awg cable with a fuse (once you get the amplifier you like, it will tell you what fuse it needs).
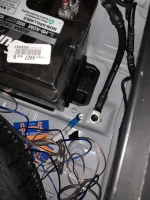
Add - (ground) wire, I connected it to the chassis. Make sure it is connected to bare metal.

Step 9.

Make sure your new amplifier is switched to HI input level:
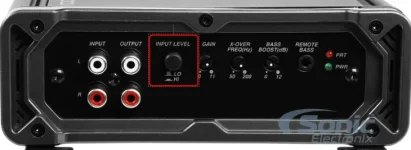
1586278066710.png

Step 10.

Set your gain, x-over. Make sure to check the video below which explains best setup for gain and x-over:

Step 11.

Test and make sure everything works properly. Clean up wires and enjoy your new sound system!!

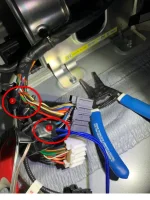
Please do not use tap a wire connectors. Cut the wires, and solder them together and cover with heat shrink. My first attempt to this project failed because tap a wire on the ACC wire would not work at all so my amp would never kick in.

Let me know if you have any questions.
PK
 
#1 - wires going to the RCA adapter which connects to the input on the new AMP
#2 - wires coming from the new AMP from the speaker side
(picture from my first attemp with tap a wire. I fixed it with soldering and heat shrink so it looks clean)
1586282420235.png

below you will see where I grounded the amp. You can use self tapping screw:
IMG_1538.JPEG


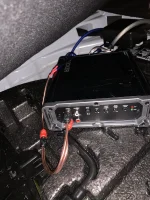
Below you will find the RCA splitter. You can also see my gain and x-over setup. With this setup, my bass is set to 3 and it is sometimes too much when listening to XM Chill channel.
IMG_1541.JPEG
 
That power wiring is overkill for that amp :LOL:
 
I know lol. It said in the manual that 8awg will be good but they only had 6awg in the store and I needed it lol
 
Nice. And no loss of cargo space or bulky stuff. How is the quality of the bass using the stock speaker? Also how and where did you secure the new amp?
 
The quality is amazing. It makes me think that I have additional sub in the trunk. I took a sit inside G80 sport couple of weeks ago during auto show in Chicago and was amazed how great the bass is in it. Now I can say my 2015 is the same or even better. I would record the video but it will not do the justice. You can only image how good it is when I have my bass set to +3 out of 10. You can tune it even better on the amp itself but I want to be gentle.

Amp is not secured. It sits tightly in the wheel compartment. It is placed so it does not move around. Originally I wanted it on the trunk area mounted to the back seat but I love the fact that I don't see it when I pop the trunk.
 
Thanks kocyk123 for the detailed instructions, I had promised months ago to do this for a few members here, but never got round to it. This mod is definitely worth it for audiophiles.
 
The quality is amazing. It makes me think that I have additional sub in the trunk. I took a sit inside G80 sport couple of weeks ago during auto show in Chicago and was amazed how great the bass is in it. Now I can say my 2015 is the same or even better. I would record the video but it will not do the justice. You can only image how good it is when I have my bass set to +3 out of 10. You can tune it even better on the amp itself but I want to be gentle.

Amp is not secured. It sits tightly in the wheel compartment. It is placed so it does not move around. Originally I wanted it on the trunk area mounted to the back seat but I love the fact that I don't see it when I pop the trunk.
I wish you lived near me I would pay you to help me convert over to what you have..🙂
 
Thanks kocyk123 for the detailed instructions, I had promised months ago to do this for a few members here, but never got round to it. This mod is definitely worth it for audiophiles.
Thanks again for your help!

I wish you lived near me I would pay you to help me convert over to what you have..🙂
If you ever come to Chicago area, stop by and I will do it for free. Just get the parts :-)
______________________________

Help support this site so it can continue supporting you!
 
Great work! Thanks for posting this. I'm looking to do this, too, but have a question first. Wouldn't you want to use the Subwoofer wires (No. 4 & 5) on Connector A instead of the Bass (RH) wires (No. 13 & 14) on Connector B? That is the audio signal the subwoofer is using, which is different than the Bass (RH) and Bass (LH) signals for the regular woofers in back.

Also, if you cut those wires instead of tapping them your Bass (RH) rear woofer is likely no longer connected. You may not even notice it with the extra power you're sending to the sub now and the three speakers being so close to each other on the rear deck.

I'd be curious to know how it would sound if you switched the wiring. That should reveal the true range of the sub with this setup. If that works well I'm ready to do the same on my Equus. Thanks!
 
Thanks again for your help!


If you ever come to Chicago area, stop by and I will do it for free. Just get the parts :-)
Thanks kocyk123. I value folks like you and their time. I would definitely make it worth your time. I purchased my vehicle from Schaumburg Illinois, I suppose you are close to Schaumburg.
 
Thank you. You are absolutely right. Thanks for catching that! It was my mistake when creating this tutorial. You want to use 4 and 5 from Connector A and 22 from Connector B:
1586443830335.png


I am not the greatest with explaining things but I added more explanation to my drawings:
1586445766432.webp
 
Thanks kocyk123. I value folks like you and their time. I would definitely make it worth your time. I purchased my vehicle from Schaumburg Illinois, I suppose you are close to Schaumburg.
I purchased mine at the same dealership lol Patric Hyundai, correct? I live further away on the burbs - Gilberts. If you are ever in the area, let me know ahead of time. It will take 2-3 hours and couple of beers ;-)
 
I purchased mine at the same dealership lol Patric Hyundai, correct? I live further away on the burbs - Gilberts. If you are ever in the area, let me know ahead of time. It will take 2-3 hours and couple of beers ;-)
Yes Patrick Hyundai. Thanks once again for sharing all of your knowledge on this matter.👍
 
I also recorded short video playing some music with new amp installed. You should listen to it on the good speaker system. This video does not do the justice and will not show you how much better is sounds now but you might be able to tell that there is lot more bass. With my current amp setting, I keep my bass at +3 which sometimes is too much (especially if you listen to Chill channel on XM). However, one thing that you may notice is at the end with the low volume, bass is still there. Before installing the amp, if you played something with low volume, bass was minimal. You would have to crank up the volume to get better bass.
I test drove a G90 couple of weeks ago and was impressed on how good the bass is when you play music on very low volume. Now, my Genesis sounds same(or better)! :)

iCloud
Nice! 👍
 
Thank you. You are absolutely right. Thanks for catching that! It was my mistake when creating this tutorial. You want to use 4 and 5 from Connector A and 22 from Connector B:
View attachment 28131


I am not the greatest with explaining things but I added more explanation to my drawings:
View attachment 28133

Thanks for the great write up and pictures. I followed the revised instructions (correct subwoofer wires) and installed this amp over the last weekend. Wow! It made a huge difference. Sounds sweeeeet now! Thanks!!!
 
Awesome! I am happy that my instructions were able to help you. And yes, what a difference, right? I felt like I got myself a new audio system. I really get to enjoy the 17 speakers now. Enjoy! 🍻
 
First thank you for taking the time to post this kocyk123.

Would a 200W amp work? I have this amp from this amp/sub combo I purchased awhile back:

MTX Audio MTX TNP112D 12-Inch Subwoofer and 200W Amplifier: Amazon.ca: Electronics

"The TNP112D includes a single channel amplifier capable of delivering 200 watts RMS power to the included enclosure."

Also is the RCA Adapter a necessity? Can't you just splice together the two wires instead of using the adaptor as a plug in between?

Thanks so much for this post, just bought a new Hyundai Genesis 2015 and this is my first mod, very excited as I too think the bass is lacking jussttt a bit.
 
Looking to update and upgrade your Genesis luxury sport automobile? Look no further than right here in our own forum store - where orders are shipped immediately!
Back
Top