• Car enthusiast? Join us on Cars Connected! iOS | Android | Desktop
  • Hint: Use a descriptive title for your new message
    If you're looking for help and want to draw people in who can assist you, use a descriptive subject title when posting your message. In other words, "I need help with my car" could be about anything and can easily be overlooked by people who can help. However, "I need help with my transmission" will draw interest from people who can help with a transmission specific issue. Be as descriptive as you can. Please also post in the appropriate forum. The "Lounge" is for introducing yourself. If you need help with your G70, please post in the G70 section - and so on... This message can be closed by clicking the X in the top right corner.

Control Panel Knob Problem

OK. I searched online with the CCP (Central Control Panel) part number, avoiding eBay, where there are 3 units only, @ $250-$300. When a new one can be purchased a bit more than $500, why pay &300 for a questionable used one...

I found several, offering the part ~$100. One of them offered up to 1 year warranty, for additional $15, which I obviously grabbed!!!

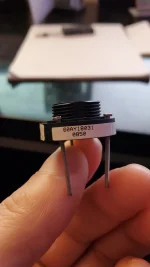
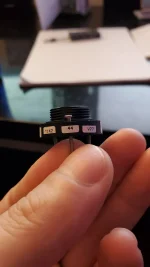
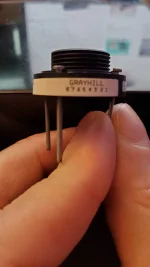
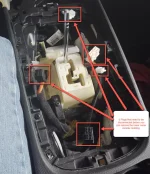
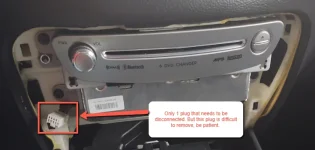
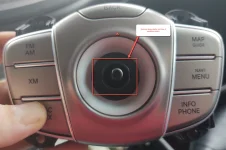
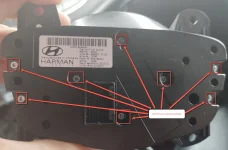
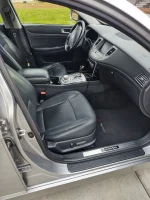
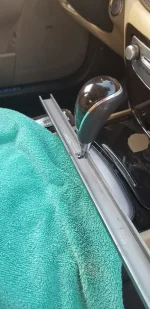
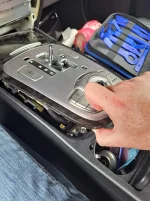
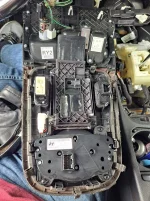
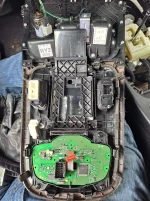
I failed in removing the shit knob. That son of a gun refused to move out, no matter where I sat or how hard I tried pulling. I had my cruise control done at the dealership under extended warranty (unfortunately the DIS wasn't covered), so I asked them to pull it out, which they did, at no charge!!! Removing the DVD cover first and then the top of the console, was relatively easy, with a pro "prying" tool kit I got at AutoZone for $10. When removing the DVD cover, just stick/push the toll on the left side, and the cover with pop out, and the rest of it can be removed by hand. I then tried pulling the console's top by hand, from under the DVD side, and it popped out on one side, then with the prying tools, pooped the rest. At this point you should disconnect the harness from the driver-seat heating/cooling button. Also, press the Start button twice (NOT TURNING THE CAR ON!!!!!), press the brake and then move the shifter to the N or D position. The the only way to pull the cover above the shifter stick. When it's out, press the brake again, move the shifter back to P and turn the car off. DO NOT MASS WITH CABLES WHEN THE CAR IS ON!!!!!. Disconnect the harness from the CCP (press a samll lever on one side of the connector). Now turn the whole cover upside down. The are 3 seen philips screws to unsrew. The 4th is hidden by a light connector, so you should remove that connector's clip, exposing the screw. Once all 4 screws are out, replace with the working CCP and reverse the whole process.

At the dealership part+tax=$1K + 3 hours. I paid $150, including shipping and now, IT WORKS GREAT!!!

This thread was super helpful. Thanks. Couple additional notes from my experience.

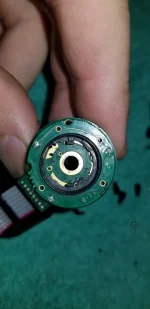
Found that the neck of the round silver knob has disintegrated into multiple small pieces and this was preventing the switch from working when pressed in. Bought the car used, and the AUX button was always sticky. So followed the instructions above and removed the whole assembly and switch. Lesson learned during disassembly was that I accidentally broke the locking tangs on the ashtray light. Did not realize you needed to twist it to remove it. So when grabbed is an pulled straight out, the two small locking tabs snapped off. Then when I was reinstalling the console saw that I could have just pulled a single plug for the cigarette lighter, heat sensor, and ashtray light. Oh well.

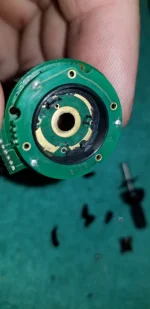
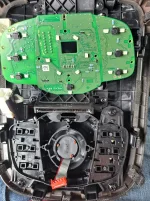
I went ahead and disassembled the entire switch by removing the 8 or 9 tiny torx head screws. Used a small flat head screw driver b/c I did not have the correct torx driver. It was very straight fwd and simple. After removing the circuit board, I cleaned out all of the soda someone spilled in the buttons using warm water, and dried out w/ compressed air and brake cleaner.

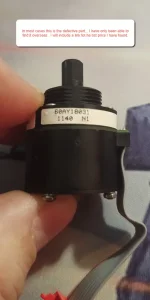
Even though the neck was gone, there as a solid 3/16 inch of the former female part of the knob left. The problem is the shaft on the switch has a notch and the plastic part of the neck that locked into that notch was gone. So for $6 I purchased Gorilla Super Glue Gel, used three drops in the female part of the knob, inserted the switch shaft and left it sitting upside down on the top of the knob for 60 min while it dried.

Washed car b/c a clean car always runs better, and reassembled. Works like new now.
 
Has anyone documented this process on you tube yet? I looked and looked nothing found. I may be better off at the dealership but would like to avoid. My Genny has 170K+ miles on her.l
 
Here is a video from YouTube on taking the panel out.

I am going to try and remove mine this weekend and clean it. I will let everyone know how it goes.
 
The underlying switch that breaks on DIS is a Grayhill Joystick Optical Encoder. The part number for component I had on my 2009 4.9 is 60AY18031. If you can source one of those you can repair the board rather than buying the whole DIS control module.

The plastic internals on the joystick are prone to breaking and cracking. Especially if there's been a hard push or impact to the top of the control knob. Once it starts acting up you'll have to either replace the whole unit or just the joystick component.
 

Attachments

  • 20191209_193332.webp
    20191209_193332.webp
    50 KB · Views: 19
  • 20191209_193335.webp
    20191209_193335.webp
    43.3 KB · Views: 17
  • 20191209_193339.webp
    20191209_193339.webp
    45.1 KB · Views: 17
  • 20191209_193351.webp
    20191209_193351.webp
    47.4 KB · Views: 18
The underlying switch that breaks on DIS is a Grayhill Joystick Optical Encoder. The part number for component I had on my 2009 4.9 is 60AY18031. If you can source one of those you can repair the board rather than buying the whole DIS control module.

The plastic internals on the joystick are prone to breaking and cracking. Especially if there's been a hard push or impact to the top of the control knob. Once it starts acting up you'll have to either replace the whole unit or just the joystick component.
I just figured that out... I found it online but all sellers seem to be in China.. The best deal I found was for $84.83 with expedited shipping from this site.


I took some pics of what I am doing. I don't see any damage to mine it must be internal. I am trying to use QD Electronic Cleaner.. I will see how it does.
 

Attachments

  • Genesis center console 1.webp
    Genesis center console 1.webp
    93.3 KB · Views: 34
  • Genesis DVD Panel 1.webp
    Genesis DVD Panel 1.webp
    24.2 KB · Views: 32
  • genesis control knob 2.webp
    genesis control knob 2.webp
    83.1 KB · Views: 45
  • genesis control knob 1.webp
    genesis control knob 1.webp
    73.3 KB · Views: 38
  • Gensis 8 possition switch.webp
    Gensis 8 possition switch.webp
    30.2 KB · Views: 41
I just figured that out... I found it online but all sellers seem to be in China.. The best deal I found was for $84.83 with expedited shipping from this site.


I took some pics of what I am doing. I don't see any damage to mine it must be internal. I am trying to use QD Electronic Cleaner.. I will see how it does.
Aliexpress has them as well around $75 with shipping

Photoelectric encoder 8 way switch Joystick push switch 60AY18031|Switches| - AliExpress
 
I saw that... I have had really bad luck with AliExpress... I am an IT geek and have purchased some computer parts from them. Took 2-3 months for most items. One item took over 4 months to get here... I guess it's a wash. It would have cost me just under $70 if I went snail mail and I may not need it. I just finished putting everything back together and the switch is working just fine after using the CRC QD Electronic Cleaner... time will tell.
 

Attachments

  • IMG_20201129_142136715_HDR.webp
    IMG_20201129_142136715_HDR.webp
    255.5 KB · Views: 14
Just an update... With expedited shipping the Grayhill 8-way switch arrived on the 18th... Not bad for placing the order on the 10th and it coming from overseas.
 
I have a 2011 Genesis and checked this site when my control knob select function started malfunctioning. I tried the CRC Electric cleaner option as a last resort before tearing apart the console. Doused it good. It seems to be working like new now for the last 3 days. Hopefully this did the trick long term. Thanks for the advice.
 
I have some sad news and some good news.... My (Feb.) 2012 Genesis R-Spec has died.... :(

Like most 2012 R-Spec owners I had the oil burning issue and was not about to spend $7,000 to $9,000 to have it rebuild with the correct Piston Rings. I drove this car like I stole it for 5 of it's 9 years but I always took care of it. My kids say I treated it better than I treated them. That is a true statement as my R-Spec never pissed me off like me kids could... LOL. In April I sold it to a young man in Ohio for $6,900. My Geni had 180K miles on it and other than burning oil it still drove great. I just found out that somehow he blow the motor. I hope for his sake it's not an expesive repair. I know I am no longer the owner but it still sucks!!!

As for my new... used... car. I went to CarMax in Louisville and these are the cars I looked at... a 2016 BMW 3 series, 2016 Mercedes C Class, 2016 Infiniti Q50 Redline, 2015 Subaru WRX, 2016 Cadillac CTS, 2017 Jaquar XE, 2018 Buick Regal Sport, 2018 Kia Stinger GTS, and a 2018 G80 Sport... At 6'3" 344lbs I couldnt fit in most of these cars so I open the doors sat, sqeezed, and walking away. In the end the Stinger GTS, G80 Sport, and Infinity Q50 Redline were the only ones I drove and liked... Yes the R-Spec had me spoiled. I couldn't afford the Stinger at $29K or the G80 Sport at $31K... I'm still getting my kids through school. If it wasn't for the smallish doors and price ($22K) on the Infinity I would have purchased it. I went home with nothing. My very smart wife offered me an alternative. Get a 2013 or 14 R-Spec with low miles, you love that car. After 2 weeks of searching I found my new... used car... a Sept. 2013 R-Spec with 47,600 miles, single owner in the new Parusion Gray (at the time). I wanted a 2014 but could not find one with low miles that was not trashed on the interior or over $20k. I am getting it detailed, paint corrected, and ceramic coated. Never done this so my fingers are crossed. I will update my avatar pic and display some pics when I get it back.
______________________________

Help support this site so it can continue supporting you!
 
The underlying switch that breaks on DIS is a Grayhill Joystick Optical Encoder. The part number for component I had on my 2009 4.9 is 60AY18031. If you can source one of those you can repair the board rather than buying the whole DIS control module.

The plastic internals on the joystick are prone to breaking and cracking. Especially if there's been a hard push or impact to the top of the control knob. Once it starts acting up you'll have to either replace the whole unit or just the joystick component.
This was awesome information, and exactly my situation. There is no amount of cleaning that will compensate for the broken internals of the 8-way encoder. One of the thin, black plastic spacer rings inside mine had broken into several pieces, and debris was also scattered throughout the inside of the switch. I cleaned, reassembled, and tried it, and it was "better", but still had frequent periods of non-functioning "Enter" key operation.

I did find a US distributer for the part (and even more local to me, 1 day shipping time). $65 plus tax and shipping. Link here.


You might have to do some trimming of the plastic ribbing on the underside of the lid, and some creative folding of the longer cable, but worth it to get a significantly cheaper part.

After completely disassembling the unit, This by far has to be the most common failure point. After finding it for ~$75, I couldn't even fathom taking a chance on the used e-bay parts.

BTW, my knob was also broken, with the d-shaped keyway part missing. Drop of hot glue in the hole while reassembling fixed that, too. I've had it off a few times since while waiting for the new encoder. A good tug pulls it off, and some alcohol and tweezers make short work of the leftover glue residue.

I also fabricated a tool to remove the shift knob. I broke plywood, lumber, and bent 1 1/2" slotted angle iron trying to remove mine. It's easier now that it's been off a few times, but that first time was tough.

I used some c-channel from home depot, used the grinder to notch it, filed smooth, and pried up with the opposite end on a ~13" 2x4 laid up against the driver's side of the center console.

Will attach some pics in a bit from the phone.
 

Attachments

  • 20210726_184215.webp
    20210726_184215.webp
    223.9 KB · Views: 21
  • 20210726_193200.webp
    20210726_193200.webp
    84.6 KB · Views: 23
  • 20210726_193441.webp
    20210726_193441.webp
    60 KB · Views: 20
Last edited:
This is what mine did. It was working fine besides having to push it kind of hard sometimes and then it stopped responding when I’d turn the knob and now it doesn’t work at all so it is just stuck on the caution screen and I can’t press enter to get it to go away. The buttons on the side work fine. I can’t afford to replace the whole unit. So am I just going to have to live with this?
 
Looking to update and upgrade your Genesis luxury sport automobile? Look no further than right here in our own forum store - where orders are shipped immediately!
Best option is to source a new encoder and replace it. The disassembly isn't over complicated. Once you have the module out I believe the encoder is just attached by a ribbon cable like you'd find inside an older PC. It's fairly simple. Get some plastic trim tools (cheap at Harbor Freight if you have one near you) and take you're time with the disassembly.

The 2nd best option is see if you can get one from a junk yard or e-bay but I suspect they may be hard to find and questionable quality.
 
I just finished replacing the Grayhill switch this afternoon. Purchased a trim removal toolkit, as well, from Amazon. I ordered the switch from a company called DigiKey. They stock all sorts of electronic parts: https://www.digikey.com/

I did this with my car parked on the street. For safety, turn the wheels all the way to the right, shift into neutral, engage the parking brake.

Removing the shifter grip needed considerable force. To avoid bloody knuckles from striking the head unit when the shifter knob finally releases, try wearing gloves. I wore my trusty Isotoners. Also, use the shift lock override to put the car in neutral. That way, the shifter will be pointing straight up, with much less chance of your hand striking the head unit.

With the trim removal tools, the trim removal was far easier than I thought it would be. I found the most difficult part to be removing all the electrical connectors, which can be finicky.

It was far easier than I thought it would be, took a little less than an hour. Photos attached.
 

Attachments

  • 20250607_152332.webp
    20250607_152332.webp
    321.9 KB · Views: 3
  • 20250607_153403.webp
    20250607_153403.webp
    256 KB · Views: 3
  • 20250607_153906.webp
    20250607_153906.webp
    369.2 KB · Views: 4
  • 20250607_154448.webp
    20250607_154448.webp
    383.7 KB · Views: 4
  • 20250607_154508.webp
    20250607_154508.webp
    347.8 KB · Views: 3
Back
Top