• Car enthusiast? Join us on Cars Connected! iOS | Android | Desktop
  • Hint: Use a descriptive title for your new message
    If you're looking for help and want to draw people in who can assist you, use a descriptive subject title when posting your message. In other words, "I need help with my car" could be about anything and can easily be overlooked by people who can help. However, "I need help with my transmission" will draw interest from people who can help with a transmission specific issue. Be as descriptive as you can. Please also post in the appropriate forum. The "Lounge" is for introducing yourself. If you need help with your G70, please post in the G70 section - and so on... This message can be closed by clicking the X in the top right corner.

Genesis Wing Emblem Installation Process

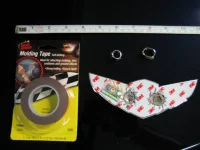
My major screw up was the rubbing compound. Just dumb. Should have used Goof-Off or some similar product to remove the residual sticky stuff. I don't know if my floss was plain or waxed or if it would have made a difference. Get some gloves, the line cuts the crap out of your fingers.:)

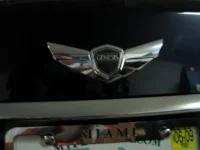
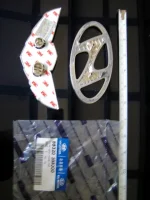
And watch the "pointy end" of the wings. They are sharp, and will scratch!

Good luck. By the time you get done, Viking will be able to do this in 5 min:D
 
BaywayRic - that sucks that it was such a pain! Since I am leasing, I will definitely have to be careful when I do the badge. I am not very handy with these types of projects so I give myself a 50/50 shot of ruining something. I did by floss already but sounds like I better return it and get some fishing line. Good thing I have the advice of this board or I would never get this done.

GenFan - what product do you recommend to get the sticky stuff off (if rubbing alcohol does not work)?
 
I guess it wasn't quite as bad as I made it sound. The garage being about 100 degrees, and me dripping sweat all over the car didn't help. More photos in my album.

picture.php
 
After you put the rubbing compound on you could have went over it with a fine polishing compound and a soft pad and it would have got rid of the scratches no problemo. Would have been easy too with a flat trunk with no badge.

GooGone is a widely recommended product for removing all types of sticky materials. I used it to help remove my badge goo on my old car as well as my old tint residue.
 
Looking to update and upgrade your Genesis luxury sport automobile? Look no further than right here in our own forum store - where orders are shipped immediately!
Just to clarify, I used Oral B Satin Floss. It must be stronger than regular floss because it didn't break. I'm sure fishing line would work just as well (if not better). I just had floss handy and it saved me a trip to the store. :)


oral_b_satin_floss_mint_1907.jpg
 
BaywayRic - that sucks that it was such a pain! Since I am leasing, I will definitely have to be careful when I do the badge. I am not very handy with these types of projects so I give myself a 50/50 shot of ruining something. I did by floss already but sounds like I better return it and get some fishing line. Good thing I have the advice of this board or I would never get this done.

GenFan - what product do you recommend to get the sticky stuff off (if rubbing alcohol does not work)?

The best thing to use is wax & grease remover. You can also use mineral spirits.
 
Just to clarify, I used Oral B Satin Floss. It must be stronger than regular floss because it didn't break. I'm sure fishing line would work just as well (if not better). I just had floss handy and it saved me a trip to the store. :)

oral_b_satin_dental_floss.jpg

and your car smelled minty fresh afterwards?
 
Geez that garage was hot.

Well I finished changing out my emblem. I got the old badge off with floss and an old gift card. It took me about 2 hours - the hardest part to me was getting the alignment and the sticky tape right! I had to remove and re-install with more tape, the self-adhesive that comes pre-installed does a poor job.

I took extra pictures of the back of the emblems so you can see what needs to be done.

Thanks for all the pointers Jwaters and BaywayRic, I couldn't have done it without you!
 

Attachments

  • IMG_0460.webp
    IMG_0460.webp
    25.6 KB · Views: 692
  • IMG_0464.webp
    IMG_0464.webp
    28.9 KB · Views: 785
  • IMG_0465.webp
    IMG_0465.webp
    16 KB · Views: 690
  • IMG_0469.webp
    IMG_0469.webp
    30 KB · Views: 731
  • IMG_0451.webp
    IMG_0451.webp
    39.7 KB · Views: 746
  • IMG_0455.webp
    IMG_0455.webp
    25.5 KB · Views: 705
  • IMG_0458.webp
    IMG_0458.webp
    32.2 KB · Views: 747
I am glad I stumbled across this post. We are installing a rear badge for a customer right now as I type. There are 2 different badges: one for the front and one for the rear. The badge you guys are using is for the front, for the hood, as it says on the package in the pic one of you posted. The correct part number for the rear is 86330-3M000, MARK ASSY-TAIL GATE. It has 2 small posts that appear to match the holes in the trunklid. I have a few pics of the emblem and I will take a few more as our tech does the install then I will load them up so you can see what I am talking about.

Your cars look great, though. I'll take a pic of his center-caps, too. They bring the whole car together.
______________________________

Help support this site so it can continue supporting you!
 
Good to know. I wonder why www.koreanutoimports.com isn't listing different emblems for the front/rear.

Would you recommend people purchase 2 of the rear emblems? It seems like it would be a bit less labor intensive to install these emblems on the hood as there would be less effort required to remove the smaller tabs, not to mention the fact that they match up w/ the existing holes on the trunk lid.
 
I would buy the front for the hood and the rear for the rear because they seem to have a different curve to them. The rear emblem seems to be flatter, as you noted that you had to build up tape under the middle of your emblem when you installed it on the truck lid. Cutting the tabs off for the front emblem is just going to come with the territory, I think. It is a minor modification to have a such a unique part.
 
Cool, thanks for this valuable info.!

I look forward to seeing pics. :)
 
EdV,
Thanks for the update, it did seem odd that the pre-installed tape did not conform well to align with the trunk. I think my tape compensated for it though.

I assume this means if that badge was for the front that in Korea their hood has two very large holes where the emblem goes...?

Is your dealership going to add the wheel caps as well?
[EDIT] ah I see that you said you were adding the caps as well. Please do share pics. Are dealers able to order these parts from HyundaiUSA?
 
I think the customer installed the center caps himself. This is probably the single biggest visual upgrade I have seen done to this car for a small amount of $. That little bit of black in the center of the wheels really pulls everything together.

WebsitePictures009.jpg

WebsitePictures012.jpg


The tabs on the back of the 86330-3M000 line up perfectly with the holes in the decklid. Once our tech removed the flying H, he just verified that the wings were level, peeled and stuck the emblem on. Looks great!

WebsitePictures008.jpg

WebsitePictures004.jpg

WebsitePictures003.jpg


Kudos to you guys for already starting the Genesis mods!!! I can't wait to see what else everyone comes up with!
 
Oooh very cool looking.
Those pics are going to make Koreanautoimports.com get more orders!

PS I just checked out their store and they have added floormats for $349
 

Attachments

  • genesisfloormats1.webp
    genesisfloormats1.webp
    11 KB · Views: 312
Thanks EVH for the updates on the part numbers. Early adopters always pay a price. Hopefully we won't find out the wheel inserts come in 'left' and 'right' :)
 
That will def make life a lot easier for all and make a more perfect fit. Good job!

I didn't know you could bring in mods for the dealer to do. Would they also do the chrome trim pieces as well?
 
Do you have any pics of the rear emblem once it's installed?

Thanks.
 
Back
Top