MattP
Getting familiar with the group...
Re: Hard Wired Radar / Laser Detectors
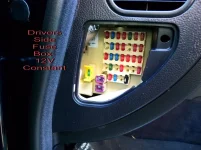
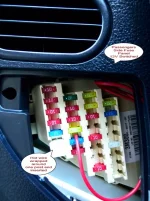
As I understand it there should be two fuse slots. The first is to place the fuse you removed to fit the connector to the box. The second is the fuse for the line you are adding (accessory, radar detector etc).
In my case, I added the connector to an empty slot, so there was no need to add the first fuse (the one closest to the plug in the photo). My radar detector already had an inline fuse so I simply added a fuse with a larger rating to the second slot (the fuse you can see in the photo)
Hope this helps.
Picked it up Autozone today. Question - why do you have a fuse connected to the black housing? Won't this work by just plugging it into the fusebox?
Forgive the novice question
As I understand it there should be two fuse slots. The first is to place the fuse you removed to fit the connector to the box. The second is the fuse for the line you are adding (accessory, radar detector etc).
In my case, I added the connector to an empty slot, so there was no need to add the first fuse (the one closest to the plug in the photo). My radar detector already had an inline fuse so I simply added a fuse with a larger rating to the second slot (the fuse you can see in the photo)
Hope this helps.
")