• Car enthusiast? Join us on Cars Connected! iOS | Android | Desktop
  • Hint: Use a descriptive title for your new message
    If you're looking for help and want to draw people in who can assist you, use a descriptive subject title when posting your message. In other words, "I need help with my car" could be about anything and can easily be overlooked by people who can help. However, "I need help with my transmission" will draw interest from people who can help with a transmission specific issue. Be as descriptive as you can. Please also post in the appropriate forum. The "Lounge" is for introducing yourself. If you need help with your G70, please post in the G70 section - and so on... This message can be closed by clicking the X in the top right corner.

License plate lights.

I just replaced one of my license plate lights. It was dim, and although it passed state inspection I still wanted to replace it. They may not have noticed it in the shop lighting during the inspection, but the difference was very noticeable at night.

I also expected this to be a much easier job than it was. I'll add a write-up here instead of making a new thread:
  1. Time: 1-2 h. It can probably be done in about an hour if you know what to do.
  2. Tools: Small Phillips screwdriver, large Phillips screwdriver, small flat blade screwdriver, 10 mm nut driver, plastic pry tool (you can use a flat blade screwdriver, but you risk scratching some of the components).
  3. Open the warning triangle holder (small plastic bracket in the top center of the trunk lid), and remove the single screw holding it in place. It hooks into the trunk using curved hooks at the end, as shown in the picture.
  4. Remove the single Phillips screw on the handle inside the trunk. You can leave the handle connected to the carpet, it'll come out with the carpet.
  5. There are two push pins located on the side of the plastic cover over each hinge, as shown in the picture. Press the center of the push pin in about 1/8", then pry out the pin.
  6. Insert a small flat blade screwdriver into the four push pins holding the carpet to the trunk lid and pry up the center pin. Then, pry the entire pin out of its hole.
  7. Gently pull the carpet away from the trunk lid. The handle and the plastic cover over the trunk latch should come out with the carpet, but you can remove them separately if desired. The trunk closing buttons remain installed, and the carpet flexes around them.
  8. Remove the three 10 mm nuts holding each tail light into the trunk lid and remove the tail lights.
  9. Remove the three 10 mm nuts holding the body panel with the license plate. I removed the license plate, but I'm not sure if this is required. Gently pry the body panel away from the trunk lid. You'll feel the push pins give as you pry.
  10. Remove the four small Phillips screws in the yellow clips that hold the trim piece above the license plate where the lights are mounted. You can see two of them in the picture. The one on the left-hand side is hidden behind a round black component (possibly an actuator to open the trunk remotely). I did not remove it since I was replacing the right side light. I could flex the panel away to remove the light. If you need to replace the left side light, you may need to remove this component to access the screw.
  11. Use a small flat blade screwdriver to press the top of the clip that holds the wire connector into the license plate light and pull. It shouldn't take much force to pull out; if it won't come out you need to press the clip harder.
  12. Squeeze the gray clips on the side of the license plate light and push it out through the panel.
  13. Reinstall everything in reverse order. To install the plastic push pins: Back out or remove the center pin, insert the outer portion into the hole, them push the center pin until it's flush with the outer portion.
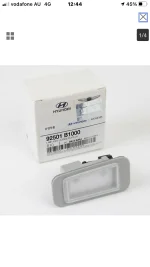
Do you happen to have a part number for the license plate LED? I just saw one of mine is very dim and in need of replacement.

Thanks!
 
Do you happen to have a part number for the license plate LED? I just saw one of mine is very dim and in need of replacement.

Thanks!
Hi
1630117041425.webp
 
Looking to update and upgrade your Genesis luxury sport automobile? Look no further than right here in our own forum store - where orders are shipped immediately!
They're different parts for the left and right side. 92501-B1000 is for the left-hand side, and 92502-B1000 is for the right-hand side.
 
Thank you so much for your help I will give it a go
I think as these cars age we will run into similar tough maintenance issues. Thanks to whom ever created this thread. So the order of operations is:

Removed trunk liner
Remove tail lights (3 nuts and connector per light)
Remove G80 panel (three nuts and the rest plastic retainers (angry emoji).
Remove camera panel (6 plastic retainers)
Change light
Reinstall in opposite order.

I broke like three of the plastic retainers but oh well. Oh make sure to plug in new bulb before doing this maintenance to make sure it’s the LED bulb burned out and not a wiring issue. Follow the amazing pics that are above, great job.

Total time 2 hours
 
More kudos to StarPower for his helpful writeup.

Just finished mine; Gmason369 has it right: angry by the time I got he big panel off; broke 5 clips, bought all new, and then decided to use just 50% of them; that panel isn't going anywhere with 5 bolts securing it.

Like the others, I sacrificed the yellow clip with tiny Phillips screw on the far driver's end; necessary if you're replacing the driver's side light.

One other possibility: after removing all those tiny Phillips , I realized their yellow clips might come out without removing the Phillips.
I pulled all the yellow clips with the panel removed; turns out you can slip a 9mm open end wrench over them, from inside the trunk, to depress the side wings, and they will pop out; beware: they may go 10 feet!

Then it was much easier going back together to install the Phillips through the clips into the panel; easy to snap them all back in. Next time I'll try the 9mm trick before removing those tiny screws.
 
I bought the license plate light assembly on line for cheap and the dealer charged me $15.00 to change it. So I didn't try to take the trunk apart.
 
I bought the license plate light assembly on line for cheap and the dealer charged me $15.00 to change it. So I didn't try to take the trunk apart.
Hello there, do you know where you got the light assembly? One of my lights is very dim and wanted to change it thanks
 
I just replaced one of my license plate lights. It was dim, and although it passed state inspection I still wanted to replace it. They may not have noticed it in the shop lighting during the inspection, but the difference was very noticeable at night.

I also expected this to be a much easier job than it was. I'll add a write-up here instead of making a new thread:
  1. Time: 1-2 h. It can probably be done in about an hour if you know what to do.
  2. Tools: Small Phillips screwdriver, large Phillips screwdriver, small flat blade screwdriver, 10 mm nut driver, plastic pry tool (you can use a flat blade screwdriver, but you risk scratching some of the components).
  3. Open the warning triangle holder (small plastic bracket in the top center of the trunk lid), and remove the single screw holding it in place. It hooks into the trunk using curved hooks at the end, as shown in the picture.
  4. Remove the single Phillips screw on the handle inside the trunk. You can leave the handle connected to the carpet, it'll come out with the carpet.
  5. There are two push pins located on the side of the plastic cover over each hinge, as shown in the picture. Press the center of the push pin in about 1/8", then pry out the pin.
  6. Insert a small flat blade screwdriver into the four push pins holding the carpet to the trunk lid and pry up the center pin. Then, pry the entire pin out of its hole.
  7. Gently pull the carpet away from the trunk lid. The handle and the plastic cover over the trunk latch should come out with the carpet, but you can remove them separately if desired. The trunk closing buttons remain installed, and the carpet flexes around them.
  8. Remove the three 10 mm nuts holding each tail light into the trunk lid and remove the tail lights.
  9. Remove the three 10 mm nuts holding the body panel with the license plate. I removed the license plate, but I'm not sure if this is required. Gently pry the body panel away from the trunk lid. You'll feel the push pins give as you pry.
  10. Remove the four small Phillips screws in the yellow clips that hold the trim piece above the license plate where the lights are mounted. You can see two of them in the picture. The one on the left-hand side is hidden behind a round black component (possibly an actuator to open the trunk remotely). I did not remove it since I was replacing the right side light. I could flex the panel away to remove the light. If you need to replace the left side light, you may need to remove this component to access the screw.
  11. Use a small flat blade screwdriver to press the top of the clip that holds the wire connector into the license plate light and pull. It shouldn't take much force to pull out; if it won't come out you need to press the clip harder.
  12. Squeeze the gray clips on the side of the license plate light and push it out through the panel.
  13. Reinstall everything in reverse order. To install the plastic push pins: Back out or remove the center pin, insert the outer portion into the hole, them push the center pin until it's flush with the outer portion.
Thanks. Any detail (additional - part no. /name) re extra clips? My dealer says $750.00 to replace. Please repost video/picture/link. Thanks
 
Back
Top