

Beeswax
2016 Hyundai Genesis DH 3.8 V6 RWD
- Joined
- Jan 8, 2020
- Messages
- 86
- Reaction score
- 89
- Points
- 18
- Location
- Chicago Illinois
- Genesis Model Type
- 2G Genesis Sedan (2015-2016)
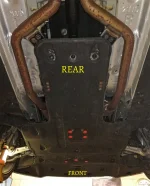
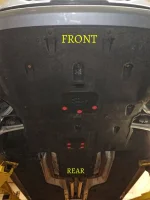
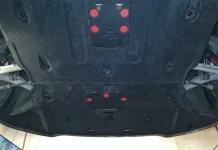
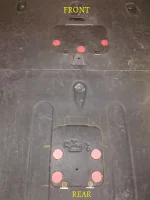
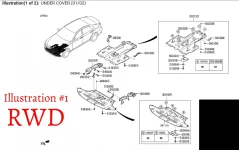
Have decided to fabricate the 2 original Under Body Panels (UBP) on my 2016 Genesis 3.8 RWD by cutting-out windows for easy access to oil filter and drain plug, to save time & money, for either a DIY or taking it to a shop. Newer 2017+ G80's UBP were updated and DO already have the EZ Access Panel/Covers (APC).
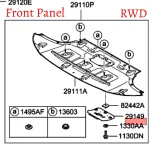
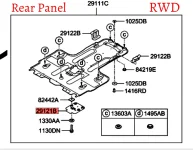
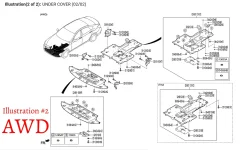
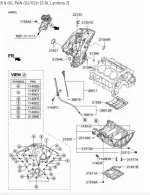
I'm pretty sure this can be done on ALL models of the same years (2015-16), despite the engine size or being an AWD/RWD (AWD's differ slightly with different part #'s, according to OEM catalog illustrations). See all attachments below.
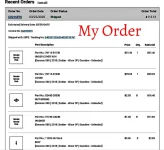
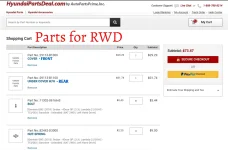
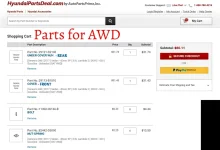
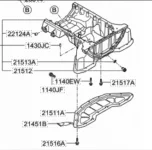
OEM catalog shows separate part #'s for these 2 small Access Panel/Covers (APC) on 2017+ models, which you can purchase at a fraction of the cost, of buying the whole/complete 2 new Under Body Panels (UBP) and worrying if they will properly fit or need additional hardware.
I'll try to make this DIY as easy as possible by listing part numbers for AWD & RWD models (according to OEM catalog), also, by attaching lots of photos.
Abbreviations:
UBP = Under Body Panels (2 Big Pieces)
APC = Access Panel/Covers (2 Smaller Pieces)
RECOMMENDATIONS:
1) Do your own search to make sure the parts will fit your specific application!
2) MEASURE - MARK - TEST FIT and repeat as many times needed, before you start cutting your own UBPs!
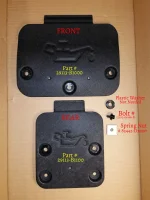
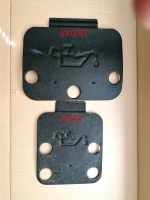
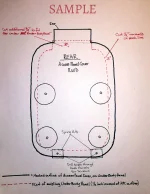
3) DO NOT CUT OPENINGS ON THE UBP AS BIG AS THE APC! The openings you will be cutting on your UBP will NEED to be 1/2" inwards/smaller all around the actual size of the APC, so it supports itself on the UBP, and doesn't cave-in (see my artistic illustration lol)
3) You will need 2 extra hands! (1 person holding the UBP as you're test fitting and 1 for holding the APC against the UBP to mark around it)
4) A 1.5"-2" hole saw to open a hole on your UBP after you mark it, so you can look through with a flashlight and see if it aligns with the oil filter & drain plug above, as your are test fitting the UBP.
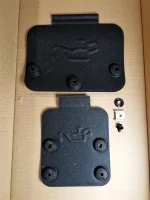
5) Order a few extra screws and plastic clips to have, as you might have some missing or broken on your UBP, from previous oil changes at dealer/shops. A couple extra Spring Washes don't hurt either.
6) The round pre-stamped/imprints on the APC will not be needed for our UBP. I cut mine off and glued pieces of thin hard plastic behind for a flushed look, plus so they won't interfere with the 1/2" space from the cut. Red color plastic is all I had available, but I will be spray painting both UBP black.
This whole DIY project was a 2.5 hour process, between me and a friend with the car being high on a lift. But, oil & filter changes will be a piece of cake from now on. ONLY 4 10mm BOLTS!!!
Some guys here like to use the fluid suction pumps as a convenient way to change the oil. Sure, it is much easier, but what about the oil filter that's in an awkward position to get to from the top?..are you changing it? And what about all that sludge that can accumulate over time at the bottom of the oil pan that the suction method can not and WILL not get to. Nothing is better then taking off the oil drain plug and gushing out ALL the old oil, along with any sludge at the bottom. No die-hard "gearhead" will ever use a fluid suction pump for their oil change.
I hope you find this thread useful and hope I didn't confuse you to much

NOTE: Scroll down to Post #2 for more attachments on this DIY
I'm pretty sure this can be done on ALL models of the same years (2015-16), despite the engine size or being an AWD/RWD (AWD's differ slightly with different part #'s, according to OEM catalog illustrations). See all attachments below.
OEM catalog shows separate part #'s for these 2 small Access Panel/Covers (APC) on 2017+ models, which you can purchase at a fraction of the cost, of buying the whole/complete 2 new Under Body Panels (UBP) and worrying if they will properly fit or need additional hardware.
I'll try to make this DIY as easy as possible by listing part numbers for AWD & RWD models (according to OEM catalog), also, by attaching lots of photos.
Abbreviations:
UBP = Under Body Panels (2 Big Pieces)
APC = Access Panel/Covers (2 Smaller Pieces)
RECOMMENDATIONS:
1) Do your own search to make sure the parts will fit your specific application!
2) MEASURE - MARK - TEST FIT and repeat as many times needed, before you start cutting your own UBPs!
3) DO NOT CUT OPENINGS ON THE UBP AS BIG AS THE APC! The openings you will be cutting on your UBP will NEED to be 1/2" inwards/smaller all around the actual size of the APC, so it supports itself on the UBP, and doesn't cave-in (see my artistic illustration lol)
3) You will need 2 extra hands! (1 person holding the UBP as you're test fitting and 1 for holding the APC against the UBP to mark around it)
4) A 1.5"-2" hole saw to open a hole on your UBP after you mark it, so you can look through with a flashlight and see if it aligns with the oil filter & drain plug above, as your are test fitting the UBP.
5) Order a few extra screws and plastic clips to have, as you might have some missing or broken on your UBP, from previous oil changes at dealer/shops. A couple extra Spring Washes don't hurt either.
6) The round pre-stamped/imprints on the APC will not be needed for our UBP. I cut mine off and glued pieces of thin hard plastic behind for a flushed look, plus so they won't interfere with the 1/2" space from the cut. Red color plastic is all I had available, but I will be spray painting both UBP black.
This whole DIY project was a 2.5 hour process, between me and a friend with the car being high on a lift. But, oil & filter changes will be a piece of cake from now on. ONLY 4 10mm BOLTS!!!
Some guys here like to use the fluid suction pumps as a convenient way to change the oil. Sure, it is much easier, but what about the oil filter that's in an awkward position to get to from the top?..are you changing it? And what about all that sludge that can accumulate over time at the bottom of the oil pan that the suction method can not and WILL not get to. Nothing is better then taking off the oil drain plug and gushing out ALL the old oil, along with any sludge at the bottom. No die-hard "gearhead" will ever use a fluid suction pump for their oil change.
I hope you find this thread useful and hope I didn't confuse you to much
NOTE: Scroll down to Post #2 for more attachments on this DIY
Attachments
-
 20200413_010236.webp186.9 KB · Views: 275
 -
 IMG_20200410_225216.webp143.8 KB · Views: 258
 -
 20200413_011227.webp112.2 KB · Views: 252
 -
 IMG_20200410_225355.webp135.4 KB · Views: 254
 -
 IMG_20200401_145039_20200413164455652_20200415130018852.webp219.3 KB · Views: 256
 -
 IMG_20200401_145214_20200413012959583.webp163.1 KB · Views: 227
 -
 IMG_20200411_220131.webp120.2 KB · Views: 224
 -
 IMG_20200402_084605.webp250.2 KB · Views: 223
 -
 IMG_20200415_130527.webp178.8 KB · Views: 259
 -
 Screenshot_20200413-163145_Chrome_20200415163530216.webp41.2 KB · Views: 274
Last edited:


 ..either way we SHOULD be supporting the ones that intrest us by subscribing to their channels for any free info they offer and is useful for us.


 . I'm sure you can manage to use the cut-out portion of the UBP as access covers, but you'll need to be very precise on the cut, which will be difficult without a stencil, which will be the actual access covers.
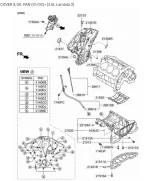
 Not saying it didn't work for you for that truck, but as you said every motor and oil pan design can vary.


