• Car enthusiast? Join us on Cars Connected! iOS | Android | Desktop
  • Hint: Use a descriptive title for your new message
    If you're looking for help and want to draw people in who can assist you, use a descriptive subject title when posting your message. In other words, "I need help with my car" could be about anything and can easily be overlooked by people who can help. However, "I need help with my transmission" will draw interest from people who can help with a transmission specific issue. Be as descriptive as you can. Please also post in the appropriate forum. The "Lounge" is for introducing yourself. If you need help with your G70, please post in the G70 section - and so on... This message can be closed by clicking the X in the top right corner.

EZ Oil & Filter Change on 2015-2016 Models (DIY Access Panel/Covers)

Beeswax

2016 Hyundai Genesis DH 3.8 V6 RWD
Joined
Jan 8, 2020
Messages
86
Reaction score
89
Points
18
Location
Chicago Illinois
Genesis Model Type
2G Genesis Sedan (2015-2016)
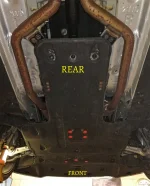
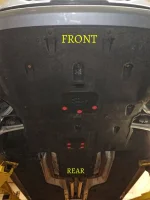
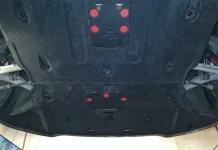
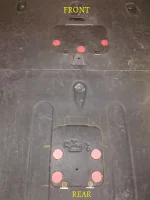
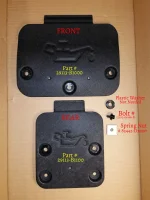
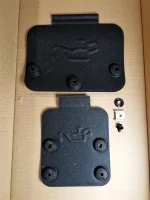
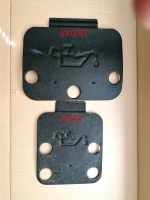
Have decided to fabricate the 2 original Under Body Panels (UBP) on my 2016 Genesis 3.8 RWD by cutting-out windows for easy access to oil filter and drain plug, to save time & money, for either a DIY or taking it to a shop. Newer 2017+ G80's UBP were updated and DO already have the EZ Access Panel/Covers (APC).

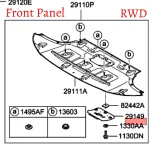
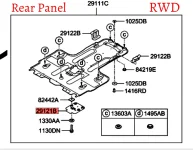
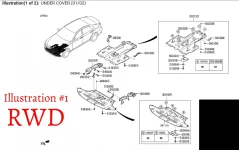
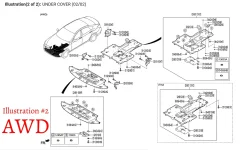
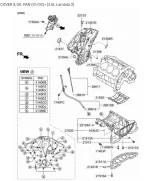
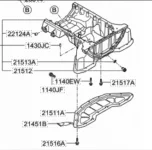
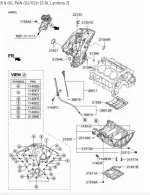
I'm pretty sure this can be done on ALL models of the same years (2015-16), despite the engine size or being an AWD/RWD (AWD's differ slightly with different part #'s, according to OEM catalog illustrations). See all attachments below.

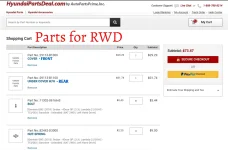
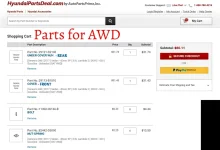
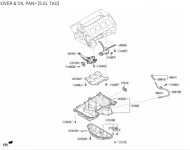
OEM catalog shows separate part #'s for these 2 small Access Panel/Covers (APC) on 2017+ models, which you can purchase at a fraction of the cost, of buying the whole/complete 2 new Under Body Panels (UBP) and worrying if they will properly fit or need additional hardware.

I'll try to make this DIY as easy as possible by listing part numbers for AWD & RWD models (according to OEM catalog), also, by attaching lots of photos.

Abbreviations:
UBP = Under Body Panels (2 Big Pieces)
APC = Access Panel/Covers (2 Smaller Pieces)

RECOMMENDATIONS:

1) Do your own search to make sure the parts will fit your specific application!
2) MEASURE - MARK - TEST FIT and repeat as many times needed, before you start cutting your own UBPs!
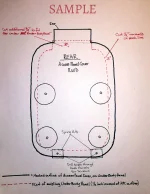
3) DO NOT CUT OPENINGS ON THE UBP AS BIG AS THE APC! The openings you will be cutting on your UBP will NEED to be 1/2" inwards/smaller all around the actual size of the APC, so it supports itself on the UBP, and doesn't cave-in (see my artistic illustration lol)
3) You will need 2 extra hands! (1 person holding the UBP as you're test fitting and 1 for holding the APC against the UBP to mark around it)
4) A 1.5"-2" hole saw to open a hole on your UBP after you mark it, so you can look through with a flashlight and see if it aligns with the oil filter & drain plug above, as your are test fitting the UBP.
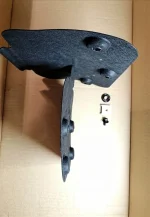
5) Order a few extra screws and plastic clips to have, as you might have some missing or broken on your UBP, from previous oil changes at dealer/shops. A couple extra Spring Washes don't hurt either.
6) The round pre-stamped/imprints on the APC will not be needed for our UBP. I cut mine off and glued pieces of thin hard plastic behind for a flushed look, plus so they won't interfere with the 1/2" space from the cut. Red color plastic is all I had available, but I will be spray painting both UBP black.

This whole DIY project was a 2.5 hour process, between me and a friend with the car being high on a lift. But, oil & filter changes will be a piece of cake from now on. ONLY 4 10mm BOLTS!!!

Some guys here like to use the fluid suction pumps as a convenient way to change the oil. Sure, it is much easier, but what about the oil filter that's in an awkward position to get to from the top?..are you changing it? And what about all that sludge that can accumulate over time at the bottom of the oil pan that the suction method can not and WILL not get to. Nothing is better then taking off the oil drain plug and gushing out ALL the old oil, along with any sludge at the bottom. No die-hard "gearhead" will ever use a fluid suction pump for their oil change. :nonono:

I hope you find this thread useful and hope I didn't confuse you to much 🤯🙂

NOTE: Scroll down to Post #2 for more attachments on this DIY 👇
 

Attachments

  • 20200413_010236.webp
    20200413_010236.webp
    186.9 KB · Views: 274
  • IMG_20200410_225216.webp
    IMG_20200410_225216.webp
    143.8 KB · Views: 257
  • 20200413_011227.webp
    20200413_011227.webp
    112.2 KB · Views: 251
  • IMG_20200410_225355.webp
    IMG_20200410_225355.webp
    135.4 KB · Views: 253
  • IMG_20200401_145039_20200413164455652_20200415130018852.webp
    IMG_20200401_145039_20200413164455652_20200415130018852.webp
    219.3 KB · Views: 255
  • IMG_20200401_145214_20200413012959583.webp
    IMG_20200401_145214_20200413012959583.webp
    163.1 KB · Views: 227
  • IMG_20200411_220131.webp
    IMG_20200411_220131.webp
    120.2 KB · Views: 223
  • IMG_20200402_084605.webp
    IMG_20200402_084605.webp
    250.2 KB · Views: 222
  • IMG_20200415_130527.webp
    IMG_20200415_130527.webp
    178.8 KB · Views: 258
  • Screenshot_20200413-163145_Chrome_20200415163530216.webp
    Screenshot_20200413-163145_Chrome_20200415163530216.webp
    41.2 KB · Views: 273
Last edited:
....More attachments
 

Attachments

  • 20200413_000542.webp
    20200413_000542.webp
    81.9 KB · Views: 116
  • 20200412_235827.webp
    20200412_235827.webp
    75.6 KB · Views: 115
  • 20200413_001705_20200413002103912.webp
    20200413_001705_20200413002103912.webp
    98.6 KB · Views: 97
  • 20200413_002236.webp
    20200413_002236.webp
    118.1 KB · Views: 100
  • 20200413_000946_20200413165243321.webp
    20200413_000946_20200413165243321.webp
    65.8 KB · Views: 114
  • 20200413_001353_20200413165803041.webp
    20200413_001353_20200413165803041.webp
    44 KB · Views: 117
  • Screenshot_20200415-162620_Chrome.webp
    Screenshot_20200415-162620_Chrome.webp
    70.4 KB · Views: 97
  • Screenshot_20200413-163145_Chrome_20200415163530216.webp
    Screenshot_20200413-163145_Chrome_20200415163530216.webp
    41.2 KB · Views: 108
Exceptional write-up! Very valuable for the do-it-yourself oil change guys...

Well done. You could be a well paid technical writer...
 
Very nice modification. I thought about just cutting a hole in my stock covers at first, but decided to go for the clean stock look. However, you saved a lot of money by just cutting holes and installing the doors as opposed to buying the entire cover set with the hole cutouts. Plus, it looks good.

You did what I would have done in my 20's; get creative and save some money :)
How correct you are carguy75... 25 years ago I already would have done the mods. Its sucks getting older just for that reason. After working on Heavy Equipment/ Heavy Trucks all day I have no desire to fix/ repair my own stuff!!!🙂
 
Exceptional write-up! Very valuable for the do-it-yourself oil change guys...

Well done. You could be a well paid technical writer...
Thank you!..but a well paid technical writer?..not even close..but I liked it 😄
I've been an automobile enthusiast for 40+ years and I think sharing information with other enthusiasts should be free of charge! Look at all the youtubers offering free information for everyone without asking for money. Sure, the more successful ones will get a percentage through YouTube for advertisements on their channels, but it's still free info for all the viewers. The only thing they are asking viewers is to like and hit that subscribe button 😀..either way we SHOULD be supporting the ones that intrest us by subscribing to their channels for any free info they offer and is useful for us.
 
Very nice modification. I thought about just cutting a hole in my stock covers at first, but decided to go for the clean stock look. However, you saved a lot of money by just cutting holes and installing the doors as opposed to buying the entire cover set with the hole cutouts. Plus, it looks good.

You did what I would have done in my 20's; get creative and save some money :)
Thanks! I thought about doing this since my 1st diy oil change when I purchased this car back in January 2020 when I found out that you need to remove the 2 whole panels for an oil change?! That sucked! Then, I joined this forum and ran into your thread about the panels you replaced on your 15' 5.0 and inspired me to look further into this. I figured that I'd try doing the small access panels 1st, since they had a separate part # from the complete panels, and if I would screw-up, I would then order them complete. Your thread photos really helped alot!..by giving me an idea to where the holes need to be placed and cut. Whould you mind if I add a direct link on my original post that whould direct our members straight to your thread, in case they need any additional info or even replacing the complete panels?
Btw, I wish I was still in my 20s, try mid 50s!🤭😁
PS I've been off work for the past 6 weeks due to foot injury and had plenty of time to do what I have done so far to my car. Back to work this coming Monday 😔
 
Im debating on just asking my mechanic shop to cut two holes in mine. I bought the car used a few years ago and whoever was doing the oil changes before butchered the underbody pieces so some of them are zip tied under the car.
 
LOVED the post!
WELL done! Thank You!
I've been considering this since I first bought my car, but was talked into the pump-out method.
Not having a lift, I really don't feel like taking the whole panel down, just to pop a hole in it for the drain plug.
I would use a big hole saw. (see link below)

I Just would like to know "WHERE EXACTLY" to drill...since the oil doesn't typically fall "straight" down from the plug, you need to adjust in the direction of the "flow", and still have the last trickle not landing on the panel. I see you cheated a little to the drivers side....was that on purpose/for that reason?

Do you happen to have any measurements, like from the rivet to the front edge of the access door?
Or even how big the actual door IS?, I could probably figure it out by knowing THAT dimension.

I access the oil filter no problem from the top, on the 3.8, but while I'm at it, I'd probably do that one too.
Like I think Warnock above is alluding to....do you REALLY think having the "doors" makes THAT big of a difference? To aerodynamics? Cooling?
Unless you drive like Tiger Woods, nobody will ever SEE the bottom of your vehicle....and at THAT point, that would be the LEAST of my worries. LOL

Additionally, you could save $60 in OEM panels, by using the piece you hole-sawed out as your door.
Screw a small ALL brass hinge to the circle, then to the UBP.. Glue/screw a little plastic tab/keeper to the circle, to keep/screw it closed...


THIS would work just fine through thin plastic....be careful/don't drill too fast...
______________________________

Help support this site so it can continue supporting you!
 
LOVED the post!
WELL done! Thank You!
I've been considering this since I first bought my car, but was talked into the pump-out method.
Not having a lift, I really don't feel like taking the whole panel down, just to pop a hole in it for the drain plug.
I would use a big hole saw. (see link below)

I Just would like to know "WHERE EXACTLY" to drill...since the oil doesn't typically fall "straight" down from the plug, you need to adjust in the direction of the "flow", and still have the last trickle not landing on the panel. I see you cheated a little to the drivers side....was that on purpose/for that reason?

Do you happen to have any measurements, like from the rivet to the front edge of the access door?
Or even how big the actual door IS?, I could probably figure it out by knowing THAT dimension.

I access the oil filter no problem from the top, on the 3.8, but while I'm at it, I'd probably do that one too.
Like I think Warnock above is alluding to....do you REALLY think having the "doors" makes THAT big of a difference? To aerodynamics? Cooling?
Unless you drive like Tiger Woods, nobody will ever SEE the bottom of your vehicle....and at THAT point, that would be the LEAST of my worries. LOL

Additionally, you could save $60 in OEM panels, by using the piece you hole-sawed out as your door.
Screw a small ALL brass hinge to the circle, then to the UBP.. Glue/screw a little plastic tab/keeper to the circle, to keep/screw it closed...


THIS would work just fine through thin plastic....be careful/don't drill too fast...
One could save the $ by using the cut out. However the factory look makes me feel warm and fuzzy inside!!🙂
 
One could save the $ by using the cut out. However the factory look makes me feel warm and fuzzy inside!!🙂
So true. I would feel a bit put-off with a hack job(I have poor fabrication skills) of a modification on such a nice ride every time I look at it. However, when I was younger and had less of a income I would have cut the holes in the cover without much thought since nobody who matters will see it aside from myself.

Now I can just spend the extra money and do the job right.
I totally agree carguy75. I did things differently 30 years ago. When I change my oil now ,It's very easy to do so and I feel as though the car is worth it.
I used my old panels and cut my own holes ,however the correct style access doors make it look stock!
 
Every time I go in for an oil change, one of my fears it that they are going to screw up putting the panels back on. This would fix that fear. But I don't want to crawl under there to do it. I might know a mechanic that I trust that would, for a price. The other thing that pisses me off is over filling the oil. Most places fill using the manufacturers capacity which is great if they were able to get ALL of the oil out and it was a dry fill. When doing an oil change, it's not possible to get all of the oil out, even if you left the plug out all night! Last place I went to, I told them to fill it 1/4 qt low and it was right on the full line.
 
No die-hard "gearhead" will ever use a fluid suction pump for their oil change. :nonono:
I found your article informative and am considering doing it, but I used to own an oil change business and we had a fluid extractor mostly used for gear boxes. I used it a few times for over fills too. But 1 time a truck came in with a bad plug underneath that looked to be a problem if we removed it. So I extracted the oil through the dipstick tube. I know how much oil it takes for that type of engine and I know that pulling the plug underneath leaves 1/4 to 1/2 a quart in the oil pan because the nut welded in the bottom of the pan sticks up. The hose from the extractor was able to go to the bottom of the pan and get more oil out than draining! The suction device has a marked reservoir showing the amount removed and I know how much I put in when I refilled it and it was more than what that engine takes by 1/4 a quart. I was impressed! It does remove the oil slower than draining, so solids have more time to drift down, but you are also pulling from the bottom, so maybe you're getting more solids. I didn't switch to using that as a method of oil changes. Many vehicles don't have a straight shot to the bottom of the pan from the dip tube. But that 1 vehicle was an eye opening experience that took place in the early '90's.
 
I found your article informative and am considering doing it, but I used to own an oil change business and we had a fluid extractor mostly used for gear boxes. I used it a few times for over fills too. But 1 time a truck came in with a bad plug underneath that looked to be a problem if we removed it. So I extracted the oil through the dipstick tube. I know how much oil it takes for that type of engine and I know that pulling the plug underneath leaves 1/4 to 1/2 a quart in the oil pan because the nut welded in the bottom of the pan sticks up. The hose from the extractor was able to go to the bottom of the pan and get more oil out than draining! The suction device has a marked reservoir showing the amount removed and I know how much I put in when I refilled it and it was more than what that engine takes by 1/4 a quart. I was impressed! It does remove the oil slower than draining, so solids have more time to drift down, but you are also pulling from the bottom, so maybe you're getting more solids. I didn't switch to using that as a method of oil changes. Many vehicles don't have a straight shot to the bottom of the pan from the dip tube. But that 1 vehicle was an eye opening experience that took place in the early '90's.
I would have just used my oil extractor for my oil changes to avoid removing the lower panels if my oil filter was located on top of the engine. However, I still have to jack up the car and crawl under it to access the oil filter so I just installed to newer panels with cutouts.

Nothing wrong with working smarter, but the oil extractor alone does not work for my 2015 oil changes unless I do not change the filter. I always change my oil filter during my oil changes.
 
LOVED the post!
WELL done! Thank You!
I've been considering this since I first bought my car, but was talked into the pump-out method.
Not having a lift, I really don't feel like taking the whole panel down, just to pop a hole in it for the drain plug.
I would use a big hole saw. (see link below)

I Just would like to know "WHERE EXACTLY" to drill...since the oil doesn't typically fall "straight" down from the plug, you need to adjust in the direction of the "flow", and still have the last trickle not landing on the panel. I see you cheated a little to the drivers side....was that on purpose/for that reason?

Do you happen to have any measurements, like from the rivet to the front edge of the access door?
Or even how big the actual door IS?, I could probably figure it out by knowing THAT dimension.

I access the oil filter no problem from the top, on the 3.8, but while I'm at it, I'd probably do that one too.
Like I think Warnock above is alluding to....do you REALLY think having the "doors" makes THAT big of a difference? To aerodynamics? Cooling?
Unless you drive like Tiger Woods, nobody will ever SEE the bottom of your vehicle....and at THAT point, that would be the LEAST of my worries. LOL

Additionally, you could save $60 in OEM panels, by using the piece you hole-sawed out as your door.
Screw a small ALL brass hinge to the circle, then to the UBP.. Glue/screw a little plastic tab/keeper to the circle, to keep/screw it closed...


THIS would work just fine through thin plastic....be careful/don't drill too fast...

Thank you!
If aesthetics don't bother you and don't want to spend the $60 bucks, I guess the easy way out whould be to leave it open, which I don't think it whould make significant difference in aerodynamics, cooling? or even mpg. Unfortunately I don't have measurements for those access covers, but if you look carefully at my attached photos above, you can get an idea where they go. Heck, you noticed the off-centered cover (yes for the oil flow)😆. I'm sure you can manage to use the cut-out portion of the UBP as access covers, but you'll need to be very precise on the cut, which will be difficult without a stencil, which will be the actual access covers.

You didn't mention if you have the RWD or AWD 3.8! If you have the AWD, the REAR UBP will need to be cut at a different spot towards the left (driver's side) of the UBP. I'm assuming but not 100% sure, due to the oil plug location and oil flow that would be coming out of that side. See attachment below for the AWD, but might be misleading, cause the AWD 3.8 uses a different oil pan then the RWD 3.8 and the oil drain plug might be on the oil pan it self instead of the block, otherwise why would the access cover be off-centered on the AWD?!..must be for a reason. Either way, if you do have AWD double check underneath to order the correct parts. The 3.8 RWD and 5.0 RWD have the drain plug centered facing the rear along with the oil flow. The oil plug on the 3.8 RWD screws into the engine block and the 5.0 RWD screws into the oil pan, but still facing same direction. Hyundai parts catalog shows different part numbers for the 3 models (3.8 RWD - 3.8 AWD - 5.0 RWD). Although slightly different access covers for the 3.8 RWD & 5.0 RWD, the locations remain at same spots..so you can use either covers for DIY! On the other hand, for the AWD you can use the same AC for the front (filter side) as the RWDs, BUT, you'll need to order the correct AC for the rear UBP! See above at my #2 post of this thread where I have attached catalog photos of the UBP that show locations of the ACs, also the correct part numbers. I hope it all makes sense 😄

Here is a link to Carguy75's awesome thread where he replaced both UBPs completely on his 15' 5.0 which might help you further of the correct location of these access covers.
 

Attachments

  • 20210313_230240.webp
    20210313_230240.webp
    72.5 KB · Views: 11
  • 20210313_230316.webp
    20210313_230316.webp
    49.5 KB · Views: 9
  • 20210313_225600.webp
    20210313_225600.webp
    66.9 KB · Views: 8
  • 20210313_225742.webp
    20210313_225742.webp
    40 KB · Views: 9
Last edited:
Looking to update and upgrade your Genesis luxury sport automobile? Look no further than right here in our own forum store - where orders are shipped immediately!
I found your article informative and am considering doing it, but I used to own an oil change business and we had a fluid extractor mostly used for gear boxes. I used it a few times for over fills too. But 1 time a truck came in with a bad plug underneath that looked to be a problem if we removed it. So I extracted the oil through the dipstick tube. I know how much oil it takes for that type of engine and I know that pulling the plug underneath leaves 1/4 to 1/2 a quart in the oil pan because the nut welded in the bottom of the pan sticks up. The hose from the extractor was able to go to the bottom of the pan and get more oil out than draining! The suction device has a marked reservoir showing the amount removed and I know how much I put in when I refilled it and it was more than what that engine takes by 1/4 a quart. I was impressed! It does remove the oil slower than draining, so solids have more time to drift down, but you are also pulling from the bottom, so maybe you're getting more solids. I didn't switch to using that as a method of oil changes. Many vehicles don't have a straight shot to the bottom of the pan from the dip tube. But that 1 vehicle was an eye opening experience that took place in the early '90's.

Thank you!
The fluid extractor method is very popular in Europe for oil changes, they also change the oil filter every 2nd oil change most of the time. I lived in Greece a few years back and had a 2007 Seat Leon FR with the 2.0 TFSI motor. I actually tested the fluid extraction method one time on my car till it sucked all the oil out. I immediately raised the car afterwards and opened the oil drain plug to see if any more oil whould come out and it DID! Not much, maybe less then a quarter liter, but still came out. In some cases like you said, you don't even know where the extraction tube bottoms out if there are any baffles in the oil pan. For sure it's much easier to extract it through the dipstick tube but with my experience I prefer the old gravity way by unscrewing the drain plug, plus getting more dirt out of there. I always use a magnetic oil drain plug in all my cars and there's always some fine metal shavings stuck on it when I do oil changes. Everybody has their own way of taking care of their baby..heck, some people don't even change the oil 😱 Not saying it didn't work for you for that truck, but as you said every motor and oil pan design can vary.
 
So true. I would feel a bit put-off with a hack job(I have poor fabrication skills) of a modification on such a nice ride every time I look at it. However, when I was younger and had less of a income I would have cut the holes in the cover without much thought since nobody who matters will see it aside from myself.

Now I can just spend the extra money and do the job right.

Lol, that would also put me off knowing it's hacked under there.
I have dropped both of the UBPs since doing the DIY access covers and spray painted them black. They now look much better than the photos I originally posted (no more red polka-dots lol). If you don't have anything to compare them with, you'd think it's original! The money I saved by going this route, I bought myself the AEM cold air intake 😉
 
I would have just used my oil extractor for my oil changes to avoid removing the lower panels if my oil filter was located on top of the engine. However, I still have to jack up the car and crawl under it to access the oil filter so I just installed to newer panels with cutouts.

Nothing wrong with working smarter, but the oil extractor alone does not work for my 2015 oil changes unless I do not change the filter. I always change my oil filter during my oil changes.
If you don't change it, you've got that much more dirty oil still in the car! I go to my old shop to get my oil changed because they pay me rent. Still, I can't see what the guy down stairs is doing!
 
Back
Top