• Car enthusiast? Join us on Cars Connected! iOS | Android | Desktop
  • Hint: Use a descriptive title for your new message
    If you're looking for help and want to draw people in who can assist you, use a descriptive subject title when posting your message. In other words, "I need help with my car" could be about anything and can easily be overlooked by people who can help. However, "I need help with my transmission" will draw interest from people who can help with a transmission specific issue. Be as descriptive as you can. Please also post in the appropriate forum. The "Lounge" is for introducing yourself. If you need help with your G70, please post in the G70 section - and so on... This message can be closed by clicking the X in the top right corner.

What did you do with your DH Genesis today?

When I bought mine (used), the mirror gears were stripped.
Just got in the metal replacement parts and had them installed.
It feels good to have working folding mirrors again and NOT have to wedge cardboard in the joints to keep them straight at highway speeds!

In case someone else is looking to purchase replacement gears for their 2015 Genesis.

Next on the list is upgrading to Apple CarPlay.
 
How's the range on the remote start? Worth it over the bluelink?
I dont miss paying for bluelink lol. The distance is pretty good on it as well.
 
IMG_3210.webp
New front rotors in the front rears coming soon
 
Today I had to drill out a couple of broken bolts that hold the front brake pad bracket in place on the caliper when I swapped my brake pads and rotors.

The stock 10mm M6 bolts only needed about 7 ft/lbs, but I used my older Sears right angle Nextec impact(strong little driver) to mistakenly tighten them to about 50 ft/lbs since the impact does not have an adjustable clutch. Seared the head off one bolt right away and one other was cracked and broke on removal.

The good news is that the plate has six bolts, so i was able to use the remaining four bolts to hold the plate in place until I could buy replacement 10mm M6 bolts and remove the broken bolts.

I end up using shiny stainless steel M6 bolts with matching washers to replace all six of the stock black M6 bolts. Fits perfectly, however the black painted stock bolts seem to be stronger rated bolts since they were tough to drill out or make a pilot hole into. However, I used a reverse drill bit and small bolt extractor pliers to remove the broken bolts with success. The reverse drill bit actually moved the bolts threads that was flushed in the caliper. When the reverse bit moved the broken threads enough to be gripped; I used the bolt extractor pliers to turn them out.

So my advice is to just hand tighten the front caliper pad bracket bolts to avoid breaking the heads off since they only need 7 ft/lbs to tighten since they are a pain to remove if broken flush in the caliper. However, if you lose or break the front pad bracket bolts; 10mm M6 bolts is the replacement size.

I probably could have just let the four remaining bolts hold the pad bracket in place, but I just feel better knowing the bracket is now held by all six bolts as designed. However, the bracket does seem like overkill to retain the pads if the slide rods fail compared to other four piston brake systems that only use wires and clips to hold the pads like Toyota.

New shiny brake pad bracket 10mm M6 bolts. I forgot to take a picture when the wheel was off.
51215364790_445ef4864c_k.jpg
 
Last edited:
While Hyundai did seem to cheap out in some parts that boggle the mind (like the door handle assembly) they also over engineered some aspects as well. The Tau engine is a perfect example of that. And it appears you may have found another. 👍🏽

Thanks for the write up. Definitely good to know.
 
While Hyundai did seem to cheap out in some parts that boggle the mind (like the door handle assembly) they also over engineered some aspects as well. The Tau engine is a perfect example of that. And it appears you may have found another. 👍🏽

Thanks for the write up. Definitely good to know.
You are welcome.

I hope I save someone from making the same mistake I made and/or help them find replacement bolts if they did; because Hyundai online part sellers do not even sell the brake pad bracket or its bolts separate from the caliper assembly.

The four piston Mando brake calipers are high-end for sure and those pads are not going anywhere if the guide pins fail with those massive six bolt brackets holding them in place.

I agree that Hyundai spent most of the money on the Genesis drive-train parts and cost-cutted on some of the trim pieces; however I am cool with that since the trim parts (like the door handle)are pretty cheap to find most of the time.
 
Last edited:
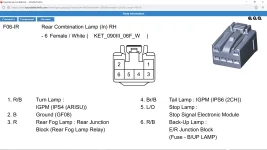
Today I performed a temporary right inner rear taillight wiring repair on my 2015 Genesis. I had to jump the #4 tail lamp connector wire to the left side inner taillight wire, and the tail light works. However, it looks like i will have to jump #5 and #6 as well to get the taillight fully working. At-least now the taillight is not out completely and still has the turn signal.

I guess that the three wires in question are broken somewhere on the trunk hinge harness. Seems to be a common problem on the Genesis. I may trace the broken wires and properly fix them at a later date.


1625324409236.png


51287717109_3fb526a10e_k.jpg

51288010465_a92258e71d_k.jpg

51287718099_e48541f528_k.jpg
 
There is a service bulletin out about this issue. Don't know the number. Dealer might help you.
It recommends wire splicing and a slight re-routing of the wire bundle.
There's about 9 wires in the bundle. Plus the optic cable for the camera.
I assume your reverse camera still works?
My car had 7 broken wires IIRC and a partially damaged optic cable. Still worked!
Don't wait too long to repair. You don't want to deal with a broken optic cable.
Good luck
Thank you. I will look it up the TSB on the Hyundai service website.
______________________________

Help support this site so it can continue supporting you!
 
Last edited:
There is a service bulletin out about this issue. Don't know the number. Dealer might help you.
It recommends wire splicing and a slight re-routing of the wire bundle.
There's about 9 wires in the bundle. Plus the optic cable for the camera.
I assume your reverse camera still works?
My car had 7 broken wires IIRC and a partially damaged optic cable. Still worked!
Don't wait too long to repair. You don't want to deal with a broken optic cable.
Good luck
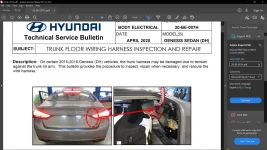
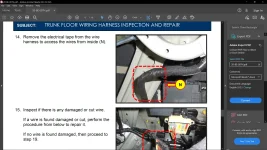
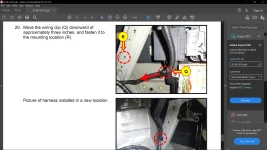
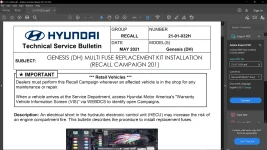
I found the TSB related to the trunk wiring harness. This TSB helps big time and clarify what went wrong with my taillight.

Here is few clips of the whole procedure.
1625336286043.webp
1625336398642.webp
1625336509573.webp
 
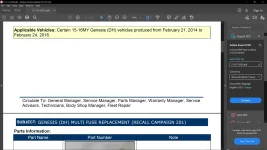
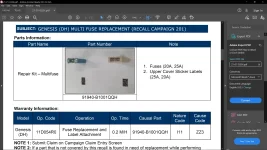
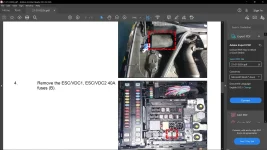
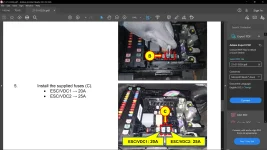
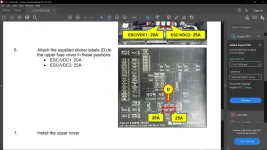
I also found the ABS fuse related recall TSB for the 2015-2016 Genesis on the service website. It seems like the 2015-2016 Genesis only need 20A and 25A fuses with no software updates or mandatory ABS inspection.

1625336999031.png
1625337033354.png
1625337091934.png
1625337138749.png
1625337171925.png
1625337203635.png
 
Today I fixed three broken inner taillight wires as per the TSB and now my inner taillight work perfectly; brake lights and all.

My advice would be for anyone with a 2015 or 2016 Genesis model is to check to see if the right side inner taillight harness has been relocated to prevent the wires from being too stressed and breaking. Either check yourself by pulling the trunk trim or have a dealership check it before the wires break. The car does not give a bulb out warning for the inner taillight if it is out. This repair job could be expensive out of warranty if a mechanic does the job, especially if the wires are broken.

My broken inner taillight wires.
51287563177_2093852360_k.jpg


Inner taillight wires repaired. I used aluminum foil to protect the good wires when I applied heat for the shrink wrap tubing. I relocated the wire harness as specified by the TSB and used cloth electrical tape to protect the harness from chaffing when the trunk lid moves.
51297812838_1302e05a06_k.jpg

51297638446_723babbfd4_k.jpg
 
I took my 2015 5.0 Genny to NOLA and back this past weekend from Memphis. This car is an absolute pleasure on the highway. I took I-55 all the way down. There's essentially no speed limit on I-55 in MS. I was generally doing 90 mph, with occasional shots up to 120 mph, and at 90, you could speak in a regular voice. What a pleasure. It reminds me of my old A6.

Oh, and on the way back I played tag with a Caspian Black 3.3 G90. Great cruise!
 
Today I fixed three broken inner taillight wires as per the TSB and now my inner taillight work perfectly; brake lights and all.

My advice would be for anyone with a 2015 or 2016 Genesis model is to check to see if the right side inner taillight harness has been relocated to prevent the wires from being too stressed and breaking. Either check yourself by pulling the trunk trim or have a dealership check it before the wires break. The car does not give a bulb out warning for the inner taillight if it is out. This repair job could be expensive out of warranty if a mechanic does the job, especially if the wires are broken.

My broken inner taillight wires.
51287563177_2093852360_k.jpg


Inner taillight wires repaired. I used aluminum foil to protect the good wires when I applied heat for the shrink wrap tubing. I relocated the wire harness as specified by the TSB and used cloth electrical tape to protect the harness from chaffing when the trunk lid moves.
51297812838_1302e05a06_k.jpg

51297638446_723babbfd4_k.jpg
Today my rear right side inner lights went off, I figured out it was a wiring issue because it’d be lit back on once my trunk was open. Excuse my ignorance but if the trunk is open, technically means these wires should still be somewhat intact? Any advice on how to fix this?
 
Today my rear right side inner lights went off, I figured out it was a wiring issue because it’d be lit back on once my trunk was open. Excuse my ignorance but if the trunk is open, technically means these wires should still be somewhat intact? Any advice on how to fix this?
My advice would be to just inspect the wiring harness by removing the trunk trim and see if a wire is damaged. A frayed wire is probably touching bare metal or another frayed wire when the trunk is closed which shorts out the light and maybe the damaged wires do not contact anything when the trunk is open.

This is only speculative; the only way to know for sure is to visually inspect the wire harness or probe the wires for any shorts.
 
Looking to update and upgrade your Genesis luxury sport automobile? Look no further than right here in our own forum store - where orders are shipped immediately!
My advice would be to just inspect the wiring harness by removing the trunk trim and see if a wire is damaged. A frayed wire is probably touching bare metal or another frayed wire when the trunk is closed which shorts out the light and maybe the damaged wires do not contact anything when the trunk is open.

This is only speculative; the only way to know for sure is to visually inspect the wire harness or probe the wires for any shorts.
Appreciate the response man! I took apart the trunk trim and it looked like everything was fine, didn’t see any exposed frayed wires. Except this time after taking it apart, and the trunk still being open the light wasn’t on at all, whereas last night if I opened the trunk the light would be back on, and when I closed it the light would flicker on and off on its way down.

So like you advised there’s most likely a short. I’ll probe the wires to see. Last question is, if I find a short, should I just cut up all the electrical tape till I find the area that’s causing the problem or?? I have friends at an audio shop who helped fix my electronic exhaust cutouts and I’m wondering if they could help or just go somewhere professional? Any advice on this?
I had to remove a lot of the tape to find my broken wires. At first I was thinking that my wires was good(and the problem was more serious) until I kept removing tape and then I found the damaged wires. Even after I found the wires I used a continuity tester to make sure the wire was not broken in other location farther down the harness. I would also relocate your wiring harness to prevent the issue from happen again when you repair the wires.

Here is how much tape I removed to find my broken wires.
51287563177_2093852360_k.jpg
Ohhh man do I feel like an idiot… I had just recently changed my rear emblem since it was getting worn down, I was a bit in a rush so I didn’t bother to plug the holes in the trunk once the emblem was removed. I was spraying goo-gone with open holes and looking now I see the wiring that’s directly in front of the holes for the emblem.. I didn’t bother to flash a light inside the hole but also assumed they wouldn’t have put open wiring connectors directly behind the holes, wow. I feel like an idiot, lesson learned. I guess imma try to clean it out and hope for the best, otherwise I have no idea what to do to be honest.
 
Ohhh man do I feel like an idiot… I had just recently changed my rear emblem since it was getting worn down, I was a bit in a rush so I didn’t bother to plug the holes in the trunk once the emblem was removed. I was spraying goo-gone with open holes and looking now I see the wiring that’s directly in front of the holes for the emblem.. I didn’t bother to flash a light inside the hole but also assumed they wouldn’t have put open wiring connectors directly behind the holes, wow. I feel like an idiot, lesson learned. I guess imma try to clean it out and hope for the best, otherwise I have no idea what to do to be honest.
Try cleaning the wire harness connectors pins with electrical contact cleaner. We all make mistakes when trying to do work our cars from time to time; it is part of DIY. Make a mistake and learn from it.:)

Hell, even so called professional mechanics make mistakes as well; but most people never learn about it since they do not know anything about cars to tell the diference until the car stop working properly and pay that mechanic more money to fix the issue they caused in the first place. Hence, why I do my own repairs if possible and had minimal issues with out-of-pocket repairs ever since on my cars.
 
Last edited:
Back
Top