• Car enthusiast? Join us on Cars Connected! iOS | Android | Desktop
  • Hint: Use a descriptive title for your new message
    If you're looking for help and want to draw people in who can assist you, use a descriptive subject title when posting your message. In other words, "I need help with my car" could be about anything and can easily be overlooked by people who can help. However, "I need help with my transmission" will draw interest from people who can help with a transmission specific issue. Be as descriptive as you can. Please also post in the appropriate forum. The "Lounge" is for introducing yourself. If you need help with your G70, please post in the G70 section - and so on... This message can be closed by clicking the X in the top right corner.

2018 G80 Shark Fin Cover

...
What is actually under the cover just the AM/FM antennae or is it the sat antennae too? Does it have anything to do with bluelink?
The AM/FM antenna is in the rear glass, over the defroster grid.
The shark fin has the Sirius XM antenna, and the GPS antenna.
The cellular antenna for bluelink is inside the dash, surprisingly.
 
I'll check out out. I do recall a local car wash that puts painters tape over the antenna covers before running them through. Not convinced it would stop the forces in play, but they can say they tried.

So the key takeaway here is that if your Genesis antenna cover comes off, make sure you find it and secure it because that little piece of plastic will cost $800 to replace. It's a $10 piece of plastic paired with a $790 antenna.
Where is the best (economical) place to purchase a new antenna? Mine broke off (while driving) and I need to replace it.
 
Where is the best (economical) place to purchase a new antenna? Mine broke off (while driving) and I need to replace it.
Are you wanting the entire assembly, or just a plastic cover that you can glue over the "shoe" on the roof of your car?
 
Are you wanting the entire assembly, or just a plastic cover that you can glue over the "shoe" on the roof of your car?
Thankfully, the base (shoe) is still attached (with screws still intact) and the antenna still works. It appears only the cover snapped off.

So... I guess it would only be the cover. I prefer it to be secured with the existing screws but could add little glue if necessary.
 
Thankfully, the base (shoe) is still attached (with screws still intact) and the antenna still works. It appears only the cover snapped off.

So... I guess it would only be the cover. I prefer it to be secured with the existing screws but could add little glue if necessary.
To attach it with the screws, you have to remove the shoe first, which involves getting between the roof and the headliner. Anyway, do that and in three to five years it will be gone again, because those screw bosses will just crack. Use the right "glue" (RTV, IMHO), and it should stay on.

Mine was loose on one side since I got it. Now the other side has cracked too, so it is completely loose at the rear, but still attached at the front. I have it taped on for now. This weekend I will break the front loose and then glue the cover back on, before I lose it.
Good advice on the RTV glue...... Where is the best (economical) place to purchase a new antenna cover?
 
Good advice on the RTV glue...... Where is the best (economical) place to purchase a new antenna cover?
Unfortunately, I don't really know. eBay has plenty under $10 advertised as fitting the G80, but the size on most of them is wrong. Measure the width at the back and the length to the front, and see if any advertised ones seem to match.
 
sorry, don't know. I found an upholstery person who did it in 2 vs 4 hours.
 
Looking to update and upgrade your Genesis luxury sport automobile? Look no further than right here in our own forum store - where orders are shipped immediately!
To attach it with the screws, you have to remove the shoe first, which involves getting between the roof and the headliner. Anyway, do that and in three to five years it will be gone again, because those screw bosses will just crack. Use the right "glue" (RTV, IMHO), and it should stay on.

Mine was loose on one side since I got it. Now the other side has cracked too, so it is completely loose at the rear, but still attached at the front. I have it taped on for now. This weekend I will break the front loose and then glue the cover back on, before I lose it.
@joegr how has the repair gone with the RTV? I finally got around to using RTV on mine last night. At first only the back right corner was loose but as I was wiggling it the whole thing came off, just cover not base. I used some RTV and it seems like it is solid but I feel the front didn't quite seat right compared to the back end. I may throw another bead around it.
 
@joegr how has the repair gone with the RTV? I finally got around to using RTV on mine last night. At first only the back right corner was loose but as I was wiggling it the whole thing came off, just cover not base. I used some RTV and it seems like it is solid but I feel the front didn't quite seat right compared to the back end. I may throw another bead around it.
So far, no problems. It's firm and does not wiggle anywhere.
______________________________

Help support this site so it can continue supporting you!
 
If RTV is not available, an even better choice is;
GOOP
Shoe GOO
E6000.
These are all the same, smell the same, feel the same and made in the same factory. I glue everything with it. My advice is to buy the smaller tube because the larger tube tends to harden in the tube once opened and not used promptly.

Goop is also sold as Carpenter Goop and various other names that end with GOOP.
Buy at Hardware stores, Walmart, Hobby Shops, etc.
 
My 2018 G80 shark fin antenna was loose and stumbled across this thread. I was able to pry it off by breaking the front attachment. The pictures below support exactly what @joegr measured and hope it helps anyone else searching for the same. I cleaned the area and used the E6000, since I did not have RTV. Seems pretty solid after a couple hours.
 

Attachments

  • IMG_4377.webp
    IMG_4377.webp
    108.1 KB · Views: 28
  • IMG_4379.webp
    IMG_4379.webp
    97.7 KB · Views: 26
  • IMG_4380.webp
    IMG_4380.webp
    79.2 KB · Views: 26
  • IMG_4382.webp
    IMG_4382.webp
    97.4 KB · Views: 25
  • IMG_4384.webp
    IMG_4384.webp
    93.8 KB · Views: 26
A lot of good information in these posts. I didn't see these when I posted yesterday "Shark Fin Antenna Came Off". In my case, I think the 5 screws holding the fin in place broke over time...1 or 2 at a time. Finally, the fin just lifted off. There are several different glues recommended here. I used Loctite because my neighbor had some and recommended it. Comes in a small tube, easy to use and is not messy. I laid a bead all around the black rubber gasket that the fin sits on and put the fin back on it. I'm not going to push on it too hard, but it certainly feels secure. My advice is to get whatever glue you choose and keep it for when your fin gets loose or comes off. Those screws are delicate and probably will break over time.
@ joegr...I never knew where the different antennas were until you posted it.
 
@pmcjr - To clarify on your message quote "In my case, I think the 5 screws holding the fin in place broke over time...1 or 2 at a time.", did your antenna screws break or was it the female plastic threads from your shark fin deteriorate?
In my case and from the pictures I included in my previous post, 4 of the 5 female plastic threads broke off from my shark-fin cover. If the metal screws are damaged/broken, then you'd have to replace them by removing the headliner, which most of us tried to avoid. Since you used Loctite, it seems you've done the same.
@ted33021 I believe it was a combination of both...broken off screws and broken plastic threads. The fin was becoming loose over time and, one day, it just lifted off completely. Thankfully I was home and wasn't driving the car. It definitely would have come off and gotten lost. I didn't have time to mess around. It needed to be fixed. A neighbor, and Loctite enthusiest, helped me and it now seems fine. I think a dealership would have fixed it with glue also. Going up under the headliner seems way too extreme. Lesson learned...check your Shark Fin from time to time. The fin is not all that secure given age and normal wear and tear.
 
I have a 2017 Genesis G80 and came across this thread. Regarding shark fin antenna: There might be a bolt thread that has to be loosened as part of removing the antenna "box" off the roof. For my car, and I suspect it is the same for the 2015 and 2016 Hyundai Genesis (same car), You Tubers and posts mention getting to this via undoing the rear portion of the interior cabin headliner (cloth in my car). Likely some plastic parts and springy snappy pieces have to be removed as well. Then, be careful with the wires. There should be 5 screws holding the sharkfin together and the heads face the roof. I did not do this dis-assembly. The shark fin cover was coming loose for several years and when washing my car, it finally was ready to come off from its base. At least it did not occur while driving as there is some type of electronic device like a square inch circuit board stuck inside the shark fin cover. That electronic thing is likely very expensive. All 5 plastic areas where the small threaded screws attach the cover to the base were broken. A common problem in Hyundai, Kia, and Genesis cars. Also noted in some Honda and Lexus cars. To reattach, I used RTV: clear Permatex, a 3 oz tube from Auto Zone, # 80050 on the package. Permatex black silicon 3 oz # 81158 was also mentioned in 2017 posting. $10.49 for clear. There are so many Permatex products, so making an informed choice was not easy. I used the clear in case of other future needs. Heat and humidity, not snow and ice, are the major issues here in the Gulf South. Did not use E6000 as the Permatex advertises itself as a type of gasket sealant: flexible and resistant to high heat (engine level heat). I did not expect this from E6000. I guess Permatex also acts just fine as a sort of glue. Not sure how easy or difficult it would be to undo Permatex after it cures in a day or 2. E6000 would likely be impossible to remove without breaking the shark fin cover. Make a tiny hole on the tip of the Permatex plastic part. So, squeezing it out was very hard. Only used a small amount of the Permatex around the screws to stop them from dropping down and a tiny amount completely around the lower inner part of the shark fin cover after cleaning everything off and letting things dry. Only teeny tiny bits of Permatex squeezed out while reseating the shark fin cover to the base. Got some silicone on the outside of the fin. Seems like the only way to get off was with my fingernail. Did not damage any painted or glass surface. I think it did not hurt the adjacent rubber seals either. I then sealed the whole area up and secured the fin to the glass sunroof with blue painter's tape. Left it on for 4 days as there was much rain for 2 of the 4 days during a 1000-mile trip and only hot and sunny when applying Permatex and just before removal of tape. No tape damage beyond tiny bits of residual "stick-um". So far, Permatex seems to be holding the shark fin antenna cover quite well six days after application. Hope this helps someone.
Hope this helps someone....
 

Attachments

  • 24 5 11 chip or circuit board inside shark fin cover G80 IMG_20240511_165757698.webp
    24 5 11 chip or circuit board inside shark fin cover G80 IMG_20240511_165757698.webp
    87.4 KB · Views: 23
  • 24 5 11 Base of shark fin with broken plastic and electronics IMG_20240511_141031032 red size.webp
    24 5 11 Base of shark fin with broken plastic and electronics IMG_20240511_141031032 red size.webp
    152.6 KB · Views: 23
1 month update: the shark fin is doing fine. Like on the old BrylCreem commercial: a little dab will do you. :)
 
@NolaG80....I used Loctite Super Glue to glue my fin back on. I didn't know about Permatex at the time. This was over a month ago. I keep gingerly checking it from time to time. I live in FL and I'm sure the heat played a factor over the 6 years I've had the car. Your fix read like I wrote it. One day in the garage it just came off. At least I wasn't on the road somewhere. Key points: keep checking your shark fin and AVOID drive thru car washes. They will definitely knock it off.
 
Thanks to the exacting measurements and advice in this thread, I was able to replace my missing cover as it probably flew off on some highway and landed on an unlucky someone's windshield.

This was the amazon item I bought and I think the model number may help if it ever disappears. 96219 or D5000EBQK

a lot of listings will say it won't work on the G80 (or 2015 Genesis Sedan in my case) with the panoramic sunroof maybe because they know you have to replace the whole structure, but since we're going the route of gluing anyway, as long as the cover fits dimensionally, we're good. Thanks to @joegr and 
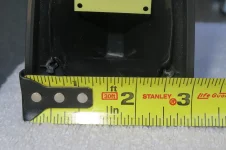
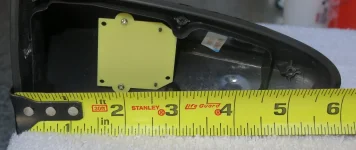
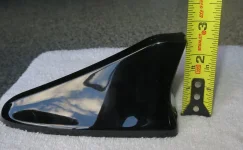
@ted33021, we have that. (3.02" wide at the back and 5.93" long. It is 2.62" tall at the back) I've tripledchecked and measured with my calipers too. I think @joegr might have been referring to the base and @ted33021 gives a closer match with his pics of the actual cover.

So, I feel more important in any listing is a pic with the dimensions like the one:
61d8hgadgfL._AC_SX679_.jpg


I'd say the same goes for ebay, but I got mine on amazon due to "easy returns" in case it didn't fit. Originally, I thought based on the measurements, it would sit over the entire structure, but when it arrived, it ended up resting on the lip pretty properly. It was just missing a bit of the vertical curve that follows the roofline. Also, I suspect these guys may have measured the lengthwise curve too instead of just the straight line of length to get their 6.2 inches.

AP1GczOwnTlg1zUkwzJ8ZQREoyTrEu09ZUkCd-PuwuArGVe7RoIkvkQJj5N5AgnfK6rjjW-vQ5wn3IQ7BwW8LT-RbYz9gcWS9nwxbr1IIfsNDMujOaZhOdaRtOs9h0e_PDkknuz1BKfiLbPlIodo9hzd5XjEIg


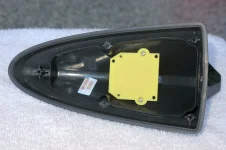
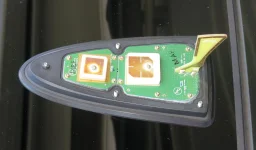
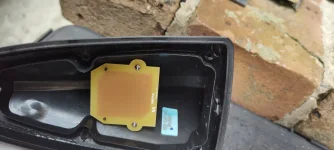
Now, the thing won't rest on properly because there's inner screw posts that get in the way of the existing screw posts that broke off from the old cover. Enter our friendly rotary tool. I thought of grinding off the ones on the roof, but then I realized those are the ones holding the antenna assembly in place! Much better to grind off the posts in the cover as we're not going to screw into it anyway. I suppose if I had dropped the headliner and properly removed it from the inside, I could've maybe screwed it back into this one. I think the posts matched, but if we did that, it'll probably break off anyway after time so the glue is still better.

AP1GczPQP_N1vWc6p7FtEWebm4ibfIiNY-BNbMNWMHH3u-RQP0TaoATd4oNH-wlJ65M4scI4l1OFE00nsc4qGQcvMdqIAAc-u3R0zq9RNymPyylOkcpP899rrw49BrNxurtLYaEALjI_O3aq9BcmgmynvPJgxQ

AP1GczMnxMA-BRxHp2TnyrrYgLbCff0WMePcy7fBu_euwdXqXJvRm2kgHrhK-Z4heFzAcDsJuC-RlVRcvn_DAqv9HNKcXWNpQAFNNh6jfRceYSNTB-w6777JIFnmekDA_NjYoWHxWiW_693uyt-WcgfkRvGcgQ


Despite this pic showing only the front 3 ground off, I did all of them.
AP1GczOLfdz5dkrdG4yG9p46s5oklEiQm8ZX8V6dERUpu1i9wicR8xXNmV5eq7X-Glhwr0GCQoNuzK2d-Bo2UKxwx7aWz-GyI3G_p-MD0XS1C6FjRNK8jQIRDOsRd2EdAEZbf6fBocYAV79Re8gaF3xtzacpmQ


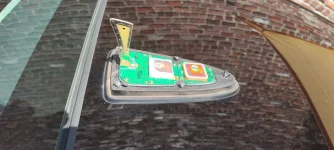
There, now it rests better on the lip. As mentioned before, it doesn't match up perfectly vertically because I don't think they accounted for the roofline curve, but I'll live with it. I'm already more than happy that it's pretty much a proper match all around.
AP1GczOY2PFF8np_N8NI5XE5yshxtdiA0B-VJu29AomgYTZeaq-xXdvo89gkqNnyP4kHOd5Ig5O5Z-e7Lc1zs6kPSA4kBbwRWS4oNfpqeGNZCXvA5V4B-oWp90tCaJJdGX1FWIwx6mQPkxfY2ojlkC9TOBeRbA


glue time. thanks to @ctrcbob for providing a few glue alternatives. Found E6000 so I went with it.
AP1GczN0c0AhnKAcm8bxlFGHm4773PmKa7uFzdYcKwK2-Tdp6Rvt32yJZELhli7gUs1wycyKRfiw5xXW7FkPJfOaOw2Aq-0rDE4b4r-9qYBK3w8G-BlFm5RHQYPXYV4t-z2P0EmuMiD0htuiK5g2XpQpTmOFEQ


So I just spread a bead along all the inner edges.
AP1GczPOsbneQm6DKL9z01gF0LkBKtnLQtQv4M4j8QTEYzFQFIuACOfuLUAt1FDcD4NxGmgvfF0qT8h2hWjfiA3p6cHigz_8jkWqgfYV6fNixn9juXYUYVH5zmq3wSdrfPqiLNCGtFaaGvT4qtiAXGstCL6UoA


oh no.. I did too much. 🤦‍♂️ The sun was in my eyes on this side
AP1GczP5_vsp8NiYpjxMXy3ep5rbfgCHXqcb36zky9QL3oM2VAd6EMSqGsDDZNRJi5EKPNkCt07NbqDXExMccsRrCB0lB7imidZ-dknZdgYLNtCtoXwQGNopHL3lGNn3E4zWBZRKqY9c_c5g7UEOYE2qjD771A


I just ran a paper towel to smooth it out. What a mess. Maybe a finger or a card would've worked better. Treat it like you're sealing your tub or something.
AP1GczPK8BpZcHOliyl2S0k3Nly7wkhZQDfme2YcbT6qaOQZq1eF1LazsmcHHLOnWdlJ4azQEtyR1Ak9jxxwiBGmo62oOHfVgDXauiVB1XI6KZihiN8HV69jxeiOAmVgOul5c1myRNaLowQApxnBD4grSfs6lw


luckily, a little bit of alcohol on a paper towel cleans it up nicely.
AP1GczN9OwOkWj9Sqn2aFXRkzgJbZR9Z0Zomm7hxC9GsqFm3rrI4YSBo1xpeXbeYgmXcN2-JupAO82Y5lecBys_v1OBaSQkzRLijI8YNEKgCZjHAFdT6WTQZ0yUzuiI22BFmW-2iDZJ8LesJjskuTlnawpumCw


All done. Maybe some may obsess over the imperfect glue bits in the seams. Feel free to substitute with an alternate glue and seal it better, but I'm good with it. As far as I'm concerned, the bead on the lip inside is holding everything pretty good and tight.

AP1GczNisowtlUUspfXmfOLD-E4LINrS0FCq02ealS0VCgVe0cBbHZOfsE2ddY3iu-XmyOC12LcPiatjgWMf1fg6DSc18NuPBMbG8dNsSuyIsouokPdn24UvtLfGI6IV71yMrTT7EFdvoqgqTgjlqBW9Ezbf3g

AP1GczM0m2LmYF2rKfnASLDCKIHGuVac3EbL9FrjH5CFUYfYIWCkTsEQqO3XqQK_R7-52oIV14qAT0K5bvSnafsMiXiejpvyztKihPzkau-bSHBzb6ac5f_ntFeOxK_0-N50KQEUyuHXb59f3oBq7LELHIkyAQ
 
Last edited:
That last photo looks good, like you waxed it all. Don't think anyone would notice. Hopefully that corrosion won't have any long term affect, and hopefully no leaks.

Thanks for posting the step by step.
 
Back
Top