• Car enthusiast? Join us on Cars Connected! iOS | Android | Desktop
  • Hint: Use a descriptive title for your new message
    If you're looking for help and want to draw people in who can assist you, use a descriptive subject title when posting your message. In other words, "I need help with my car" could be about anything and can easily be overlooked by people who can help. However, "I need help with my transmission" will draw interest from people who can help with a transmission specific issue. Be as descriptive as you can. Please also post in the appropriate forum. The "Lounge" is for introducing yourself. If you need help with your G70, please post in the G70 section - and so on... This message can be closed by clicking the X in the top right corner.

Dash cam?

Jargen

Registered Member
Joined
Aug 2, 2021
Messages
68
Reaction score
29
Points
18
Location
Cincinnati, Ohio
Genesis Model Year
2022
Genesis Model Type
Genesis GV70
Has anyone tried hardwiring a dash cam into a GV70 yet? Wondering how to disassemble the A pillar area as it looks like it has a vent in it as well.
 
I would love to hear the answer myself.
 
No but I looked into hard-wiring my radar detector but just went with an extended cord to the 12v in the center console. I didn't want to pull the A-pillar apart.
 
I am installing one myself tomorrow. I am not sure, but I believe the a-pillar is just held on to with clips. I was planning to use a plastic pry bar to remove. Any suggestions would be greatly appreciated 🙂.
 
Looking to update and upgrade your Genesis luxury sport automobile? Look no further than right here in our own forum store - where orders are shipped immediately!
I am installing one myself tomorrow. I am not sure, but I believe the a-pillar is just held on to with clips. I was planning to use a plastic pry bar to remove. Any suggestions would be greatly appreciated 🙂.
Would be great if you could document or video as much as possible for us. This will be my first mod.
 
I wish we could hack the camera in the car and just get that to record. I'd pay good money for that.
Agree. I'd be willing to pay for it as an option as well. This certainly isn't a C8, but interesting to see recent "mechanic raced my car" news items. In my previous Audi A6, I had a severe fluid leak and it had to be towed to the dealer. They had a driver return the car to me - bass was blown - who knows what driving antics there were beyond killing the stereo. Given the Genesis model of picking up & dropping off, would love to have the comfort of knowing how it got to the dealership and back.
 
i did it in my g70 and instead of pulling the a pillar completely off, i popped the top off, then pulled the door gasket off and there was a nice lip to slip the wires behind. There were several things connecting the a piller that made it near impossible to completely get off.
 
i did it in my g70 and instead of pulling the a pillar completely off, i popped the top off, then pulled the door gasket off and there was a nice lip to slip the wires behind. There were several things connecting the a piller that made it near impossible to completely get off.

Yeah I was going to take a look at the gasket path and dash removal as soon as I can decide what to get for a new dashcam and get it in. Looking at a Viofo A129 Pro Duo or a Street Guardian SGGCX2PRO at the moment. My old Street Guardian was rock solid, but seems like they are overdue to release an updated model.

That A pillar seems on there solid! This car is definitely put together better than my old Subaru so it may just take some exploration when routing everything. Not to mention if I want to run a rear camera how to route that. Wish there was some power to tap into around the rear view mirror and front facing camera, but I don't know how to get those panels off without just trying to yank at them too.
for my rear camera, i routed down the a pillar in the front door gasket, down the floor after taking off the front door gasket and trim piece (should just pop right off, at the B pillar i pried the trim piece up from the bottom and shoved the wire through it, then back through the rear door trim piece and door gasket. From there in the GV70, youll probably have to shove it under trim pieces to the back hatch, then can probably get it under the hatch trim and up to the top of the door.

I went with the Z-Edge off amazon ( Amazon.com: Z-Edge WiFi Dash Cam, 1920x1080P FHD, Front and Rear Dash Cam, Dual Cam, Car DVR, Night Vision, Parking Mode, G-Sensor, Loop Recording ) and have no complaints. Hardwired into the fuse box with a fuse tap. Have it on both my truck (ram 1500) and g70. Great image quality and pretty good night image quality.
______________________________

Help support this site so it can continue supporting you!
 
CSU87, do you have any pics?
 
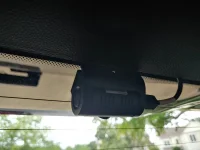
Hi all, I found an installation video guide for installing a dashcam in the G80. It is in Korean, but the visuals should be sufficient to follow along. He also installs a dash cam with a side camera, which I don't think I have ever seen in the US.


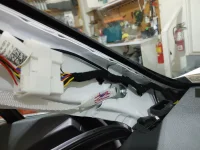
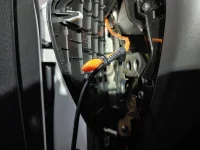
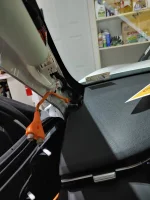
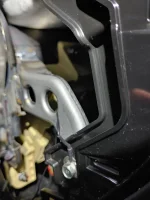
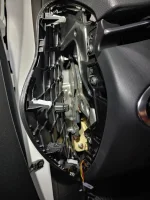
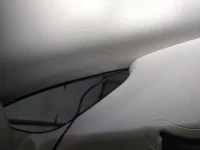
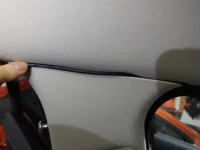
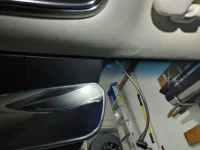
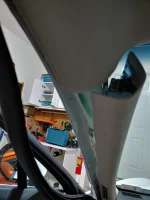
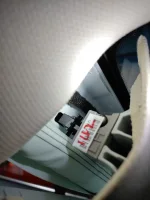
I can confirm that the GV70 A pillar is constructed almost the same, except the clip holding the top of the A pillar is black instead of white, and is a bit harder to reach because the gap is a little smaller. After removing some of the rubber door trim, I used a plastic Scosche interior panel pry tool to pull the top edge of the A pillar off. There is a black clip holding the top of the panel to the A pillar, and tabs on both sides of the clip need to be pressed in order to release it. The gap at the top is too narrow for needle nose pliers, so I pushed one tab using the pry tool from the top, and while holding the panel away from the pillar to keep the first tab depressed, I pushed the other tab very carefully by wedging the pry tool from under the airbag. The panel then comes off freely.

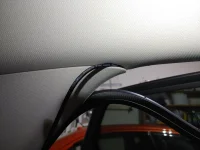
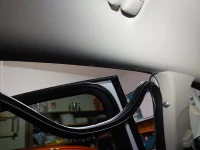
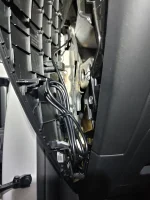
I saw another Korean installation video that strongly recommended removing the A pillar and routing the dash cam wires down the front of the A pillar. Routing the wires in the back of the A pillar by just removing the rubber seal can cause safety issues by obstructing the path of the airbag inside the A pillar.

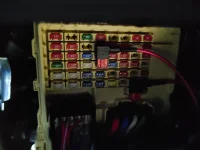
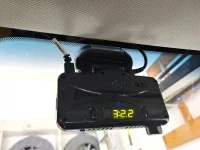
I have not yet installed my 
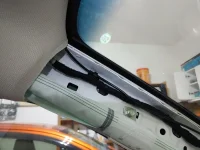
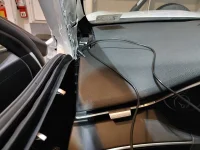
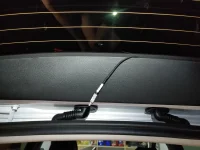
dashcam as I need to order some micro fuse taps. I would rather not just wrap bare wire around a fuse like the guy in the linked video does - seems a bit unsafe to me but I could be wrong. Curious to see if anyone manages to install a rear 
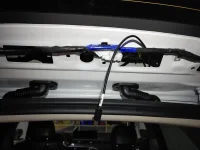
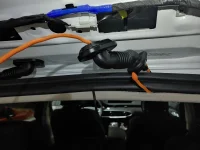
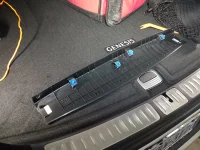
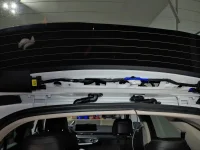
dash cam as well. When it opens, the trunk adds about 5cm of distance from the inside roof of the car. I assume I will need to allow for about 5-6cm of extra cable length for the rear camera, but am worried the extra loop of wire might look a bit ugly.
 

Attachments

  • 20210808_234322_HDR.webp
    20210808_234322_HDR.webp
    93 KB · Views: 201
  • 20210808_234353_HDR.webp
    20210808_234353_HDR.webp
    77.9 KB · Views: 200
Too much risk for problems for me with that install. My luck I'd break something and never get it back on that way..
 
I didn’t do a hardwire install, but it looks fairly clean. Just used some clips and hid the cable in open spots. Tucked the wire under the passenger floor mat, then underneath the seat and through the back of the center console compartment.
 
I didn’t do a hardwire install, but it looks fairly clean. Just used some clips and hid the cable in open spots. Tucked the wire under the passenger floor mat, then underneath the seat and through the back of the center console compartment.
Pictures? :)
 
Forgot to share the photos of my dashcam installation. Used the two spare fuses (10A and 15A), one was ACC and one was always on (Battery), which worked out perfectly for wiring a dashcam. Be sure to orient the fuse taps as shown since the wire from the fuse tap needs to be in the same direction as the negative terminal of the fuse.

Definitely helps to have a wire puller to get the wires through tight spots. Removing the A pillar panel isn't too hard once you know how to reach the clip in the top portion that holds it.
 

Attachments

  • 20210815_013441.webp
    20210815_013441.webp
    162.4 KB · Views: 363
  • 20210815_013436.webp
    20210815_013436.webp
    138.7 KB · Views: 340
  • 20210815_013428_HDR.webp
    20210815_013428_HDR.webp
    94.5 KB · Views: 334
  • 20210815_012519_HDR.webp
    20210815_012519_HDR.webp
    166.9 KB · Views: 339
  • 20210815_012000_HDR.webp
    20210815_012000_HDR.webp
    118.6 KB · Views: 367
  • 20210815_011954_HDR.webp
    20210815_011954_HDR.webp
    123.9 KB · Views: 377
  • 20210815_011838_HDR.webp
    20210815_011838_HDR.webp
    145.9 KB · Views: 360
  • 20210815_010805_HDR.webp
    20210815_010805_HDR.webp
    99.9 KB · Views: 366
  • 20210815_010746_HDR.webp
    20210815_010746_HDR.webp
    72.6 KB · Views: 386
  • 20210815_010735_HDR.webp
    20210815_010735_HDR.webp
    149.2 KB · Views: 377
Wiring the rear dash cam was a real pain. Tucking the wires into the panels along the way was tough since they are REALLY tightly fit. Had to use my interior panel pry tool to shove it in. Also removing the rear door interior panel and snaking the wire through the rubber hose was tricky too, definitely need a wire snake to get it through. Also beware that the rear door weather seals have a black gooey glue that the other weather seals do not, and will leave black stains on your interior that are very hard to remove if you are not careful.

One more post after this due to 10 image upload limit.
 

Attachments

  • 20210815_022040.webp
    20210815_022040.webp
    99.4 KB · Views: 198
  • 20210815_021525_HDR.webp
    20210815_021525_HDR.webp
    104.8 KB · Views: 200
  • 20210815_021251.webp
    20210815_021251.webp
    341.8 KB · Views: 188
  • 20210815_021241_HDR.webp
    20210815_021241_HDR.webp
    109.6 KB · Views: 186
  • 20210815_014945_HDR.webp
    20210815_014945_HDR.webp
    163.1 KB · Views: 177
  • 20210815_014812_HDR.webp
    20210815_014812_HDR.webp
    258.5 KB · Views: 180
  • 20210815_014739.webp
    20210815_014739.webp
    215.3 KB · Views: 176
  • 20210815_014307.webp
    20210815_014307.webp
    147.7 KB · Views: 183
  • 20210815_013606_HDR.webp
    20210815_013606_HDR.webp
    142.8 KB · Views: 180
  • 20210815_013428_HDR.webp
    20210815_013428_HDR.webp
    94.5 KB · Views: 192
Final results look pretty clean. Rear dash cam has a loop of usb cable visible in the back window due to how the usb cable inserts, not sure if there is any way to hide it better. Hope these photos help for any DIYers. I think the photos are uploaded in reverse order, so start from the last photo of each post to see the chronology. Took me a few hours to do as I was being slow and careful. If I had to do it again I might just pay a professional shop to do it for me if it was under $200.
 

Attachments

  • 20210815_152311_HDR.webp
    20210815_152311_HDR.webp
    95.1 KB · Views: 248
  • 20210815_152205_HDR.webp
    20210815_152205_HDR.webp
    158.6 KB · Views: 246
  • 20210815_022106.webp
    20210815_022106.webp
    250.7 KB · Views: 245
Back
Top