
-

-
Hint: Use a descriptive title for your new message
If you're looking for help and want to draw people in who can assist you, use a descriptive subject title when posting your message. In other words, "I need help with my car" could be about anything and can easily be overlooked by people who can help. However, "I need help with my transmission" will draw interest from people who can help with a transmission specific issue. Be as descriptive as you can. Please also post in the appropriate forum. The "Lounge" is for introducing yourself. If you need help with your G70, please post in the G70 section - and so on... This message can be closed by clicking the X in the top right corner.
- Genesis Forums
- Hyundai Genesis Sedan Forums - 3.8 V6, 4.6 V8, 5.0
- General 2009-2014 Hyundai Genesis Sedan Discussion
You are using an out of date browser. It may not display this or other websites correctly.
You should upgrade or use an alternative browser.
You should upgrade or use an alternative browser.
What accessories have you put on your Genesis
- Thread author danieltoye101@msn.com
- Start date
-
- Tags
- accessories genesis
Doing it yourself is the best way and you can save HUGE money. You can get all the stuff you want off of ebay...
...when it comes to the steering wheel there are two methods;
1. Get the stick-on wings that go directly over the flying H
2. Get a new airbag for around $250 (has inflator) also found on ebay and other stores. www.kdmstuff.com or www.koreanautoimports.com/store
Speaking of taking "Genesis 4.6" off on the rear;
I just did this a couple days ago. I bought a 1.5" puddy knife made of plastic for $1 at a dollar store and it worked perfect. On a warm day I let my car sit outside for 15 minutes with the sun beating down on the trunk. They came off soooo easily. I then used some goo gone to get a small amount of 3M adhesive off.
I then had to use some cleaner to get dirt outline off.... used some pre cleaner product before you wax... then I used a little bit of the same wax/polish I used in that area. All is good.
michaeldallen
Getting familiar with the group...
I did the same thing in February. You are right.... it IS soooo easy.
It looks so sleek & clean. For those considering it, you can see a shot
of the rear in my pix. Click on the photo above and it will lead you to
other shots available. P.S. I decided to put the 4.6 back on with a few dabs of silicone, 'cause I wanted everyone to know my engine size (ego issue) but then removed it again, prefering the cleaner look. In other words none of these proceedures are permanent. My car color is the Titanium Grey.
Matt Z
Been here awhile...
When I put the lip spoiler on I did the same thing and removed the "Genesis 4.6" and even the Genesis on the Chrome License plate frame.....Looks so much cleaner and symmetrical

Midnightsun
Been here awhile...
They still know my engine size. 

Midnightsun
Been here awhile...
OK, just installed the new caps and it was a breeze. As mentioned prevoiusly I heated up the outside and inside surfaces of the original wheel caps with a heat gun. Got them pretty hot so it was actually hard to hold. I then put a piece of electrical tape right at the gap between the cap you want to remove and the outer cap. I then pried up with a small screw driver real gently and it came off easily.
Here is the cool part. The new caps need to be removed from the plastic retaining mount. Again, I heated both the front and back side up real good. Put one of the plastic clips in a vice and then pryed up with a small screw driver ever so gently but with constant force. It peeled away slowly and cleanly. Best part is the sticky tape remained entirely intact and stuck to the removed aluminum cap ready to be installed on the original wheel caps. All I did was clean the surface with rubbing alcohol to ensure a good bond. Came out beautifully and could do a complete set in less than 20 mins since I know how to do it now.")
Here is the cool part. The new caps need to be removed from the plastic retaining mount. Again, I heated both the front and back side up real good. Put one of the plastic clips in a vice and then pryed up with a small screw driver ever so gently but with constant force. It peeled away slowly and cleanly. Best part is the sticky tape remained entirely intact and stuck to the removed aluminum cap ready to be installed on the original wheel caps. All I did was clean the surface with rubbing alcohol to ensure a good bond. Came out beautifully and could do a complete set in less than 20 mins since I know how to do it now.
Orcaman
Getting familiar with the group...
- Joined
- Mar 15, 2010
- Messages
- 49
- Reaction score
- 1
- Points
- 8
....not to mention you saved $230.00 along the way!OK, just installed the new caps and it was a breeze. As mentioned prevoiusly I heated up the outside and inside surfaces of the original wheel caps with a heat gun. Got them pretty hot so it was actually hard to hold. I then put a piece of electrical tape right at the gap between the cap you want to remove and the outer cap. I then pried up with a small screw driver real gently and it came off easily.
Here is the cool part. The new caps need to be removed from the plastic retaining mount. Again, I heated both the front and back side up real good. Put one of the plastic clips in a vice and then pryed up with a small screw driver ever so gently but with constant force. It peeled away slowly and cleanly. Best part is the sticky tape remained entirely intact and stuck to the removed aluminum cap ready to be installed on the original wheel caps. All I did was clean the surface with rubbing alcohol to ensure a good bond. Came out beautifully and could do a complete set in less than 20 mins since I know how to do it now.
scottdk
Registered Member
Just installed my new caps, and just like Midnightsun and Orcaman said, it's pretty easy.
Took me around 20 minutes. Just used my heat gun and I was done a lot faster then I thought I would be.
I never could justify the price of the actual KDM center caps at $275 + shipping, and figured I would hold out until a better solution came about. Glad I waited.
Thanks guys
Took me around 20 minutes. Just used my heat gun and I was done a lot faster then I thought I would be.
I never could justify the price of the actual KDM center caps at $275 + shipping, and figured I would hold out until a better solution came about. Glad I waited.
Thanks guys
nearwater
Been here awhile...
Just installed my new caps, and just like Midnightsun and Orcaman said, it's pretty easy.
Took me around 20 minutes. Just used my heat gun and I was done a lot faster then I thought I would be.
I never could justify the price of the actual KDM center caps at $275 + shipping, and figured I would hold out until a better solution came about. Glad I waited.
Thanks guys
Yeah, the asking prices for the V8 caps on ebay was just ridiculous.
I personally got the V6 wheel caps just because I liked the look better.
Glad you're happy with yours.
Ah, the joy of fun, cheap DIY.
")
Dan
Looking to update and upgrade your Genesis luxury sport automobile? Look no further than right here in our own forum store - where orders are shipped immediately!
nearwater
Been here awhile...
Will this work for the 18" V6 wheels also?
No need to do any DIY mods for the V6 wheels.
If you check ebay, they already got the 18" V6 wheel caps with the wing badge.
Reason being, the V6's 18" wheel is KDM's top of the line wheel and they already come with the wing caps.
Mean while, the V8's wheel is not offered in Korea, therefore no OEM wing badge.
All you have to do is buy the KDM caps and just put it on.
Dan
I contacted WeatherTech regarding snap in (rather than stick on) window deflectors for my 10 Genesis and 11 Sonata. They wrote back advising they were designing the products now and we should see them on the market in a few months. These are the best solution (had them on my Porsche and Mercedes) and look particularly sharp if you have tinted windows. You can go onto their website and there's a place for them to email you when the prioduct is released.
mjsmith3
Getting familiar with the group...
Orcaman
Getting familiar with the group...
- Joined
- Mar 15, 2010
- Messages
- 49
- Reaction score
- 1
- Points
- 8
Just to make sure I understand, you bought the 17" plastic wheel cap set and applied it to the V8 18" wheels (after removing the H)?
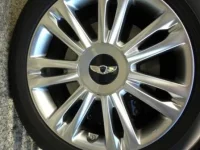
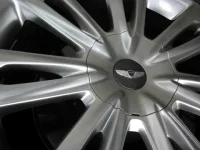
Maybe this will help. The winged cap that fits the center of the V-8 18" factory wheel is roughly 2.25" in diameter. The winged cap that fits the center of the V-6 18" factory wheel is roughly 3.5" in diameter. Both center caps are the same diameter, 6 1/8" The winged badge is the difference See the attached pictures:View attachment 1132 You will notice the V-8 center cap continues the spoke that ends in a point. The V-6 center cap will fit the V-8 Wheel, but you lose the flow of the spoke. You can easily convert the flying H cap to the 2.25" winged cap by heating and removing the flying H cap and replacing it with a 2.25" winged cap part #: 52960 3M000 (Hyundai Mobis part number). I got these for $14.99 + shipping off of E-Bay. You will need to heat and remove the cap from the plastic mounting piece. It takes about 10 minutes and a little care per cap.
Attachments
mjsmith3
Getting familiar with the group...
These directions were brilliant. Easy as pie using the drill/ #2 pencil trick. I found getting the Genesis cap off was easy if, when heating up the front, I grasped two of the tabs with pliers and pushed the pencil through by pulling up against something hard. Worked great, thanks for the help everyone
I did these myself for $14.99 + $7.99 shipping and about 15 minutes per wheel
Where did you buy them? I can only find ones from import shark or comparable and they are like $70.
Seattle Genesis
Registered Member
please remove
scottdk
Registered Member
Could you please point me to the emblems you used to insert into the wheel caps after removal of the old ones? I assume after you managed to get the original H emblem out (any advice or trick to make this easier?) there was epoxy or something that needed to be dremeled out before applying/epoxying in the new wing emblem?
EDIT: Would this be the ones you ordered? http://cgi.ebay.com/ebaymotors/ws/e...=LVI&its=I&otn=2&category=43961#ht_5059wt_941
If what i understand here is correct then the $269 cap deal is a total ripoff. If this works out then I seriously doubt another set will be sold unless the consumer does not read this forum.
The link is no longer valid, but the same emblems can still be found on Ebay. Problem is they are more then double from what I paid a year ago!

Anyone have a source that is less $?
I put KDM wing badges and wheel caps, but no other accessories so far.
I did some "modification" - removing the door panels and sound deadening them.
Planning on adding a subwoofer and the genesis airbag in the future.
Dan
Why do you do the sound deadening? I think Genesis is very quiet.
Do you see any improvement at all?
I'm afraid that if you remove the panel and after putting it back on, it could create some loose nut and bolt and give more rattle here and there.
 | ||||
| | | | | |
| | | |||
Great products:
- VIN Check
- Add more horsepower!
- Clean your leather!
- Safe Emergency Charging
- Windshield Repair Kit
- Chemical Guys HydroSpeed Ceramic Quick Detailer
- Chemical Guys HydroCharge High-Gloss Hydrophobic SI02 Ceramic Spray Coating
- Get a dash cam!
- Auto Buyers Market
- Foreign invaders vs USA gangs


Featured content
-

-
Thread 'Help us to keep helping you. Your support is essential to our survival.'
- Sal Collaziano
Replies: 27