
Thanks to the jwaters943 post, I was able to install the wing emblem on the hood and trunk. Fortunately I have a Kawasaki tool that I was able to grind down the tabs on the hood emblem. I cut and installed Gorilla tape in the holes to prevent any possible rough edge contacting the paint. it was then just a matter of placing the emblem on the hood. The trunk took a bit more time to complete. I used a hair dryer and 50# fishing line to remove the Hyundai emblem. This took me about 15 minutes. However, the time consuming part began. The emblem removal left a thick residue of adhesive. I used the hair dryer and my thumb nail to slowly remove most of the adhesive but a thin layer remained. Fortunately I had a product called Goo Gone that is made to remove glue and similar adhesives. Using a cotton swab, the Goo Gone and my thumb nail, I was able to remove all of the adhesive residue. The wing emblem installation was then just placing the emblem in the two drilled holes and applying pressure for a couple of minutes to the emblem adhesive tape. It took me about 90 minutes to complete the installation whereas I am certain most people would/could cut that time by at least half. It was worth every minute as the wing emblems look great. I could not have completed this installation successfully without the post directions. Thank you!
-

-
Hint: Use a descriptive title for your new message
If you're looking for help and want to draw people in who can assist you, use a descriptive subject title when posting your message. In other words, "I need help with my car" could be about anything and can easily be overlooked by people who can help. However, "I need help with my transmission" will draw interest from people who can help with a transmission specific issue. Be as descriptive as you can. Please also post in the appropriate forum. The "Lounge" is for introducing yourself. If you need help with your G70, please post in the G70 section - and so on... This message can be closed by clicking the X in the top right corner.
- Genesis Forums
- Hyundai Genesis Sedan Forums - 3.8 V6, 4.6 V8, 5.0
- Detailing, Lighting and Appearance
You are using an out of date browser. It may not display this or other websites correctly.
You should upgrade or use an alternative browser.
You should upgrade or use an alternative browser.
Genesis Wing Emblem Installation Process
- Thread author jwaters943
- Start date
-
- Tags
- emblem genesis installation process wing
Looking to update and upgrade your Genesis luxury sport automobile? Look no further than right here in our own forum store - where orders are shipped immediately!
QuantumRift
Been here awhile...
I did the steering wheel emblem first since it was by far the easiest (I excel at easy installations). I am waiting to receive the wheel cap emblems which hopefully will arrive in the next few days. I have been looking for a stainless steel or chrome rear license plate frame but have not been able to find. Any suggestions? Thanks.
decan9
Getting familiar with the group...
- Joined
- Aug 19, 2011
- Messages
- 50
- Reaction score
- 0
- Points
- 0
got mine from EbayI did the steering wheel emblem first since it was by far the easiest (I excel at easy installations). I am waiting to receive the wheel cap emblems which hopefully will arrive in the next few days. I have been looking for a stainless steel or chrome rear license plate frame but have not been able to find. Any suggestions? Thanks.

Ovrfiend
Hasn't posted much yet...
Potty_Pants
Been here awhile...
- Joined
- Jul 31, 2012
- Messages
- 475
- Reaction score
- 4
- Points
- 0
On my 2012 3.8 with 18" wheels the full install was 10 minutes with the help of my 3 year old. (holding a hair dryer while I used braided suture to remove the trunk badge) wheel caps popped off and on. Steering wheel sticker. Looks so good. 35% ceramic next. Then winter wheels and rubber!
+1 on the 35% ceramic... unfortunately my area doesnt have alot of tint places, quality is lacking, ceramic... good luck ! ... I had ceramic put on my bmw down in florida, man those guys down there do such great work at great prices.
ppp
cruzman
Hasn't posted much yet...
A tip for installing the Front Emblem if you don't have a $30 power tool handy.
Evidently my little craftsman grinder grew legs and ran off just before I started my re-badging. So I had to figure another way to get the job done.
Here is what I did.
Take a box knife with a new blade and carefully make multiple cuts straight down the sides of each post like slicing a cake. I would suggest making the cuts at least an eight of an inch apart. Work slowly and carefully as the blade will cut through the plastic with ease.
Make sure the cuts are all the way to the bottom and then one at a time slowly bend each slice back and forth until they snap off.
Then use the knife to clean up and trim away any excess plastic and you are ready proceed with the install.
In my excitement to finish the job I didn't think about taking pictures of this technique, but I have attached the 'after' pics.
Attachments

Last edited:
Qbedobedoo
Registered Member
Looks very nice indeed.. Now come do my trunk!! he he j/k
I was wondering how much space should be left between the chrome strip that is mounted on he hood and the bottom of the wing emblem?
I cant seem to find that piece of information anywhere, and from the pics I have seen, there seems to be a different amount of space between the way most people mounted...
I cant seem to find that piece of information anywhere, and from the pics I have seen, there seems to be a different amount of space between the way most people mounted...
Silver Gen
Registered Member
- Joined
- Aug 31, 2012
- Messages
- 116
- Reaction score
- 2
- Points
- 18
- Genesis Model Year
- 2012
- Genesis Model Type
- 1G Genesis Sedan (2009-2014)
Hello all. I'll come back and post pics and give a narrative of the installation of my wheel caps, steering wheel emblem and rear emblem later; but I just wanted to get opinions on something.
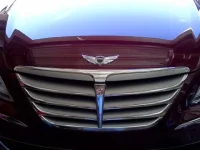
Who says you have to follow everyone else and place the front emblem where it usually is? I took some pics to get some opinions of what people think (YES, this is one of the rare times I've asked people what they think looks good on a car, usually I don't care, I do what I want, LOL!); and my main reason is when I look at my Genesis Coupe, the wing emblem is part of the grill; and yes, I know it was meant to be there, but having it there leaves you with a "clean" hood. I'm just opening the discussion;
MY GENESIS COUPE GRILL

WING EMBLEM BELOW HOOD ON GRILL


WING EMBLEM ON HOOD ON CHROME


WING EMBLEM IN USUAL PLACE ON HOOD


...have at it!
Who says you have to follow everyone else and place the front emblem where it usually is? I took some pics to get some opinions of what people think (YES, this is one of the rare times I've asked people what they think looks good on a car, usually I don't care, I do what I want, LOL!); and my main reason is when I look at my Genesis Coupe, the wing emblem is part of the grill; and yes, I know it was meant to be there, but having it there leaves you with a "clean" hood. I'm just opening the discussion;
MY GENESIS COUPE GRILL
WING EMBLEM BELOW HOOD ON GRILL
WING EMBLEM ON HOOD ON CHROME
WING EMBLEM IN USUAL PLACE ON HOOD
...have at it!
bobmarley421
Getting familiar with the group...
I was wondering how much space should be left between the chrome strip that is mounted on he hood and the bottom of the wing emblem?
I cant seem to find that piece of information anywhere, and from the pics I have seen, there seems to be a different amount of space between the way most people mounted...
Approximately 1 Inch. Use a piece of masking tape as a guide.
pilotdane
Registered Member
I vote for the usual location about 1" up on the hood. Down on the grill it looks like an afterthought since it just does not fit. The circle in the grill of the first photo says something is supposed to go here. The smooth, unbroken lines of the Genesis grill just don't leave much for the wings to work with unless you could find a smaller one to put in the center of the hood chrome. Maybe the aftermarket steering wheel emblem?
KyKernel
Getting familiar with the group...
- Joined
- Oct 9, 2012
- Messages
- 109
- Reaction score
- 10
- Points
- 18
Rear Wing - No grinding necessary
I bought a rear emblem from kdmland on eBay and installed it this afternoon. It had small pegs and I DID NOT have to grind them off. They fit perfectly into the holes left when the flying H was removed. (2011 Genesis 4.6 sedan) Therefore no alignment was necessary. The emblem stuck easily using the double-sided tape that came with it. No other tape needed.
To remove the flying H, I used a hair dryer on the already sun-warmed car. The dental floss broke a few times, but the old emblem came off easily. Not so for the goo! Rubbing alcohol and WD-40 didn't touch it. I ended up using acetone (fingernail polish remover). I checked this first on paint in a door opening, and it does not affect the paint. It still took quite a while (1/2 hour+) to get the goo off.
This was so easy I may do the front, the wheels, and the steering wheel.
bobmarley421
Getting familiar with the group...
Re: Rear Wing - No grinding necessary
Goo Gone works the best for removing the left over adheasive.
I bought a rear emblem from kdmland on eBay and installed it this afternoon. It had small pegs and I DID NOT have to grind them off. They fit perfectly into the holes left when the flying H was removed. (2011 Genesis 4.6 sedan) Therefore no alignment was necessary. The emblem stuck easily using the double-sided tape that came with it. No other tape needed.
To remove the flying H, I used a hair dryer on the already sun-warmed car. The dental floss broke a few times, but the old emblem came off easily. Not so for the goo! Rubbing alcohol and WD-40 didn't touch it. I ended up using acetone (fingernail polish remover). I checked this first on paint in a door opening, and it does not affect the paint. It still took quite a while (1/2 hour+) to get the goo off.
This was so easy I may do the front, the wheels, and the steering wheel.
Goo Gone works the best for removing the left over adheasive.
Qbedobedoo
Registered Member
Mark_888
Registered Member
- Joined
- Jan 9, 2009
- Messages
- 13,335
- Reaction score
- 224
- Points
- 63
- Genesis Model Type
- 1G Genesis Sedan (2009-2014)
Next time try GooGone (but not the industrial strength version). Then clean the GooGone off with lots of soap and then then water. GooGone will also remove those pesky price stickers and product labels on stuff you buy.I replaced the flying H a few days ago.. it came off pretty easily, but the goo (glue residue) was a different story.. took me a good 15 mins to remove it all manually. Cleaned the area with alcohol, dried it good, then applied the Wing-emblem.
Result is amazing.!!!
Qbedobedoo
Registered Member
Cool.
It wasn't difficult to get off, there was just a lot of it.
It wasn't difficult to get off, there was just a lot of it.
Great products:
- VIN Check
- Add more horsepower!
- Clean your leather!
- Safe Emergency Charging
- Windshield Repair Kit
- Chemical Guys HydroSpeed Ceramic Quick Detailer
- Chemical Guys HydroCharge High-Gloss Hydrophobic SI02 Ceramic Spray Coating
- Get a dash cam!
- Auto Buyers Market
- Foreign invaders vs USA gangs
 | ||||
| | | | | |
| | | |||


Featured content
-

-
-
Thread 'Help us to keep helping you. Your support is essential to our survival.'
- Sal Collaziano
Replies: 27