• Car enthusiast? Join us on Cars Connected! iOS | Android | Desktop
  • Hint: Use a descriptive title for your new message
    If you're looking for help and want to draw people in who can assist you, use a descriptive subject title when posting your message. In other words, "I need help with my car" could be about anything and can easily be overlooked by people who can help. However, "I need help with my transmission" will draw interest from people who can help with a transmission specific issue. Be as descriptive as you can. Please also post in the appropriate forum. The "Lounge" is for introducing yourself. If you need help with your G70, please post in the G70 section - and so on... This message can be closed by clicking the X in the top right corner.

Oil change info 3.8 V6 in pics

ntx_v8

Registered Member
Joined
Feb 20, 2010
Messages
67
Reaction score
5
Points
8
I changed my oil and inspected my air filter on my 3.8L V6. Due to the bottom fairings, it is somewhat of a pain, but probably easier and definitely neater than my 2010 V8.
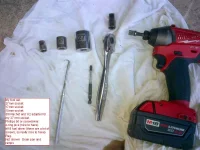
My tool set is:
27mm socket.
17mm socket.
10mm socket.
3/8 Rachet and 1/2 adapter for my 27 mm socket.
Phillips bit or screwdriver.
o-ring pick (nice to have).
M18 fuel driver (there are a lot of screws, so really nice to have).
Rag.
Drain pan
Ramps

The basic procedure is:
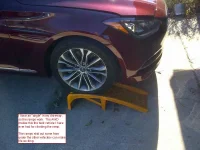
Drive/Raise vehicle onto ramps.
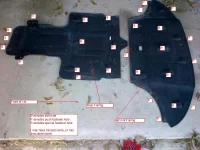
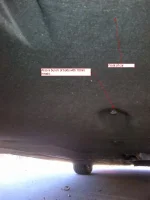
Remove front fairing
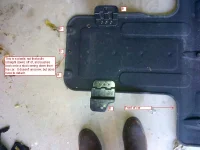
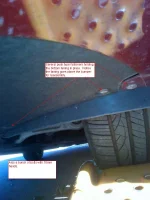
Remove rear fairing
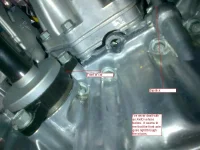
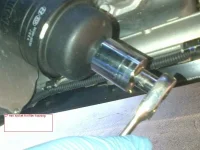
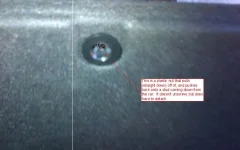
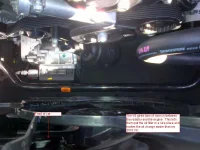
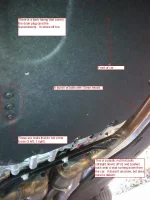
Remove drain plug and drain oil pan
Replace drain plug (and drain plug gasket if desired)
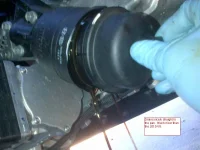
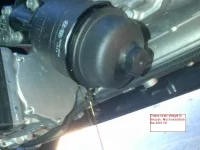
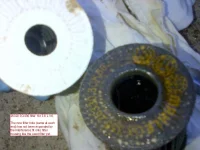
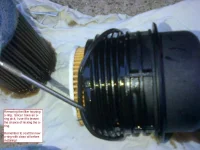
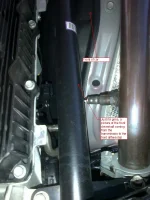
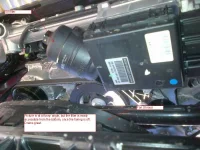
Remove filter housing and let drain
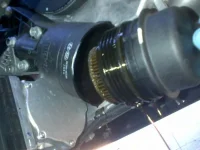
Replace filter and filter housing o-ring. (Coat new o-ring with clean oil before installing).
Replace rear fairing
Replace front fairing
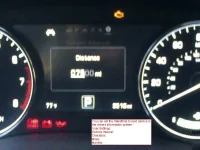
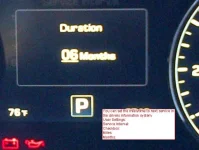
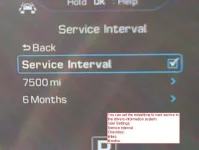
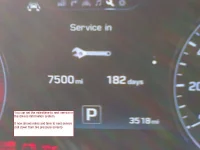
Reset service interval on Driver's Information System
Record Maintainence in Maintainence Log.

If it weren't for the 5,000 fasteners for the 2 fairings, it would be on the easy side of oil changes. (If my aunt . . ., she would be my uncle).

I am considering cutting a large access hole for the drain plug into the rear fairing. Would simplify the job a fair bit. I haven't figured out how I will cover the hole (thus retaining the aerodynamics that Hyundai seems to covet) yet.

I can post 10 pictures per post, so I will post several replies with the rest of the pictures.
 

Attachments

  • oil.change_Page_01.webp
    oil.change_Page_01.webp
    63.8 KB · Views: 1,363
  • oil.change_Page_02.webp
    oil.change_Page_02.webp
    53.5 KB · Views: 1,320
  • oil.change_Page_03.webp
    oil.change_Page_03.webp
    52.8 KB · Views: 1,168
  • oil.change_Page_04.webp
    oil.change_Page_04.webp
    44.2 KB · Views: 1,128
  • oil.change_Page_05.webp
    oil.change_Page_05.webp
    36.1 KB · Views: 1,112
  • oil.change_Page_10.webp
    oil.change_Page_10.webp
    48.3 KB · Views: 1,138
  • oil.change_Page_09.webp
    oil.change_Page_09.webp
    60.8 KB · Views: 1,143
  • oil.change_Page_08.webp
    oil.change_Page_08.webp
    63.7 KB · Views: 1,186
  • oil.change_Page_07.webp
    oil.change_Page_07.webp
    24 KB · Views: 1,050
  • oil.change_Page_06.webp
    oil.change_Page_06.webp
    26.5 KB · Views: 1,054
Last edited:
Here are the second 10 pictures.
 

Attachments

  • oil.change_Page_11.webp
    oil.change_Page_11.webp
    42.5 KB · Views: 811
  • oil.change_Page_12.webp
    oil.change_Page_12.webp
    46.1 KB · Views: 811
  • oil.change_Page_13.webp
    oil.change_Page_13.webp
    47.2 KB · Views: 772
  • oil.change_Page_14.webp
    oil.change_Page_14.webp
    66.4 KB · Views: 874
  • oil.change_Page_15.webp
    oil.change_Page_15.webp
    53.7 KB · Views: 757
  • oil.change_Page_20.webp
    oil.change_Page_20.webp
    36.7 KB · Views: 797
  • oil.change_Page_19.webp
    oil.change_Page_19.webp
    39.4 KB · Views: 1,213
  • oil.change_Page_18.webp
    oil.change_Page_18.webp
    45.3 KB · Views: 758
  • oil.change_Page_17.webp
    oil.change_Page_17.webp
    54.3 KB · Views: 781
  • oil.change_Page_16.webp
    oil.change_Page_16.webp
    28.6 KB · Views: 749
Here are the third 10 pictures.

I probably got carried away, but . . .
 

Attachments

  • oil.change_Page_21.webp
    oil.change_Page_21.webp
    33.8 KB · Views: 707
  • oil.change_Page_22.webp
    oil.change_Page_22.webp
    55.5 KB · Views: 694
  • oil.change_Page_23.webp
    oil.change_Page_23.webp
    56.9 KB · Views: 667
  • oil.change_Page_24.webp
    oil.change_Page_24.webp
    39.9 KB · Views: 674
  • oil.change_Page_25.webp
    oil.change_Page_25.webp
    41 KB · Views: 722
  • oil.change_Page_30.webp
    oil.change_Page_30.webp
    44.9 KB · Views: 653
  • oil.change_Page_29.webp
    oil.change_Page_29.webp
    48.5 KB · Views: 674
  • oil.change_Page_28.webp
    oil.change_Page_28.webp
    60.3 KB · Views: 688
  • oil.change_Page_27.webp
    oil.change_Page_27.webp
    57.4 KB · Views: 656
  • oil.change_Page_26.webp
    oil.change_Page_26.webp
    46.3 KB · Views: 774
And the last 4 pictures.

Sorry for the length.
 

Attachments

  • oil.change_Page_31.webp
    oil.change_Page_31.webp
    42.7 KB · Views: 475
  • oil.change_Page_32.webp
    oil.change_Page_32.webp
    29.5 KB · Views: 443
  • oil.change_Page_33.webp
    oil.change_Page_33.webp
    33 KB · Views: 439
  • oil.change_Page_34.webp
    oil.change_Page_34.webp
    32.4 KB · Views: 524
Nice write up. One tip i heard someone here mention, is take off the rear fairing first. Remove the rear fasteners from the front fairing and the rear fairing will be held in place by the pop nut at the rear and the rear edge of the front fairing at the front. I used this this technique on my last oil change and it worked great. It makes reassembly easier too. Put the front fairing on first but leave the rear fasteners off until the rear fairing goes on.
 
Also, on my last oil change, i had originally planned to change the oil filter without removing the front fairing, but i couldn't get the filter housing moving without a 27mm socket and all mine are deep sockets so i put a 27mm oil filter socket on my wish list.

http://www.weselltools.com/27-mm-oil-filter-socket.html

That and a mighty vac should allow me to do the changes without dropping either of the fairings. A Chinese food takeout container (black plastic) fit perfectly to catch the oil from the housing.
Keep us informed when you successfully do that.
 
I will do. I should have explained the 27mm deep socket wouldn't clear the fairing to fit on the filter housing.
 
Also, on my last oil change, i had originally planned to change the oil filter without removing the front fairing, . . A Chinese food takeout container (black plastic) fit perfectly to catch the oil from the housing.

You gotta love that huge space in front of the V6.
 
Looking to update and upgrade your Genesis luxury sport automobile? Look no further than right here in our own forum store - where orders are shipped immediately!
Thanks for the very detailed writeup, NTX. I've been doing my own oil changes, brakes and most other car maintenance for years, so it's great to learn how best to take care of our cars. I've never owned a Mityvac, but this thread has convinced me to go out and get one. Having to remove both the front and rear undercarriage fairings/shrouds doubles the time for what should be a 20min job! With the Mityvac, at least you only have to remove the front portion to have access to the filter, and it appears we may be even able to avoid that with a shallow 27mm socket, doing everything from up top. Will have to check that out. Anyway, thanks again. BTW, where is the best place online to purchase OEM Hyundai oil filters? Also, are there any WIX or other decent alternatives to our part no. 26320-3CKB0 oil filter? Thanks in advance!
 
. . .doubles the time for what should be a 20min job! With the Mityvac, at least you only have to remove the front portion to have access to the filter, and it appears we may be even able to avoid that with a shallow 27mm socket, doing everything from up top. Will have to check that out. Anyway, thanks again. BTW, where is the best place online to purchase OEM Hyundai oil filters? Also, are there any WIX or other decent alternatives to our part no. 26320-3CKB0 oil filter? Thanks in advance!


I haven't found a Fram/Wix/etc. part number. I negotiated parts at fleet rate when I bought my car, so my dealer is where I go for now.

If you don't have to use a jack to lift the car-and have some sort of power driver for the 10mm socket, 30 minutes will probably do it. I'm still thinking about how to put a sturdy, cheap, easy to remove access cover in the rear fairing for the drain plug/oil flow.

But I don't think you will go wrong with a top side job---if you can reach down to the filter area without trouble.
 
Thanks for the very detailed writeup, NTX. I've been doing my own oil changes, brakes and most other car maintenance for years, so it's great to learn how best to take care of our cars. I've never owned a Mityvac, but this thread has convinced me to go out and get one. Having to remove both the front and rear undercarriage fairings/shrouds doubles the time for what should be a 20min job! With the Mityvac, at least you only have to remove the front portion to have access to the filter, and it appears we may be even able to avoid that with a shallow 27mm socket, doing everything from up top. Will have to check that out. Anyway, thanks again. BTW, where is the best place online to purchase OEM Hyundai oil filters? Also, are there any WIX or other decent alternatives to our part no. 26320-3CKB0 oil filter? Thanks in advance!
If you get a MityVac oil extractor, make sure you get the MV7300 PneumatiVac. You will need to hook it up to an air compressor (a small electric compressor will do fine). The ones with hand pumps do not work well, unless you are OK with getting out only 80-90% of the oil.

You should get the Hyundai OEM filter. You can purchase them from some dealers who sell them online, such as http://www.jimellishyundaiparts.com. If you purchase a bunch of oil filters, air filters, and cabin filters all that the same time, the shipping cost is not a concern.
 
I have a small, wall-mounted Campbell Hausfeld air compressor so that should work fine. I"ll check out the web site and see how prices compare with a couple other sites I found. Thanks for the tips guys!
 
I just changed the oil on my 2012 3.8 genesis sedan with 30k miles. I did not have a 27 mm socket, same as a 1-1/16 inch socket. I tired an ajustabe wrench but it did not work properly, turned on the plastic hex. I used a small oil filter strap wrench below the hex and it did the trick. I don't think my oil filter had been changed for a while so I needed a lot of torque. The strap wrench put the torque closer to the threads. Perhaps you won't need a new socket.
 
I just changed the oil on my 2012 3.8 genesis sedan with 30k miles. I did not have a 27 mm socket, same as a 1-1/16 inch socket. I tired an ajustabe wrench but it did not work properly, turned on the plastic hex. I used a small oil filter strap wrench below the hex and it did the trick. I don't think my oil filter had been changed for a while so I needed a lot of torque. The strap wrench put the torque closer to the threads. Perhaps you won't need a new socket.
Are you serious? The 27mm socket above costs $7.00.
 
. . .
Replace rear fairing
Replace front fairing . . .

MidnightSun had some good points the other day that I am copying the highlights to here. His full post is at http://genesisowners.com/hyundai-genesis-forum/showthread.php?t=17511.

The panel inserts (plastic ones) will become almost unusable once taken out so do pick up a bag of 100 or so on eBay and keep in your trunk. http://www.ebay.com/itm/Black-Plast...ash=item566e964550:g:eVYAAOSw9N1Vi50O&vxp=mtr

Secondly, the 10mm head bolts holding the balance of the panel in place tend to rust up/jam tight. I sheared off 4 of them and I was very careful. Dunked the remainder in grease and inserted those. Worked half the day drilling out an retapping the frozen ones. What a pita.

The plastic panel inserts don't break a lot, but they do get difficult to re-install. It is a choice about how much time you want to spend installing splayed ones.

Midnightsun uses grease to reduce corrosion, and I started use WD-40 on my 4th oil change today. I live in salt-free Texas, and was already seeing minor rust after only 13 months.
 
Are you serious? The 27mm socket above costs $7.00.

Is the 27 mm socket required for the 3.8L or the 5.0L (mine) or what?

I think I take a 24 mm. - not sure.

Haven't done the job yet - looks like a lot of fun.
 
Is the 27 mm socket required for the 3.8L or the 5.0L (mine) or what?

I think I take a 24 mm. - not sure.

Haven't done the job yet - looks like a lot of fun.
27mm for G1. I don't know about G2.
 
Last edited:
Back
Top