• Car enthusiast? Join us on Cars Connected! iOS | Android | Desktop
  • Hint: Use a descriptive title for your new message
    If you're looking for help and want to draw people in who can assist you, use a descriptive subject title when posting your message. In other words, "I need help with my car" could be about anything and can easily be overlooked by people who can help. However, "I need help with my transmission" will draw interest from people who can help with a transmission specific issue. Be as descriptive as you can. Please also post in the appropriate forum. The "Lounge" is for introducing yourself. If you need help with your G70, please post in the G70 section - and so on... This message can be closed by clicking the X in the top right corner.

Illuminated Door Sill Plates - 3.8 HTRAC Ultimate

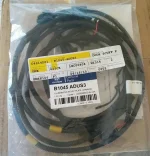
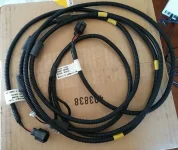
Weeeeeeeellllllll... I I got it installed, and it wasn't pretty. I opened up the sheath of the harness and easily identified a negative wire for ground. That took 10 minutes. I spent the next 2.5 hours trying to find a wire that provided 12vdc when the door is open then zero when it is shut. I never found one. By the way, there are 2 fiber optic cables running in that harness !

So..... I went to the bench to see just how much the light in the sill draws. Answer is .007 amps (7micro amps). So I made a decision to power it all the time. It is now hard wired to one of the wires that has 12vdc all the time. That is the part that is not pretty.

It so happens that the Genny is always drawing power. Small amounts of it to power the clock, receivers for sensing the key, etc. so,I adding another .007 amps seemed like a safe thing. I DID add a way to turn of the sill if I need to. It is a poor man's switch, called an inline fuse. I tucked the fuse in the crease where carpet meets the side wall by the driver left foot.

Here are the pics.....
5972EF71-547F-4B5D-933C-5B60428F4D63.jpg


3027A0DE-A77C-4325-839D-1A37B1FF18AD.jpg


054D243D-D49B-4603-9A55-E954319D8421.jpg


35E966EA-D85F-4286-9ACA-6E0AC73EDD08.jpg


78AF6407-EC15-4155-8ACD-08E7805A64B1.jpg
 
That looks really nice. i hope you'll provide additional info and pics as you do the other plates.

Wonder if any 5.0 forum members would be willing to pull theirs up to see how they are installed...
 
Last edited:
I installed the passenger side illuminated door sill plate today. I really thought someone had posted that the connectors for the sills are tucked up in the side kick plates in the foot well. Well... They're not.

BUT... this time I had the advantage of the full schematic and learned that the door lights that come on when a door is opened, is a red with black stripe, so... I just tapped that and a black wire for ground. I THINK it's working right, but hard to tell. The door sill is pretty well covered by the door when it's closed so it's hard to see if the light goes off ;).

On to my next project.
 
Can you please give me the part number for the RH side sill plates. My Hyundai has the still plates listed as (B1045-ADU00-RNB) the parts are listed on OEM123 for $210 after discount. I am thinking this price is for the R&L SILL PLATES. I do not know if one or two come in the box? Thank for your time in this matter.
 
Bummer. I already have the front ones on my 5.0 Ultimate. I wanted to add the rear ones like I had on my 2011 4.6. Seems weird to lose that feature going from the 11 to the 15.
 
If I could revisit this issue, just wondering if anyone has a "definitive" install that works like factory on the V8. I could've sworn that I read somewhere in this forum that the prewire WAS there for the lighted door sills on the V6 so I went ahead and got these:

http://www.ebay.com/itm/Fit-Hyundai...r-Step-Scuff-Plate-Front-Door-2p/111574477437

I thought it was a good deal for $75 total price. They arrived today and seem to be as advertised, but I found that bad news as posted here earlier that there is just a whole lot of wrapped wires running along that channel and no wiring harness for them! They otherwise installed great, there is a precut flat section out of the metal edge under the rubber door gasket to run the flat wire so at least did not have to do any metal work lol. There is even a empty screw thread for mounting the flat grey plastic section of the connector that is prewired to the new door sill so it can be secured and not rattle around.

If anyone has specific wiring details and/or pictures to share about installing the LED door sills in a 2015 V6 Ultimate sedan it would be appreciated, thanx.
 
You're correct that all the signs are there to indicate that the lighted door sills SHOULD slip in and plug right in. I never found any connector hidden anywhere.
 
Yea I posted last week about this because I was unable to find the plugs. I would love to see if someone with a 5.0 can take a pic of the hardness and where they tap into the main hardness on bot sides.
 
Yea I posted last week about this because I was unable to find the plugs. I would love to see if someone with a 5.0 can take a pic of the hardness and where they tap into the main hardness on bot sides.

The plot thickens. My Hyundai dealer informed me that their LED door sills kit INCLUDES two additional wiring harnesses and instructions to install. They managed to find a separate part number for just those two wiring harnesses and I figured I would throw them $70 for finding this out to order them. I should have them next week and I can post more details.
______________________________

Help support this site so it can continue supporting you!
 
Received the "Illuminated Scuff Plate Harness" kit today, part number B1045-ADUS3 for installing the LED scuff plates I have already bought from eBay. My dealer sold it to me for $71.50 + tax. It includes two wiring harnesses attached to a single 12 foot cable wrapped in plastic ribbed conduit. Also in the packet are two electrical taps, some cable ties and small foam pads with adhesive backs. The ends have labels for the passenger and driver side. So one pair of wires feeds both doors and attaches to the power in the middle. It also includes a detailed instruction booklet, listing 32 steps to install.

I will take pictures of everything and post them soon.

I haven't started the installation yet, but here is the kit. A Google search of the part number turned up two web sites selling the kit, both calling it illuminated door scuff plates, no picture. This part number is ONLY the wiring kit and not the actual door sills.
 

Attachments

  • Genesis door sill kit1.webp
    Genesis door sill kit1.webp
    72.2 KB · Views: 415
  • Genesis door sill kit2.webp
    Genesis door sill kit2.webp
    125.5 KB · Views: 372
  • Genesis door sill kit3.webp
    Genesis door sill kit3.webp
    93.9 KB · Views: 387
Last edited:
I have reviewed the documentation. It basically involves popping off all of the plastic covers from one door, across the lower side of the dash, to the other door. The wire conduit runs through there, strapped in with cable ties. Run the wire from the passenger side to the driver side, it has to be fished through the center dash at one point. The instructions literally show where every single wire tie should be, very detailed.

A battery disconnect during installation is recommended. Electrical connections are made at the Body Control Module under the passenger side kick panel. The black wire is spliced into the yellow/black wire connected to pin 2. The red wire to the green/orange wire connected to pin 1.

I think I may have my aftermarket installer guy help me with this, I would hate to damage one of the panels on my new car because I have never torn a dashboard apart before. I will take a few pics during the install. Let me know if you have any questions.

Now if they'd only make a simliar kit for adding the fog lights to the V6 - they'd sell alot of those. Good luck with your scuff plate install!
 
I have reviewed the documentation. It basically involves popping off all of the plastic covers from one door, across the lower side of the dash, to the other door. The wire conduit runs through there, strapped in with cable ties. Run the wire from the passenger side to the driver side, it has to be fished through the center dash at one point. The instructions literally show where every single wire tie should be, very detailed.

A battery disconnect during installation is recommended. Electrical connections are made at the Body Control Module under the passenger side kick panel. The black wire is spliced into the yellow/black wire connected to pin 2. The red wire to the green/orange wire connected to pin 1.

I think I may have my aftermarket installer guy help me with this, I would hate to damage one of the panels on my new car because I have never torn a dashboard apart before. I will take a few pics during the install. Let me know if you have any questions.
Dr.Notes
Can you please post pics off all the pages? If you can post them up I will be able to create a how to for everyone here. I just got my fog connectors so when I get a moment I will post pics and create a how to for that too. I already started to make a custom wiring hardness for the fogs.
 
Dr.Notes
Can you please post pics off all the pages? If you can post them up I will be able to create a how to for everyone here. I just got my fog connectors so when I get a moment I will post pics and create a how to for that too. I already started to make a custom wiring hardness for the fogs.

I will work on that tomorrow, maybe I can download a PDF instead of trying to scan all 12 pages. There is a separate thread in here about adding fogs to the V6:

http://genesisowners.com/hyundai-genesis-forum/showthread.php?t=14020&page=17

that I am also watching so that would probably be the best place for your wiring details about those, don't you think?
 
Last edited:
These are scans of every page but one from the instructions, looks like I can only post 5 at a time so this will take three postings. I left out the page of install checks of making sure they are not loose and that they light up, thank you for mentioning that Capt. Obvious!
Genesis door sill01.webp

Genesis door sill03.webp

Genesis door sill04.webp

Genesis door sill05.webp

Genesis door sill06.webp
 
Dr.Notes
Can you please post pics off all the pages? If you can post them up I will be able to create a how to for everyone here. I just got my fog connectors so when I get a moment I will post pics and create a how to for that too. I already started to make a custom wiring hardness for the fogs.

Did you find the instructions useful? I want to find out if I wasted my time scanning them all. I am going to install my wiring next week with some help from guys who tear cars apart for a living.
 
Looking to update and upgrade your Genesis luxury sport automobile? Look no further than right here in our own forum store - where orders are shipped immediately!
Back
Top