• Car enthusiast? Join us on Cars Connected! iOS | Android | Desktop
  • Hint: Use a descriptive title for your new message
    If you're looking for help and want to draw people in who can assist you, use a descriptive subject title when posting your message. In other words, "I need help with my car" could be about anything and can easily be overlooked by people who can help. However, "I need help with my transmission" will draw interest from people who can help with a transmission specific issue. Be as descriptive as you can. Please also post in the appropriate forum. The "Lounge" is for introducing yourself. If you need help with your G70, please post in the G70 section - and so on... This message can be closed by clicking the X in the top right corner.

I'm at a loss...

I genuinely appreciate the comments, thoughts, and ideas so far!

@NLJ and @mrcleeaan - nobody nearby to help for the time being, mostly because of my work schedule and no extended family nearby. I have a couple work buddies but so far their schedules have been out of sync with mine and have been unable to lend a hand. Even so, I appreciate the thought! Would love it if you guys were here helping me out! I could really use another set of hands.

@EdsNotHere - I was considering it while tossing and turning at night.. but, it may not be needed now because...


IMG_20190919_165344__01.jpg


....I GOT ONE OF THE BOLTS ON!!!

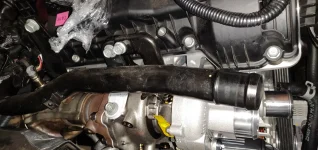
This is VERY difficult. Here's what I did.

First, after mounting the turbo back on, I removed all the manifold nuts except one...
IMG_20190919_165422.jpg
IMG_20190919_165427.jpg

This last nut I kept on, but kept it at the end of the threads for more room to move the turbo....
IMG_20190919_165439__01.webp

I started out really loose, then went under the car to check the holes, then would nudge the turbo around, then come back up and tighten this nut again a little more, then go back underneath to check the holes.... I did this, again, and again, and again, until finally it looked right. Hand-threaded the bolt partially in, but the friction of the flange and everything not being perfectly flush, it gave me a little resistance, but not too much. Threaded in all the way by hand!

Now, I need to loosen it a tiny bit so I can re-align the gasket and the other bolt holes on the other side of the oil flange. Once those are lined up I'll just have to cross my fingers that I can get the bolt in there. I may have to trim the tip of the other bolt as well to help get the threads started like on this one.

For now, I'm breathing a HUGE, but temporary, sigh of relief.
 
Also, forgot to mention that when reinstalling the turbo, I remove the electronic wastegate actuator again. This time I marked it, as it is threaded down to a very specific spec.

IMG_20190918_194648.webp

IMG_20190918_195252.webp
IMG_20190918_195642.webp

Then I marked the torx screws ( though it's not needed)...
IMG_20190918_194923.webpIMG_20190918_194702.webp
IMG_20190918_195844.webp

Having the wastegate actuator out makes putting the turbo back in much easier. AND it makes reinstalling those drain flange bolts actually doable. With it on, I don't know how I'd reach those bolts..
 
One more thing, before mounting the turbo I made sure the turbo oil drain flange was nice and clean of old gasket material...

Before-

IMG_20190918_193909.webp

After-
IMG_20190918_194156.webp

Tape was removed prior to turbo install, obviously.
 
Looking to update and upgrade your Genesis luxury sport automobile? Look no further than right here in our own forum store - where orders are shipped immediately!
Todd. Have you tried a little gasket adhesive that way you stick it on the turbo and the gasket won’t move
Todd, if you do follow this good advice, don't use regular silicone as an adhesive on any gasket which contacts the exhaust stream. It will poison the cats. Instead use an exhaust system safe silicone, or use weatherstrip adhesive which is the way we usually go. I was going to suggest you loosen the turbo before attaching the oil lines, but was beat to it. Good suggestion. Don't taper your bolts any further. So doing might make them start cross threaded...and you sure don't want that to happen. When they're aligned they'll screw right in. Don't force them or you could end up with a bigger problem than you already have.

Are you using new bolts? If so, compare them to the original bolts just to make sure they're right.
 
Is the new downpipe still going on?
 
Todd, if you do follow this good advice, don't use regular silicone as an adhesive on any gasket which contacts the exhaust stream. It will poison the cats. Instead use an exhaust system safe silicone, or use weatherstrip adhesive which is the way we usually go. I was going to suggest you loosen the turbo before attaching the oil lines, but was beat to it. Good suggestion. Don't taper your bolts any further. So doing might make them start cross threaded...and you sure don't want that to happen. When they're aligned they'll screw right in. Don't force them or you could end up with a bigger problem than you already have.

Are you using new bolts? If so, compare them to the original bolts just to make sure they're right.

Reusing stock bolts. I'll taper the 2nd bolt just a tiny bit, no more than the first one.

Also, no need for gasket adhesive. It's held in place right now with the first bolt.
 
Okay, after 2 hours and an extra set of helping hands (and tools), I FINALLY got the 2nd oil drain flange bolt on.

Here is how we did it. First, I completely removed all the manifold nuts so the turbo had more room to move. I then pulled the turbo is far towards the frame as I could. Then, I slightly loosened the existing drain bolt that I got on the other day, then I spent a lot of time and effort into lining up the second oil drain bolt holes. This was VERY tedious and difficult... It's hard to even see the bolt holes from under the car, and even using my phone camera slipped under the turbo wasn't very helpful. But, eventually I was able to do it...somehow. I did use a small hex wrench, from the top, and rattled it around in the bolt hole in an attempt to help line things up.

After the fact I realize that something like this would have been VERY helpful....

https://www.amazon.com/DEPSTECH-Wat...9Y2xpY2tSZWRpcmVjdCZkb05vdExvZ0NsaWNrPXRydWU=


Anyway, with all the manifold nuts removed, and the turbo pushed as far towards the frame as I could get it, I was BARELY able to (from above) squeeze my hands/fingers both in-between the turbo and the block, and with my other hand come from the exhaust end of the turbo, and slowly, gently, tediously, begin to thread the bolt in place. I did this with a 1/4 drive 10mm socket attached to the bolt, by using a small folded section of tape to keep the bolt in the socket.

IMG_20190921_093802.webp

Using a 3/8 drive socket is just too big, as the drain pipe bends towards that way in makes it so there is very little room...

Once I couldnt thread in the bolt any more by hand (which was very soon), I came at it from under the car, using a 1/4 wobble extension, combined with a bunch of other extensions, and was able to tighten it bit by bit, until there was enough room for the extension to actually pop in place in the socket. From there, it was smooth sailing.

Here is my view of the tightened bolt from underneath....

IMG_20190921_094439__01.webp


Lol, you can barely tell what's even going on there. Anyway, bolts are torqued down to 11.3 Nm. Per the FSM, these should be torqued between 9.8-11.8 Nm, or roughly 7-8lb-ft.

Now it's way passed my bedtime, so I just finger tightened the manifold nuts so the oil drain pipe isn't taking the full weight of the turbo while I sleep.

Sorry I didn't get around to taking many pics on this step.... It was very difficult...
 
Yeah, so far he has 45 minutes in dedicated repair time, but has 32 hours in taking photos and editing them.

Should not be much longer and sounds like it will be done right.
Yes, good documentation is always time consuming. His shared pictures and experience may be very helpful to others (even if it's just to scare them away from getting in so deep 😊).
Hats off to Todd for taking the time to document his efforts. 👏👏
 
I have tomorrow and Tuesday off. Hopefully I'll have it up and running on Tuesday. This story will finally come to a close very soon!
 
Okay, so yesterday I got a good amount finished.

First thing I did was torque down the turbo manifold nuts. The FSM calls for torque to be between 43-47lb-ft, so I set them each to 45lb-ft. In addition to this, they must be tightened in an opposing pattern, similar to wheel lug nuts.

IMG_20190918_203117.webp
IMG_20190918_205445.webp

After this, I installed the oil feed line and banjo bolt, complete with new copper o-rings - but not before dropping in about 1mL of oil! Torqued down to spec, 9-13lb-ft or 11.8-17.7Nm.

IMG_20190923_155055.webp
IMG_20190923_155405.webp
IMG_20190923_155618.webp
IMG_20190923_155739.webp

Now it's time to install the electronic wastegate actuator. Simply bring it into place, and tighten down the torx screws, they really don't even need to be that tight. I just lined up the previous marks I made...

IMG_20190923_160124.webp
IMG_20190923_160552.webp
IMG_20190923_160947.webp


Next, it's time to line up/attach/tighten the actuator arm. Here it is in place, before tightening everything up to spec...

IMG_20190923_161655.webp
 
Last edited:
.....and here it is all lined up and tightened.
IMG_20190923_161726.webp

Don't forget to plug in the wiring harness!
IMG_20190923_161825.webp

Now, it's time to install the new studs. They threaded in perfectly. These were all finger tightened, as there is no other way to do it.
IMG_20190923_161925.webp

IMG_20190923_162748.webp

^And yes, that is dried blood on the turbo. The exhaust manifold gasket has a sharp protrusion that is a magnet for knuckles.

Next up is the OEM downpipe. To install this you must put it in from under the car, carefully bring it up and line it up to the turbo studs, then it slides right in, but don't forget the new gasket! After this, lightly tighten down all the nuts, then torque them down in an opposing pattern (again, just like lug nuts) to something between 26-30lb-ft. In order to reach the 2 lower nuts, you need to use a few long extensions and a u-joint, then tighten them from underneath the car.
IMG_20190923_163205.webp
IMG_20190923_163514.webp

When bringing it up I realized that this metal bracket/shield was in the way of the primary o2 sensor. Just one 10mm bolt and it was out of the way and I had enough room to slide the downpipe in.
IMG_20190923_163824.webp
IMG_20190923_163856.webp

Here's a view of my extensions+u-joint from underneath the car.
IMG_20190923_165112.webp

All torqued down to 29lb-ft.
IMG_20190923_165432.webp
 
Last edited:
Downpipe is installed!

IMG_20190923_170435.jpg

Better reinstall the turbo stay bracket before bringing down the coolant hard lines, along with the bracket/shield I removed to make room for the downpipe.
IMG_20190923_170847.jpg
IMG_20190923_171249.jpg


Now time to line up the large radiator coolant return pipe. Once lined up I put in the bolt at the very back of the engine block, then attached the bolt to the stay bracket up above the turbo.


IMG_20190923_171752.jpg
IMG_20190923_171502.jpg

Now time for the turbo coolant line banjo bolts. Used new copper o-rings for these guys as well.

IMG_20190923_170632.webp
IMG_20190923_172537.jpg
IMG_20190923_172818.jpg

Coolant hard lines all in place and torqued down!
IMG_20190923_173128.webp
 

Attachments

  • IMG_20190923_171502.webp
    IMG_20190923_171502.webp
    215.4 KB · Views: 14
Last edited:
Syringe.
Yes, doctor.
Torx.
Here it is.
Have the surgical assistant move the light here please.
Suture?
Yes, to 11 Nm. Then clamp.
(Nurse wipes brow of surgeon)
The anastomosis is ready for closure here. See that everyone?

Now for the new kidney wastegate.
 
Back
Top