-

-
Hint: Use a descriptive title for your new message
If you're looking for help and want to draw people in who can assist you, use a descriptive subject title when posting your message. In other words, "I need help with my car" could be about anything and can easily be overlooked by people who can help. However, "I need help with my transmission" will draw interest from people who can help with a transmission specific issue. Be as descriptive as you can. Please also post in the appropriate forum. The "Lounge" is for introducing yourself. If you need help with your G70, please post in the G70 section - and so on... This message can be closed by clicking the X in the top right corner.
- Genesis Forums
- Genesis Motors Forums
- Genesis G70 Forum - G70FORUM.COM
- Engine, Drivetrain and Exhaust Discussion
You are using an out of date browser. It may not display this or other websites correctly.
You should upgrade or use an alternative browser.
You should upgrade or use an alternative browser.
3.3T Intake comparisons
- Thread author Tdefrees
- Start date
maxsilver
Registered Member
- Joined
- Apr 3, 2019
- Messages
- 335
- Reaction score
- 294
- Points
- 63
- Genesis Model Type
- Genesis G70
I'm hoping to get mine done tomorrow as my elbows and filters are supposed to be arriving then.So, did anyone get this installed yet?
trdehmer
Registered Member
- Joined
- Apr 29, 2019
- Messages
- 173
- Reaction score
- 52
- Points
- 28
- Genesis Model Type
- Genesis G70
maxsilver
Registered Member
- Joined
- Apr 3, 2019
- Messages
- 335
- Reaction score
- 294
- Points
- 63
- Genesis Model Type
- Genesis G70
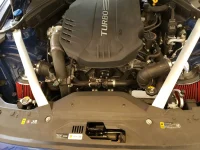
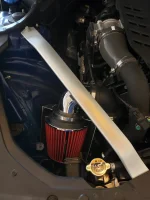
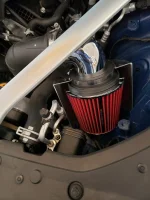
My filters and elbows showed up so I got to work installing everything. It's a pretty easy project, to remove the stock air boxes it's unlatch 4 clips per box, remove two bolts for each strut bar, and remove 3 bolts at the bottom of each airbox. I used some stick on weatherstripping under the strut bars and on top of the elbow just to hold everything in place.
I've only gone for a short drive so far to ensure everything was working properly. The sound change is subtle in my opinion, just a bit more induction noise from the intakes, and the blowoff valve is more audible now as well. I'm not sure if the car felt any faster so far, but I was more after the sound improvement and better airflow for when I do get myself a JB4.
Toddasaurus
REEEEEEEEEEEEEEEE!!!!!
- Joined
- Feb 18, 2018
- Messages
- 3,299
- Reaction score
- 4,526
- Points
- 113
- Genesis Model Type
- Genesis G70
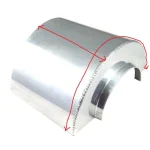
^Looks good! Now if you can figure out a way to expand the heat shield to completely block the filters from the heat of the engine bay. Even so, as it is I bet it's just as good as some of the aftermarket intakes available right now, at like 1/3 the price!
trdehmer
Registered Member
- Joined
- Apr 29, 2019
- Messages
- 173
- Reaction score
- 52
- Points
- 28
- Genesis Model Type
- Genesis G70
Did you have to trim the heat shields at all?
View attachment 20939View attachment 20940View attachment 20941
My filters and elbows showed up so I got to work installing everything. It's a pretty easy project, to remove the stock air boxes it's unlatch 4 clips per box, remove two bolts for each strut bar, and remove 3 bolts at the bottom of each airbox. I used some stick on weatherstripping under the strut bars and on top of the elbow just to hold everything in place.
I've only gone for a short drive so far to ensure everything was working properly. The sound change is subtle in my opinion, just a bit more induction noise from the intakes, and the blowoff valve is more audible now as well. I'm not sure if the car felt any faster so far, but I was more after the sound improvement and better airflow for when I do get myself a JB4.
maxsilver
Registered Member
- Joined
- Apr 3, 2019
- Messages
- 335
- Reaction score
- 294
- Points
- 63
- Genesis Model Type
- Genesis G70
I didn't have to trim mine. The driver side shield was a bit tricky to get it positioned in a spot where it would fit though.Did you have to trim the heat shields at all?
trdehmer
Registered Member
- Joined
- Apr 29, 2019
- Messages
- 173
- Reaction score
- 52
- Points
- 28
- Genesis Model Type
- Genesis G70
I picked up my filters today. Elbows don’t arrive until Friday. If I do the heat shields, figure I need some good reflective material from DEI over the back side so they don’t heat soak.
maxsilver
Registered Member
- Joined
- Apr 3, 2019
- Messages
- 335
- Reaction score
- 294
- Points
- 63
- Genesis Model Type
- Genesis G70
I did purchase a pack of reflective material but I didn't have enough to do both shields.I picked up my filters today. Elbows don’t arrive until Friday. If I do the heat shields, figure I need some good reflective material from DEI over the back side so they don’t heat soak.
trdehmer
Registered Member
- Joined
- Apr 29, 2019
- Messages
- 173
- Reaction score
- 52
- Points
- 28
- Genesis Model Type
- Genesis G70
I did purchase a pack of reflective material but I didn't have enough to do both shields.
What material did you find/purchase? What is the exterior height and length dimension so I'd know what size sheet of reflective material to get?
The reflect-a-gold would be the #1 reflective barrier, and the reflect-a-cool would be the #2 reflective barrier product offered by DEI.
Reflect-A-GOLD™ - Heat Reflective Sheet
Reflect-A-Cool™ - Heat Reflective Sheets
Also, I didn't realize this, but Spectre Performance is a division of K&N Engineering. So, these are basically K&N Filters from what I can gather.
Attachments
Last edited:
Looking to update and upgrade your Genesis luxury sport automobile? Look no further than right here in our own forum store - where orders are shipped immediately!
maxsilver
Registered Member
- Joined
- Apr 3, 2019
- Messages
- 335
- Reaction score
- 294
- Points
- 63
- Genesis Model Type
- Genesis G70
I ordered this stuff:
I should have paid better attention to how much it came with, it's only 12x12 inches in size, I thought the picture made it look like a roll of this material, but it was just one piece.
I'll see if I can get you measurements of the heat shields at some point.
Thermo-Tec 13500 12" X 12" Adhesive Backed Heat Barrier : Amazon.ca: Automotive
Thermo-Tec 13500 12" X 12" Adhesive Backed Heat Barrier : Amazon.ca: Automotive
www.amazon.ca
I should have paid better attention to how much it came with, it's only 12x12 inches in size, I thought the picture made it look like a roll of this material, but it was just one piece.
I'll see if I can get you measurements of the heat shields at some point.
maxsilver
Registered Member
- Joined
- Apr 3, 2019
- Messages
- 335
- Reaction score
- 294
- Points
- 63
- Genesis Model Type
- Genesis G70
Reflect-a-gold seems like it would be effective, but holy hell that stuff is garish looking. I'm worried if I put that in my engine bay it would be like a gateway to gold, next thing you know I would be getting gold teeth installed. 
trdehmer
Registered Member
- Joined
- Apr 29, 2019
- Messages
- 173
- Reaction score
- 52
- Points
- 28
- Genesis Model Type
- Genesis G70
Reflect-a-gold seems like it would be effective, but holy hell that stuff is garish looking. I'm worried if I put that in my engine bay it would be like a gateway to gold, next thing you know I would be getting gold teeth installed.
Yeah, I felt the same. But figured intake temps were more important. Reflect-a-cool is the next best stuff. But they said the gold reflects around 17% more.
TOGuy242
Registered Member
- Joined
- Jun 25, 2018
- Messages
- 319
- Reaction score
- 237
- Points
- 43
- Location
- Toronto, ON
- Genesis Model Type
- Genesis G70
So about to pull the trigger on an intake - debating between;
69-5318TS K&N Performance Air Intake System
And
BMS Kia Stinger / Genesis G70 Performance Dual Intake, Dual Performance Filters, and Mounting Hardware
Both look pretty similar, except the BMS appears to use the lower portion of the OEM air filter housing, while the K&N doesn’t. Would one be better than the other in terms of getting cooler air into the turbos?
Toddasaurus
REEEEEEEEEEEEEEEE!!!!!
- Joined
- Feb 18, 2018
- Messages
- 3,299
- Reaction score
- 4,526
- Points
- 113
- Genesis Model Type
- Genesis G70
So about to pull the trigger on an intake - debating between;
69-5318TS K&N Performance Air Intake System
And
BMS Kia Stinger / Genesis G70 Performance Dual Intake, Dual Performance Filters, and Mounting Hardware
Both look pretty similar, except the BMS appears to use the lower portion of the OEM air filter housing, while the K&N doesn’t. Would one be better than the other in terms of getting cooler air into the turbos?
Get the K&N kit. Without a doubt a much better setup than the BMS version. Lighter weight, filters are closer to the headlights, and a much more effective heat shield. The k&n housing also has a cutout for the OEM snorkel. It will bring in cooler temps than the BMS intake.
TOGuy242
Registered Member
- Joined
- Jun 25, 2018
- Messages
- 319
- Reaction score
- 237
- Points
- 43
- Location
- Toronto, ON
- Genesis Model Type
- Genesis G70
Get the K&N kit. Without a doubt a much better setup than the BMS version. Lighter weight, filters are closer to the headlights, and a much more effective heat shield. The k&n housing also has a cutout for the OEM snorkel. It will bring in cooler temps than the BMS intake.
Thanks, I was partial to K&N anyway having used their drop-in filters in the past.
NLJ
Registered Member
- Joined
- Oct 12, 2018
- Messages
- 2,143
- Reaction score
- 1,153
- Points
- 113
- Location
- Canada
- Genesis Model Type
- Genesis G70
Have you seen the engine bay of the MacLaren F1 Road Car?Reflect-a-gold seems like it would be effective, but holy hell that stuff is garish looking. I'm worried if I put that in my engine bay it would be like a gateway to gold, next thing you know I would be getting gold teeth installed.
It's all bling!
Pickle
Crunchy and Sour
- Joined
- Jun 3, 2019
- Messages
- 61
- Reaction score
- 53
- Points
- 18
- Location
- Canada
- Genesis Model Type
- Genesis G70
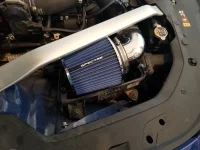
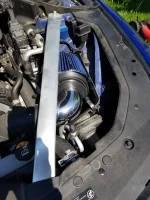
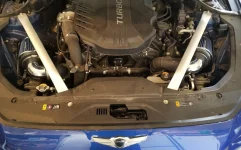
So, I installed the Build-Your-Own Intakes today. I have to say, I'm super impressed. I did mine slightly differently, but others on the Stinger forum have done the same with great results. After this install, I went for a quick drive and saw no error codes or other abnormal behavior. You could definitely hear the air induction better and for the first time, I actually heard the blow off valves in operation. That was kinda underwhelming. The stock BOV sounds like a cat farting. But at least I can hear it now.
For this install, you leave in the bottom half of the stock Intake box. This provides stability for the filters and act as heat shields from the engine. The stock snorkels are intact, providing some cool air from the outside, but my biggest concern with this setup is how much hot engine bay air I will pull in. You can't see it in the pics, but there is a large amount of space between the filters and the bottom of the lower airbox. The snorkels open into this area, so the underside of the filters will get unrestricted access to the cool outside air. I'm hoping this will help offset the top of the filters getting hot engine bay air.
It looks and sounds great, and was super easy to install. Simply:
1) Remove the brace bars
2) Pop the top half of the airbox off using the 4 clips.
3) Unscrew the clamp holding the hose to that top half of the airbox.
4) Remove the top half of the airbox and the stock filter.
5) Position and insert the new filter 90 elbow into the stock airbox hose and re-tighten the clamp.
6) No extra bracing, tape or anything else needed. It all fits snugly, doesn't wiggle, and is held in place by the cross brace bar.
7) Enjoy.
The filters and elbows cost about $95cad.
As an interesting side note, this install looks very much like the BMS install seen on page 1 of this thread.
Here's some pics:


Last edited:
Great products:
- VIN Check
- Add more horsepower!
- Clean your leather!
- Safe Emergency Charging
- Windshield Repair Kit
- Chemical Guys HydroSpeed Ceramic Quick Detailer
- Chemical Guys HydroCharge High-Gloss Hydrophobic SI02 Ceramic Spray Coating
- Get a dash cam!
- Auto Buyers Market
- Foreign invaders vs USA gangs
Featured content
-
Thread '🚗 Hey Gearheads and Speed Demons! Is Your Ride the Hottest on the Block? 🚗'
- Sal Collaziano
Replies: 0 -
-
Thread 'Help us to keep helping you. Your support is essential to our survival.'
- Sal Collaziano
Replies: 27


