• Car enthusiast? Join us on Cars Connected! iOS | Android | Desktop
  • Hint: Use a descriptive title for your new message
    If you're looking for help and want to draw people in who can assist you, use a descriptive subject title when posting your message. In other words, "I need help with my car" could be about anything and can easily be overlooked by people who can help. However, "I need help with my transmission" will draw interest from people who can help with a transmission specific issue. Be as descriptive as you can. Please also post in the appropriate forum. The "Lounge" is for introducing yourself. If you need help with your G70, please post in the G70 section - and so on... This message can be closed by clicking the X in the top right corner.

3.3T Intake comparisons

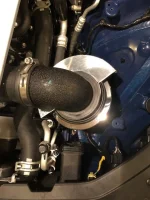
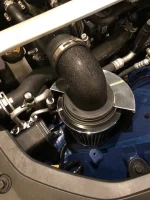
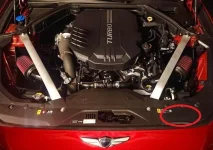
So, I installed the Build-Your-Own Intakes today. I have to say, I'm super impressed. I did mine slightly differently, but others on the Stinger forum have done the same with great results. After this install, I went for a quick drive and saw no error codes or other abnormal behavior. You could definitely hear the air induction better and for the first time, I actually heard the blow off valves in operation. That was kinda underwhelming. The stock BOV sounds like a cat farting. But at least I can hear it now.

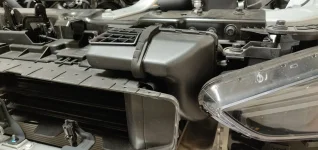
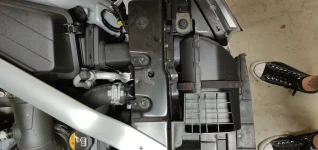
For this install, you leave in the bottom half of the stock Intake box. This provides stability for the filters and act as heat shields from the engine. The stock snorkels are intact, providing some cool air from the outside, but my biggest concern with this setup is how much hot engine bay air I will pull in. You can't see it in the pics, but there is a large amount of space between the filters and the bottom of the lower airbox. The snorkels open into this area, so the underside of the filters will get unrestricted access to the cool outside air. I'm hoping this will help offset the top of the filters getting hot engine bar air.

It looks and sounds great, and was super easy to install. Simply:
1) Remove the brace bars
2) Pop the top half of the airbox off using the 4 clips.
3) Unscrew the clamp holding the hose to that top half of the airbox.
4) Remove the top half of the airbox and the stock filter.
5) Position and insert the new filter 90 elbow into the stock airbox hose and re-tighten the clamp.
6) No extra bracing, tape or anything else needed. It all fits snugly, doesn't wiggle, and is held in place by the cross brace bar.
7) Enjoy.

The filters and elbows cost about $95cad.

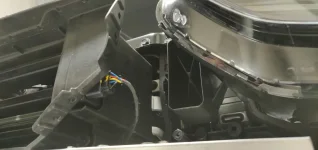
Here's some pics:
View attachment 21044View attachment 21045View attachment 21046
Nice results for $95 for sure. I thought about this setup as well, my concern is that most of the air flowing into the filters would be warm engine bay air given the placement of the filters with regards to the stock intake ducts, especially given how the filters are reversed compared to the intake ducts. Maybe it's not an issue as you mention there is quite a bit of space underneath the filters though. At least one of the Stinger forum guys was measuring intake air temps with a JB4, it would be super interesting to see how these DIY intakes affect air temps.

I'm still pondering how to build some sort of extended heat shield for my setup as suggested that doesn't look completely ghetto. For your setup I wonder if you could cut the top off of the stock airbox to create a pretty effective heat shield? That would certainly make it impossible to return to stock though if desired.
 
Looking to update and upgrade your Genesis luxury sport automobile? Look no further than right here in our own forum store - where orders are shipped immediately!
Nice results for $95 for sure. I thought about this setup as well, my concern is that most of the air flowing into the filters would be warm engine bay air given the placement of the filters with regards to the stock intake ducts, especially given how the filters are reversed compared to the intake ducts. Maybe it's not an issue as you mention there is quite a bit of space underneath the filters though. At least one of the Stinger forum guys was measuring intake air temps with a JB4, it would be super interesting to see how these DIY intakes affect air temps.

I'm still pondering how to build some sort of extended heat shield for my setup as suggested that doesn't look completely ghetto. For your setup I wonder if you could cut the top off of the stock airbox to create a pretty effective heat shield? That would certainly make it impossible to return to stock though if desired.

I'd love to see how the intake air temps compare between these DIY intakes, stock and "real" intakes like the BMS and K&N ones.

I don't want to damage my stock airboxes, since reversing this install is a 10min job. However, I was thinking of using them for a template to fab up an "extension" to the bottom half of the box, to make it taller. Maybe use some ABS or plexi plastic sheeting. That's easy to cut, shape and glue together. Then some of that black foam pipe insulation for the top edge to "seal" it against the underside of the hood. That foam insulation is pretty much the same stuff the "real" intakes use. It's a thought, but I'll see how this works as is, for now.
 
Last edited:
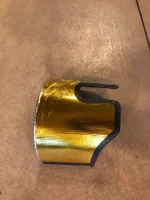
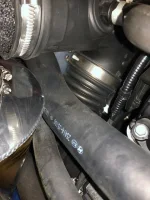
Installed my DIY intakes last night. I used the Spectre heat shields and used some DEI Reflect-a-gold on the back side of them to help reflect heat. Drive to work this morning outside temp was 70F. Intake temps climbed up to 100F doing about 55mph (sometimes dropping down to 98F). On a slower road before parking, temps climbed to 113F. I'd argue IAT temps seem about the same as the K&N panel filters. You can hear the turbo's spool now at lower speeds, and you can hear the OEM BOV a bit more now (which sounds kinda like a bullfrog). I did some trimming of the heat shields to reduce concerns of the sharper bottoms edges cutting into anything, then added car door edge guards. I'm not a huge fan of how the heat shield pushes against the hoses on the drivers side, but there isn't much a person can do about it.

I did some looking up by the grill area, etc. I honestly can't figure out where the outside air is feeding the OEM airbox? I never understand why the OEM's don't give the airbox a direct path to outside air.

I'd be curious to what your seeing for IAT temps Pickle with your setup....
 

Attachments

  • Intake 1.webp
    Intake 1.webp
    55.9 KB · Views: 59
  • Intake 2.webp
    Intake 2.webp
    51.3 KB · Views: 64
  • Intake 3.webp
    Intake 3.webp
    54.7 KB · Views: 63
  • Intake 4.webp
    Intake 4.webp
    53.5 KB · Views: 60
Last edited:
^ Nicely done. Did you feel any performance improvement?
 
^ Nicely done. Did you feel any performance improvement?

I need more seat/butt dyno time to see if I can tell a difference. I think so, but time will tell I guess. If the IAT's aren't any different than the OEM setup, but it pulls more air I'd assume there is a benefit.
 
^ Nicely done. Did you feel any performance improvement?

My butt dyno says yes. Seems more responsive to throttle input and the turbos seem to spool up faster too. I've been running my DIY setup for a few days now, and have had no problems at all.

@trdehmer - I'll try to get some IAT readings soonish, but I don't have too much time to play around with this ATM. :(
 
You had IAT's logged prior to installing the intakes? I would assume the OEM air path would bring in cooler temps, as it's all routed through the factory snorkel in the bumper... ...said path, while bringing in nice and cool air, is very restrictive, which is why, I think, people are seeing significant Dyno gains from just an intake alone.

Here's some pictures of the OEM snorkel to give you an idea...

21124
21125
21126

As you can see, the stock airbox gets all the air from, essentially, outside the engine bay, so it should be all cool air. But the factory setup is quite a bottle neck. The DIY intake, along with all other aftermarket intakes, should make a nice little performance improvement. But, I would think that AIT's would increase from stock unless you had a REALLY good heat shield that completely blocks off the rest of the engine bay.
 
I totally agree that the intake air temp would increase compared to stock. There's a few logs floating around on this forum and others, using a JB4 with and without an intake installed. We can use those for "stock" reference numbers. I'd also be very interested to see what the intake temps are for commercial products like the BMS and K&N intakes, to see how the DIY stacks up.

Here's 2 references done by BMS.
With stock intake:
With BMS intake:

I'm not too sure how to interpret the IAT lines in those graphs, but they seem to be on the same scale at least.

In the end, I think there is going to be a tradeoff between air temp and flow restriction unless we cut holes in our hood, or something. :grinlaugh:
 
Last edited:
I watched my IAT's yesterday prior to the install.

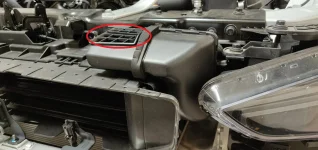
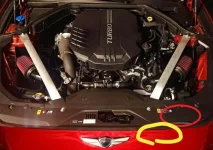
I'm a bit confused on the photos below, it would appear the OEM intake for pulling in outside air is right below the plastic covering behind and above the headlight assembly and grill? If so, where the heck is the outdoor air entering from and how is air getting into the area I circled? In the 2nd photo I attached, isn't the opening to the OEM outdoor air intake right below the area I circled? No wonder when I shined a flexible flashlight into the OEM snorkel I couldn't see light come out anywhere!

You had IAT's logged prior to installing the intakes? I would assume the OEM air path would bring in cooler temps, as it's all routed through the factory snorkel in the bumper... ...said path, while bringing in nice and cool air, is very restrictive, which is why, I think, people are seeing significant Dyno gains from just an intake alone.

Here's some pictures of the OEM snorkel to give you an idea...

View attachment 21124
View attachment 21125
View attachment 21126

As you can see, the stock airbox gets all the air from, essentially, outside the engine bay, so it should be all cool air. But the factory setup is quite a bottle neck. The DIY intake, along with all other aftermarket intakes, should make a nice little performance improvement. But, I would think that AIT's would increase from stock unless you had a REALLY good heat shield that completely blocks off the rest of the engine bay.
 

Attachments

  • OEM G70 Intake 1.webp
    OEM G70 Intake 1.webp
    137.6 KB · Views: 60
  • OEM G70 Intake 4.webp
    OEM G70 Intake 4.webp
    39.9 KB · Views: 61
Last edited:
I watched my IAT's yesterday prior to the install.

I'm a bit confused on the photos below, it would appear the OEM intake for pulling in outside air is right below the plastic covering behind and above the headlight assembly and grill? If so, where the heck is the outdoor air entering from and how is air getting into the area I circled? In the 2nd photo I attached, isn't the opening to the OEM outdoor air intake right below the area I circled? No wonder when I shined a flexible flashlight into the OEM snorkel I couldn't see light come out anywhere!

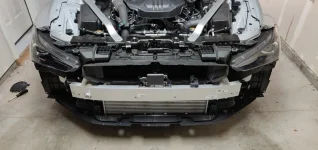
Close, but the intake snorkel inlet is more in line with the headlights. It's outside of the firewall, in front and above the radiator.

More like this (but not exactly)...
21130


Here is maybe a better viewing angle...
21131


Keep in mind that I removed the black plastic covers in the engine bay in addition to the bumper. The upward facing inlets are in line with the headlights when looking from the top down. They're actually under the colored part of the bumper, thus bringing in outside air (albeit in a very restrictive way, which, I assume, is to not allow water in the intake tract).
______________________________

Help support this site so it can continue supporting you!
 
Thanks for those pictures, very helpful. I take it you had yours apart to add a different intercooler? Did you change around the OEM intake snorkel inlet? I do wonder how easy it would actually be for water to get into the intake filter if there was an almost direct line of sight to the filter? It would be nice if there was a simple way to allow more outside air to get to the filter more efficient.

Close, but the intake snorkel inlet is more in line with the headlights. It's outside of the firewall, in front and above the radiator.

More like this (but not exactly)...
View attachment 21130


Here is maybe a better viewing angle...
View attachment 21131


Keep in mind that I removed the black plastic covers in the engine bay in addition to the bumper. The upward facing inlets are in line with the headlights when looking from the top down. They're actually under the colored part of the bumper, thus bringing in outside air (albeit in a very restrictive way, which, I assume, is to not allow water in the intake tract).
 
Thanks for those pictures, very helpful. I take it you had yours apart to add a different intercooler? Did you change around the OEM intake snorkel inlet? I do wonder how easy it would actually be for water to get into the intake filter if there was an almost direct line of sight to the filter? It would be nice if there was a simple way to allow more outside air to get to the filter more efficient.


No problem!

Agreed. In fact, that's actually the reason why I removed the bumper. I was in touch with the owner of Velossa Tech to see if he could make replacement intake snorkels for our car, and he wanted some pics. He said he was able to get ahold of a G70 to play with for the snorkels. Hopefully he comes out with something, because I'd be interested in it for sure.

Still using the stock intercooler for now.
Have you seen any kind of proof that the Velossa Tech snorkels actually improve performance? So far I've come across mixed feedback for these.
 
Have you seen any kind of proof that the Velossa Tech snorkels actually improve performance? So far I've come across mixed feedback for these.


No proof. Just logs showing cooler AIT's found on the Stinger forum. I doubt there is any significantly measurable difference; but, would still be worthwhile to me. Not worth it for everyone though, which I completely understand.

EDIT: Just got word that Dan @ Velossatech has finished a prototype set of snorkels for our cars! Looks like we will be seeing them relatively soon. When I buy mine I'll post a review including some before/after AIT's.
 
Last edited:
Heard these readings might not be the most accurate, but prior to DIY intakes my best 0-60 mph was 4.80 sec. which is w/o launch control. Just traction control off for this latest run. I've yet to hear the tires break loose or even see the traction control light flash that traction has been lost for a moment....
 

Attachments

  • 0-60 mph..webp
    0-60 mph..webp
    30.1 KB · Views: 48
^ yeah...not sure how accurate it is. I am told it is not. Who knows. My best time on Map 3 and 99 fuel is 3.81 sec.
 
Well, the BMS intakes claim about +27hp and +28tq over stock (with a JB4 @ Map2) with a dyno chart to back it up:


I don't see how the DYI setup would perform too much worse. We could discuss intake air temps, but the BMS one would suffer the same issues, I'd think.
 
Well, the BMS intakes claim about +27hp and +28tq over stock (with a JB4 @ Map2) with a dyno chart to back it up:

[/URL]

I don't see how the DYI setup would perform too much worse. We could discuss intake air temps, but the BMS one would suffer the same issues, I'd think.
I saw those dyno charts as well. That was a big reason why I decided to make an intake my first performance mod. You get the added sound and a small power boost with just the intakes, and once you add in the JB4 the two mods are highly synergistic.
 
Back
Top