
-

-
Hint: Use a descriptive title for your new message
If you're looking for help and want to draw people in who can assist you, use a descriptive subject title when posting your message. In other words, "I need help with my car" could be about anything and can easily be overlooked by people who can help. However, "I need help with my transmission" will draw interest from people who can help with a transmission specific issue. Be as descriptive as you can. Please also post in the appropriate forum. The "Lounge" is for introducing yourself. If you need help with your G70, please post in the G70 section - and so on... This message can be closed by clicking the X in the top right corner.
- Genesis Forums
- Hyundai Genesis Sedan Forums - 3.8 V6, 4.6 V8, 5.0
- General 2015-2016 Hyundai Genesis Sedan Discussion
You are using an out of date browser. It may not display this or other websites correctly.
You should upgrade or use an alternative browser.
You should upgrade or use an alternative browser.
Stalk/foglights v6 replacement
- Thread author dxtra196
- Start date
xsolara
Registered Member
Re: Stalk/foglighs v6 replacement
You will need a service manual.... You're taking on a hard project
It might have been better to do more investigation before starting to buy parts.
I have worked on less technical steering wheels to repair a defective stalk and I'll never do that again
I purchased the stalk and hardness from eBay. How do you remove the steering wheel?
You will need a service manual.... You're taking on a hard project
It might have been better to do more investigation before starting to buy parts.
I have worked on less technical steering wheels to repair a defective stalk and I'll never do that again
CanukV6
Registered Member
- Joined
- Mar 25, 2008
- Messages
- 9,281
- Reaction score
- 1,345
- Points
- 113
- Location
- Florida
- Genesis Model Year
- 2015
- Genesis Model Type
- 2G Genesis Sedan (2015-2016)
Re: Stalk/foglighs v6 replacement
Nice! Any chance you could post a how-to with pictures?
Thanks for your input. I was able to install the stalk, is fairly easy. If anyone is interested . I walk you through
Nice! Any chance you could post a how-to with pictures?

Nice! Any chance you could post a how-to with pictures?
I could do a how-to but without the pics.
- Joined
- Mar 25, 2008
- Messages
- 9,281
- Reaction score
- 1,345
- Points
- 113
- Location
- Florida
- Genesis Model Year
- 2015
- Genesis Model Type
- 2G Genesis Sedan (2015-2016)
Re: Stalk/foglighs v6 replacement
I think that would be fine. It seems a lot of people are doing this modification and I'm sure everyone would appreciate some instructions...
I could do a how-to but without the pics.
I think that would be fine. It seems a lot of people are doing this modification and I'm sure everyone would appreciate some instructions...
Nikgen
Been here awhile...
- Joined
- Jul 8, 2014
- Messages
- 2,244
- Reaction score
- 22
- Points
- 0
Re: Stalk/foglighs v6 replacement
So, are you saying you installed the Fog Light Control Stalk from the 5.0 and now can control the foglights the same way you can on the stock install on the 5.0? Was the harness going from the stalk to the front of the car already in place or did you have to add that? How about the harness connecting the 2 foglights in the front bumper - did you buy that as well? Thanks!
Thanks for your input. I was able to install the stalk, is fairly easy. If anyone is interested . I walk you through
So, are you saying you installed the Fog Light Control Stalk from the 5.0 and now can control the foglights the same way you can on the stock install on the 5.0? Was the harness going from the stalk to the front of the car already in place or did you have to add that? How about the harness connecting the 2 foglights in the front bumper - did you buy that as well? Thanks!
So, are you saying you installed the Fog Light Control Stalk from the 5.0 and now can control the foglights the same way you can on the stock install on the 5.0? Was the harness going from the stalk to the front of the car already in place or did you have to add that? How about the harness connecting the 2 foglights in the front bumper - did you buy that as well? Thanks!
Here's the link to the hardness http://www.ebay.com/itm/171763455035
Stalk- http://www.ebay.com/itm/171715662714
That's all you need the circuit's and everything else is in place. Connect the multi switch, disconnect the front bumper hardness and replace with the new one. The two orange and two outside black wires are you posite and negative that feeds the foglights. You can skip the hardness if you want , just tap into these wires. The hardness is on the driver side under the left headlights
Last edited:
I think that would be fine. It seems a lot of people are doing this modification and I'm sure everyone would appreciate some instructions...
I should of took some pictures before hand but is to late now. The hardest part is getting the lock bolt loose ( the center screw that holds the steering wheel) Everything else is snap clips
PMCErnie
Ancient ‘steemed Member
- Joined
- Jan 2, 2012
- Messages
- 5,933
- Reaction score
- 1,274
- Points
- 113
- Location
- Richmond, VA
- Genesis Model Type
- Genesis GV70
I thought there was a DRL OFF setting on the left stalk? Where is that?
Last edited:
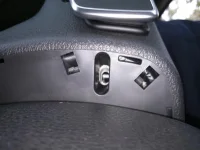
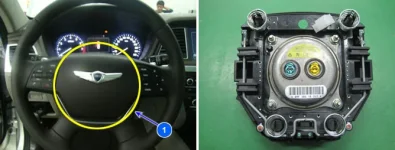
Here a quick rundown
update: Don't change the harness. See post #14 (this is #12) by scrolling down...
There's 3 access holes you have to press to get the airbag loose. The first one is under the steering wheel - it's like 3mm wide. Put a screw driver into the hole and push in. You'll see the airbag pop out from that corner. Turn the steering wheel counterclockwise until the paddle shifter is right in the middle. There's a bunch of holes behind the steering wheel - the big rectangular one - the second one from the top - push all the way then press down until you see the clips snap off. Turn the steering wheel clockwise until the other paddle shifter is in the middle and do the same on that side.
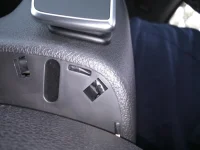
Pull the airbag.
Disconnect the car battery. Just unplug the negative.
Disconnect the airbag.
Pull up the orange top and then the plugs.
Remove all other harnesses.
Remove the steering wheel. There's five screws plus the lock bolt you need to take off. Now remove the steering wheel column (cover), unscrew the bottom screw then the top part of the cover comes off by pulling it apart. Pull the the cover apart. Now once you do that the bottom cover has two screws that need to come out. Now you you see the clock spring (it has yellow going around it) and the stalk. The clock spring and the stalk are connected by clips. There's four of them. Unclip. Replace the stalk.
Reconnect every thing back up the same way.
Reconnect the battery.
update: Don't change the harness. See post #14 (this is #12) by scrolling down...
There's 3 access holes you have to press to get the airbag loose. The first one is under the steering wheel - it's like 3mm wide. Put a screw driver into the hole and push in. You'll see the airbag pop out from that corner. Turn the steering wheel counterclockwise until the paddle shifter is right in the middle. There's a bunch of holes behind the steering wheel - the big rectangular one - the second one from the top - push all the way then press down until you see the clips snap off. Turn the steering wheel clockwise until the other paddle shifter is in the middle and do the same on that side.
Pull the airbag.
Disconnect the car battery. Just unplug the negative.
Disconnect the airbag.
Pull up the orange top and then the plugs.
Remove all other harnesses.
Remove the steering wheel. There's five screws plus the lock bolt you need to take off. Now remove the steering wheel column (cover), unscrew the bottom screw then the top part of the cover comes off by pulling it apart. Pull the the cover apart. Now once you do that the bottom cover has two screws that need to come out. Now you you see the clock spring (it has yellow going around it) and the stalk. The clock spring and the stalk are connected by clips. There's four of them. Unclip. Replace the stalk.
Reconnect every thing back up the same way.
Reconnect the battery.
Attachments
Last edited:
- Joined
- Mar 25, 2008
- Messages
- 9,281
- Reaction score
- 1,345
- Points
- 113
- Location
- Florida
- Genesis Model Year
- 2015
- Genesis Model Type
- 2G Genesis Sedan (2015-2016)
Thank you very much! I separated a few sentences out to make it easier to skim through quickly. I'm sure this will be very useful for anyone and everyone looking to update/replace their stalk. I may break it out into it's own topic in the not too distant future. ")
Looking to update and upgrade your Genesis luxury sport automobile? Look no further than right here in our own forum store - where orders are shipped immediately!
Update!!!!!! Don't bother getting the harness. The sensor are not working properly. Just tap into the black and orange wires to give the foglights power and leave the original harness in place . Since I have the the harness and is going to be a pain to return it , I'm just going to cut out the two Orange and black wires with the foglights plugs and reconnect it with the original harness and tape it together. The pins are easy to take out
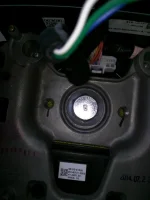
Here's a picture of the pins and factory harness the four corners are for you foglights Orange and black wires that you could disconnect from the harness you order on eBay and put here
Here's a picture of the pins and factory harness the four corners are for you foglights Orange and black wires that you could disconnect from the harness you order on eBay and put here
Attachments

Last edited:
Nikgen
Been here awhile...
- Joined
- Jul 8, 2014
- Messages
- 2,244
- Reaction score
- 22
- Points
- 0
Here's a picture of the pins and factory harness the four corners are for you foglights Orange and black wires that you could disconnect from the harness you order on eBay and put here
So are yours fully functional using the stalk now? Thanks!
So are yours fully functional using the stalk now? Thanks!
Yes. What I end up doing since I was going to keep the harness I bought from ebay. I cut open both hardness right is the middle with a blade and remove the Orange and black wire with the foglights connector and place back into the factory harness tube you just cut and seal it with tape again. Then I replace the main connector. I cut, then solder the wires together.
So basically what your doing is keeping the main connector plus the connection to fog light from the harness you bought on eBay. All other wires throw out. Now the harness that comes with the car cut the main connector and solder the wires together to the main connector you bought from eBay. Use the same tubing to tuck your foglights wires and your done.
But you could avoid all this if you just power your foglights straight from the Orange and black wires. All you need is the stalk and the foglights connectors they cost like $24 on eBay
Last edited:
Update!!! The pins in the hardness arw super easy to get out . With a flat head screw driver , pop out the Orange piece in the connector. It literally come right off . Now the pins, with a small skinny tool unclip and pull the wires. You don't need to cut the wires no more. You could even use the hardness you bought from eBay . Reorder the sensors pins to match the factory sensor pins and your done. The reason the hardness from eBay wasn't working was because the wires were reverse.
Last edited:
Is there an indicator light on the dash when the fog lights are on? I was wondering if there was a different dash for the V6.
Yes the foglights indicator comes on . The foglights come on with the headlights in auto or on. They turn off when the high beams are on. They behave just as stock
Nikgen
Been here awhile...
- Joined
- Jul 8, 2014
- Messages
- 2,244
- Reaction score
- 22
- Points
- 0
Yes the foglights indicator comes on . The foglights come on with the headlights in auto or on. They turn off when the high beams are on. They behave just as stock
Just got my stalk and harness in from eBay today! Once I get my car back from the dealer (sunroof rattle fix - hopefully), I'll get this wired up. Thanks for verifying this - it's great to be able to wire it up and have it function exactly as OEM!
One question - the fog light switch on the left stalk seems spring loaded and does not stay in the upper "on" position - it moves back to the "off" after you push it up to the "on" position (versus the wiper speed control on the right stalk that stays in several detent positions). Is that the way the foglight switch works? I want to make sure the stalk is not defective before I pull the wheel to install it. Thanks!
Last edited:
Great products:
- VIN Check
- Add more horsepower!
- Clean your leather!
- Safe Emergency Charging
- Windshield Repair Kit
- Chemical Guys HydroSpeed Ceramic Quick Detailer
- Chemical Guys HydroCharge High-Gloss Hydrophobic SI02 Ceramic Spray Coating
- Get a dash cam!
- Auto Buyers Market
- Foreign invaders vs USA gangs
 | ||||
| | | | | |
| | | |||


Featured content
-

-
Thread 'Help us to keep helping you. Your support is essential to our survival.'
- Sal Collaziano
Replies: 32