Get your Genesis emblem/badges here!:

 kdmwarehouse.com
I know that there are already similar posts for the 1st gen Genesis trunk lid emblem swap but I thought I would create one for the 2nd gen (2015+) owners.
 kdmwarehouse.com

SUPPLIES:
TIME:
30 minutes
INTRO:
North American 2nd gen Genesis sedans come with the "Flying H" oval emblem on the trunk lid with the remainder of the badging being the Genesis "Wings" on the hood and elsewhere. However, in Korea, the Genesis are sold with the "Wings" emblem throughout including the trunk lid.
For those North American owners who want to convert their trunk lid badging to the "Wings" emblem it can be done by ordering the KDM part and some simple modification. Please note that the "Wings" emblem for the 2nd gen Genesis sedan is shaped differently than the emblem for the 1st gen Genesis sedan or coupe. Also the trunk lid emblem is smaller in size than the hood emblem. Also the emblems are aligned from the factory using plastic pegs and holes drilled into the trunk lid itself. Unfortunately, the hole spacing is different between the North American and KDM Genesis sedans so some modification will be needed to the KDM emblem prior to installation:
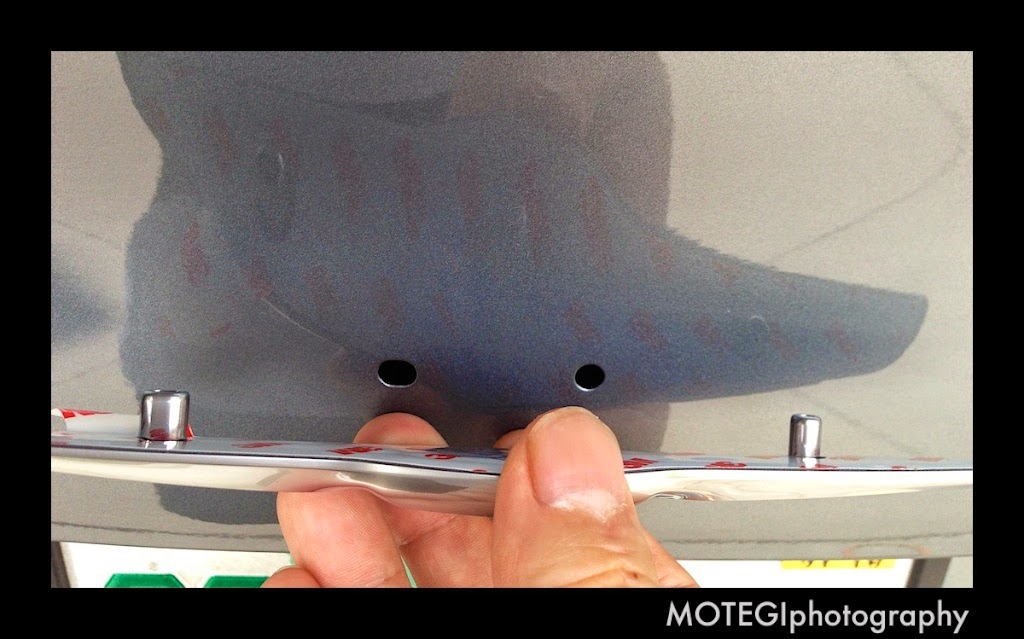
You can get the KDM 2nd gen Genesis "Wings" trunk lid emblem right here. Here's how mine looked when it arrived:


-------------------------------------------------------------
INSTRUCTIONS:
PREP:
Wash the car thoroughly OR wipe down the trunk lid with a clean microfiber cloth and detailing spray. Remove all surface dust from the area. Be careful to avoid introducing swirl marks into the paint.

Next assemble your emblem removal tool using the about 12-14 inches of fishing line and the two dowels. The dowels will act as handles and the line is what will cut through the adhesive on the trunk badge without scratching the paint. I used a black plastic yard stake cut into 4 inch pieces. I scored a shallow groove into the center of the handles using some utility scissors. The groove will make it easier to tie the fishing line on and prevent it from sliding up and down the dowel. I tied mine so that there was only 7-8 inches of fishing line between the two dowels for better control.


-------------------------------------------------------------
STEP 1:
First you will need to remove the plastic pegs from the back of the KDM "wings" emblem using a Dremel tool with cutting disc. I recommend covering the back with some masking tape to protect the factory adhesive. I found it easiest to cut a little on all 4 sides rather than to try to cut through all the way from just one side due to the slight angle of the cutting disc with respect to the emblem.

-------------------------------------------------------------
STEP 2:
Use the Dremel with grinding stone to gently sand down the peg stumps so that they are below the level of the factory adhesive. If the stump sticks out above the adhesive it will scratch your paint and may prevent the adhesive from making good contact with the car.

-------------------------------------------------------------
STEP 3:
Remove the existing "Flying H" emblem from the trunk lid. First use the low heat setting on a heat gun or the high setting on a hair dryer to heat up one side of the "Flying H" emblem. Using the heat gun it only took 10-15 seconds to become hot to the touch. It may take a little longer to heat with a hair dryer.

-------------------------------------------------------------
STEP 4:
Gently pass the fishing line tool under one edge of the heated emblem and use a slight "sawing" motion to cut through the adhesive. If the adhesive has been heated enough it should cut through without much force.
You will be able to cut the adhesive down to the plastic peg which protrudes closer to the middle of the emblem

-------------------------------------------------------------
STEP 5:
Repeat on the other half of the emblem and then bring the fishing line though the top and bottom edges as well. Now the "Flying H" emblem should come off easily. If you are still feeling resistance keep working all the way around with the fishing line.
-------------------------------------------------------------
STEP 6:
Now remove the chunks of adhesive left behind on the trunk lid gently using your fingernails. Do not use anything here that would scratch or gouge your paint.
For the adhesive residue left behind use some Goo Gone or WD40 applied to a shop rag to wipe down the area.

-------------------------------------------------------------
Continued...
Genesis Accessories
Genesis accessories, high performance and cosmetic modifications.
kdmwarehouse.com
I know that there are already similar posts for the 1st gen Genesis trunk lid emblem swap but I thought I would create one for the 2nd gen (2015+) owners.
Premium Emblem Removal and Installation Preparation Kit
This unique "Installation" Kit ensures the surface of your vehicle is prepped properly for maximum adhesion for new emblems / badges. Also, the special polishing cloth is made specifically to care for the surface of your new emblems, never causing fine lines or scratches left by standard terry...
kdmwarehouse.com
SUPPLIES:
- KDM trunk lid emblem (Part No: 86330 B1000)
- 20lb fishing line ($3 at WalMart)
- 2 pieces of wooden dowel/pencils/plastic sticks
- Blue painters tape
- Goo Gone or WD40
- Detailing spray
- Isopropyl alcohol
- Bubble/spirit level
- Heat gun or hairdryer
- Measuring tape
- Dremel tool with cutting disc and grinding stone
- Shop rags/microfiber cloths
TIME:
30 minutes
INTRO:
North American 2nd gen Genesis sedans come with the "Flying H" oval emblem on the trunk lid with the remainder of the badging being the Genesis "Wings" on the hood and elsewhere. However, in Korea, the Genesis are sold with the "Wings" emblem throughout including the trunk lid.
For those North American owners who want to convert their trunk lid badging to the "Wings" emblem it can be done by ordering the KDM part and some simple modification. Please note that the "Wings" emblem for the 2nd gen Genesis sedan is shaped differently than the emblem for the 1st gen Genesis sedan or coupe. Also the trunk lid emblem is smaller in size than the hood emblem. Also the emblems are aligned from the factory using plastic pegs and holes drilled into the trunk lid itself. Unfortunately, the hole spacing is different between the North American and KDM Genesis sedans so some modification will be needed to the KDM emblem prior to installation:
You can get the KDM 2nd gen Genesis "Wings" trunk lid emblem right here. Here's how mine looked when it arrived:
-------------------------------------------------------------
INSTRUCTIONS:
PREP:
Wash the car thoroughly OR wipe down the trunk lid with a clean microfiber cloth and detailing spray. Remove all surface dust from the area. Be careful to avoid introducing swirl marks into the paint.
Next assemble your emblem removal tool using the about 12-14 inches of fishing line and the two dowels. The dowels will act as handles and the line is what will cut through the adhesive on the trunk badge without scratching the paint. I used a black plastic yard stake cut into 4 inch pieces. I scored a shallow groove into the center of the handles using some utility scissors. The groove will make it easier to tie the fishing line on and prevent it from sliding up and down the dowel. I tied mine so that there was only 7-8 inches of fishing line between the two dowels for better control.
-------------------------------------------------------------
STEP 1:
First you will need to remove the plastic pegs from the back of the KDM "wings" emblem using a Dremel tool with cutting disc. I recommend covering the back with some masking tape to protect the factory adhesive. I found it easiest to cut a little on all 4 sides rather than to try to cut through all the way from just one side due to the slight angle of the cutting disc with respect to the emblem.
-------------------------------------------------------------
STEP 2:
Use the Dremel with grinding stone to gently sand down the peg stumps so that they are below the level of the factory adhesive. If the stump sticks out above the adhesive it will scratch your paint and may prevent the adhesive from making good contact with the car.
-------------------------------------------------------------
STEP 3:
Remove the existing "Flying H" emblem from the trunk lid. First use the low heat setting on a heat gun or the high setting on a hair dryer to heat up one side of the "Flying H" emblem. Using the heat gun it only took 10-15 seconds to become hot to the touch. It may take a little longer to heat with a hair dryer.
-------------------------------------------------------------
STEP 4:
Gently pass the fishing line tool under one edge of the heated emblem and use a slight "sawing" motion to cut through the adhesive. If the adhesive has been heated enough it should cut through without much force.
You will be able to cut the adhesive down to the plastic peg which protrudes closer to the middle of the emblem
-------------------------------------------------------------
STEP 5:
Repeat on the other half of the emblem and then bring the fishing line though the top and bottom edges as well. Now the "Flying H" emblem should come off easily. If you are still feeling resistance keep working all the way around with the fishing line.
-------------------------------------------------------------
STEP 6:
Now remove the chunks of adhesive left behind on the trunk lid gently using your fingernails. Do not use anything here that would scratch or gouge your paint.
For the adhesive residue left behind use some Goo Gone or WD40 applied to a shop rag to wipe down the area.
-------------------------------------------------------------
Continued...
Last edited:


")

")