
-

-
Hint: Use a descriptive title for your new message
If you're looking for help and want to draw people in who can assist you, use a descriptive subject title when posting your message. In other words, "I need help with my car" could be about anything and can easily be overlooked by people who can help. However, "I need help with my transmission" will draw interest from people who can help with a transmission specific issue. Be as descriptive as you can. Please also post in the appropriate forum. The "Lounge" is for introducing yourself. If you need help with your G70, please post in the G70 section - and so on... This message can be closed by clicking the X in the top right corner.
- Genesis Forums
- Genesis Motors Forums
- Genesis GV70 Forum / GV70 EV Forum - GV70FORUM.COM
- Genesis GV70 Technology Discussion
You are using an out of date browser. It may not display this or other websites correctly.
You should upgrade or use an alternative browser.
You should upgrade or use an alternative browser.
Dash cam?
- Thread author Jargen
- Start date
luck11
2023 GV70 2.5T Prestige
Except, I don't think ours comes equipped with the built in dash cam. We have a forward facing camera in the front, but must be for other purposes because in the vids, you actually see a separate lens next to it that they refer to as the dash cam. We don't have that. So contrary to previous comments hoping they would "activate" the cameras, I don't think this is just a firmware/software issue...we actually do not have hardware in place to activate. Happy to be proven wrong here.Have you seen the website where they show using the built in cameras? It also combines with the GPS whis is really cool.!
Dee-Genesis
Registered Member
- Joined
- Oct 6, 2021
- Messages
- 323
- Reaction score
- 206
- Points
- 43
- Genesis Model Year
- 2022
- Genesis Model Type
- Genesis GV70
I think we all know about that, however, it isn't something that we have in North America. Hence why I and many others are disappointed Genesis didn't give up that feature here.Have you seen the website where they show using the built in cameras? It also combines with the GPS whis is really cool.!
Neal0026
New member
- Joined
- Sep 12, 2022
- Messages
- 7
- Reaction score
- 1
- Points
- 3
- Genesis Model Year
- 2023
- Genesis Model Type
- Genesis GV80
On a GV80, does the connector behind mirror provide an always on tap ? I am concerned about the always ON tap draining the battery. Where is the power control box on GV80 and how do you set it to avoid draining the battery if the dash cam is wired. The camera I am trying to install is AZDOME M550.Most dashcam hard wire kits come with two hot wires, one ground and a power control box. They wire up with one wire to an ignition hot (only on when ignition is on) to provide power to the camera when you start the car. The other is connected to an always on tap to provide power when the car is shut off (for parking monitor). The power control box has settings for voltage levels to shut off the always on tap when the battery gets to the preset. This keeps the camera from killing your battery when the vehicle is not running.
Do not know what camera you have or its requirements.
Looking to update and upgrade your Genesis luxury sport automobile? Look no further than right here in our own forum store - where orders are shipped immediately!
DaleNet
Registered Member
- Joined
- May 22, 2022
- Messages
- 1,778
- Reaction score
- 791
- Points
- 113
- Location
- Niceville, Florida
- Genesis Model Year
- 2023
- Genesis Model Type
- Genesis GV80
I do not think it is always powered on the GV80. The garage door opener and other functions do not work when the vehicle is off.

Same and doing the same thing. It's a hassle...
Haven't asked Genesis to check it out but I'm pretty sure this is a defect. I have a few other friends who do not have this issue.
dhuhtala
Registered Member
- Joined
- May 30, 2022
- Messages
- 1,899
- Reaction score
- 722
- Points
- 113
- Genesis Model Year
- 2023
- Genesis Model Type
- Genesis GV70
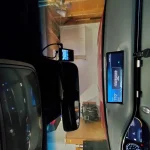
I'm wondering how people have actually mounted their dash cams? I would prefer to install it right where the big plastic cowl is on the windshield that has the cameras, etc in it. I really don't want to put the camera below it or it is blocking my view. If I mount it too far over on the passenger side then it isn't centered...just curious if anyone has any pictures? My dashcam is on the way so I have to figure this out now I guess. One of the pictures of the camera I ordered shows exactly how I do NOT want to mount mine! The camera is a Vantrue E1, by the way...
Attachments
luck11
2023 GV70 2.5T Prestige
I don't want to see my dash cam...it's there and running "just in case". So I purposely put it on the other side. Below the cowl, I find it becomes a blind spot and is distracting, although I have my screen turn off about 5 seconds after the camera boots. Also don't want it super visible from the outside. I balanced height and as tight as possible to the cowl (ideal was tight to headliner, but then it was being blocked by the cowl) so after playing with the positioning, I found that was optimal spot. It's a bit off centre but the view is wide so the 4" off to one side makes little difference.I'm wondering how people have actually mounted their dash cams? I would prefer to install it right where the big plastic cowl is on the windshield that has the cameras, etc in it. I really don't want to put the camera below it or it is blocking my view. If I mount it too far over on the passenger side then it isn't centered...just curious if anyone has any pictures? My dashcam is on the way so I have to figure this out now I guess. One of the pictures of the camera I ordered shows exactly how I do NOT want to mount mine! The camera is a Vantrue E1, by the way...
Sorry, not sure why the image keeps rotating 90 degrees each time I attach, but I give up trying to fix it.
Attachments
Dealer60
Registered Member
- Joined
- Dec 21, 2022
- Messages
- 55
- Reaction score
- 22
- Points
- 8
- Genesis Model Year
- 2023
- Genesis Model Type
- Genesis GV70

luck11
2023 GV70 2.5T Prestige
Just be aware that dealer may unplug if they need to check anything on the car. Also, if Ring has any sort of parking mode, where it will record when it senses motion, bumps changes in pitch of the car even with car is off, I would verify that it also has function to detect if car battery voltage drops below a certain level and if so, cuts off any further power to the dash cam. If it's getting 12V constant off OBD port and it's running frequently when car is off, it could kill your battery. That's why I went with a wiring harness from my dash cam brand that has this built in, and you can choose 3 or 4 diff voltage levels. Plugged into two spare spots in the fuse box on drivers side dash, left shin level.I have pre ordered the new Ring dashcam. It uses the ODB 2 port which faces vertically down under the fuse box on the GV70 . Installation seems fairly easy but I’m not yet sure how it’ll look ! View attachment 51034View attachment 51034
dhuhtala
Registered Member
- Joined
- May 30, 2022
- Messages
- 1,899
- Reaction score
- 722
- Points
- 113
- Genesis Model Year
- 2023
- Genesis Model Type
- Genesis GV70
Thanks - that's exactly what I was looking for - a picture of a dashcam mounted to the side where I was thinking of putting it! I think that's the sweet spot!I'm wondering how people have actually mounted their dash cams? I would prefer to install it right where the big plastic cowl is on the windshield that has the cameras, etc in it. I really don't want to put the camera below it or it is blocking my view. If I mount it too far over on the passenger side then it isn't centered...just curious if anyone has any pictures? My dashcam is on the way so I have to figure this out now I guess. One of the pictures of the camera I ordered shows exactly how I do NOT want to mount mine! The camera is a Vantrue E1, by the way...
dhuhtala
Registered Member
- Joined
- May 30, 2022
- Messages
- 1,899
- Reaction score
- 722
- Points
- 113
- Genesis Model Year
- 2023
- Genesis Model Type
- Genesis GV70
I considered the Ring dashcam but they won't sell it in Canada...I have pre ordered the new Ring dashcam. It uses the ODB 2 port which faces vertically down under the fuse box on the GV70 . Installation seems fairly easy but I’m not yet sure how it’ll look ! View attachment 51034View attachment 51034

Halo777
Registered Member
- Joined
- Mar 27, 2022
- Messages
- 130
- Reaction score
- 37
- Points
- 28
- Genesis Model Year
- 2022
- Genesis Model Type
- Genesis GV70
I have pre ordered the new Ring dashcam. It uses the ODB 2 port which faces vertically down under the fuse box on the GV70 . Installation seems fairly easy but I’m not yet sure how it’ll look !
Let us know your experience with the Ring.
I am curious as to how it fits behind the infotainment screen.
Also have some of the questions mentioned by Luck11
dhuhtala
Registered Member
- Joined
- May 30, 2022
- Messages
- 1,899
- Reaction score
- 722
- Points
- 113
- Genesis Model Year
- 2023
- Genesis Model Type
- Genesis GV70
Well, I installed the Vantrue E1 camera from Amazon today. It's actually a pretty high quality mini 2.5K dashcam that supports HDR and 30 fps or HDR/60 FPS at 1080p. It is very small, has a base mount with the GPS chip in it and then you can slide it off the base and take it with you to transfer video at a faster speed with a USB-C connector. I used the mirror power adapter but that might cause me some issues, I think.
The mirror power adapter means that it loses all power every time you turn off the car (and will probably shut off with the auto on/off as well). Every time it shuts off, it turns off the WiFi signal, which is how you connect your phone to it. Manually turning on the wifi seems to start messing with my Motorola MA1 AA wireless adapter and it connects/disconnects...so I will have to play with that some more to see if it is a consistent problem.
I contacted the seller to ask about the WiFi connection - but even if you don't use that, it still works okay without the phone connection. Transferring videos over that wifi signal is way too slow anyway, so I'd just remove it and physically plug it into my computer to transfer anyway.
The power adapter in the mirror was really easy to connect power with...you don't have to remove the whole cowl from the mirror like the Youtube video says, by the way - just the plate in the centre...you can reach the power connector with just that piece removed. Also, I would NOT pull that plate from the bottom like the video says - just hurt my fingers. If you pull down from the top of that plate near the headliner, it comes out way easier.
I just need a short USB-C cable with a 90-degree angle connector now to keep the cable tighter to the camera and I should be good to go. I'll give an update when I try to use it some more.
Mirror Adapter Cable:

 dongar.tech
Camera:
USB cable:
The mirror power adapter means that it loses all power every time you turn off the car (and will probably shut off with the auto on/off as well). Every time it shuts off, it turns off the WiFi signal, which is how you connect your phone to it. Manually turning on the wifi seems to start messing with my Motorola MA1 AA wireless adapter and it connects/disconnects...so I will have to play with that some more to see if it is a consistent problem.
I contacted the seller to ask about the WiFi connection - but even if you don't use that, it still works okay without the phone connection. Transferring videos over that wifi signal is way too slow anyway, so I'd just remove it and physically plug it into my computer to transfer anyway.
The power adapter in the mirror was really easy to connect power with...you don't have to remove the whole cowl from the mirror like the Youtube video says, by the way - just the plate in the centre...you can reach the power connector with just that piece removed. Also, I would NOT pull that plate from the bottom like the video says - just hurt my fingers. If you pull down from the top of that plate near the headliner, it comes out way easier.
I just need a short USB-C cable with a 90-degree angle connector now to keep the cable tighter to the camera and I should be good to go. I'll give an update when I try to use it some more.
Mirror Adapter Cable:
Dash Cam Power Adapter (10-Pin Type H) for Select Kia/Hyundai
Plug and play dash Dongar Dash Cam power adapter for Hyundai/Kia! COMING SOON! Q1 2022 LAUNCH Powers your camera upon vehicle ignition ON Recommended for cameras requiring less than 2A @ 5V The Dongar Technologies dash cam adapter allows easy plug-and-play installation of a USB device with no...
dongar.tech
Camera:
USB cable:
dhuhtala
Registered Member
- Joined
- May 30, 2022
- Messages
- 1,899
- Reaction score
- 722
- Points
- 113
- Genesis Model Year
- 2023
- Genesis Model Type
- Genesis GV70
Dee-Genesis
Registered Member
- Joined
- Oct 6, 2021
- Messages
- 323
- Reaction score
- 206
- Points
- 43
- Genesis Model Year
- 2022
- Genesis Model Type
- Genesis GV70
Good to know. I've bought the adapter but still haven't gotten a dash cam as yet. Can you please show your installation set up.
DoozyTheFloozy
Registered Member
- Joined
- Nov 23, 2022
- Messages
- 46
- Reaction score
- 7
- Points
- 8
- Genesis Model Year
- 2023
- Genesis Model Type
- Genesis GV70
X2. Also would love to see any video showing the opening of the Mirror back! (Apologies if I missed it, I'll scroll back in the posts and check YT)..Good to know. I've bought the adapter but still haven't gotten a dash cam as yet. Can you please show your installation set up.
DoozyTheFloozy
Registered Member
- Joined
- Nov 23, 2022
- Messages
- 46
- Reaction score
- 7
- Points
- 8
- Genesis Model Year
- 2023
- Genesis Model Type
- Genesis GV70
How about the rear-facing cam (not the cabin-cam attached to the front cam). What's the best way to power/wire the rear-facing camera attached to the rear window? Two connections - one for power and one to connect to the main unit - anyone have advice how to connect the power in the rear best and snake the connection to the front cam? Been using Vantrue front dual cams for about 8 years or so now - never added the rear - and that (the front cam) was in a Cherokee Sport, Ford Edge Sport, and Mazda CX-5..
DaleNet
Registered Member
- Joined
- May 22, 2022
- Messages
- 1,778
- Reaction score
- 791
- Points
- 113
- Location
- Niceville, Florida
- Genesis Model Year
- 2023
- Genesis Model Type
- Genesis GV80
I paid Best Buy to wire my front and rear cam. Did not want to hassle with it. Also, they used a mount to attach the rear camera to the trim and not the rear glass. I like this because you do not need a loop in the cable for the rear hatch to be opened. The loop always hangs down and looks bad. Mine is hard wired to the fuse box so I have parking monitoring too.
dhuhtala
Registered Member
- Joined
- May 30, 2022
- Messages
- 1,899
- Reaction score
- 722
- Points
- 113
- Genesis Model Year
- 2023
- Genesis Model Type
- Genesis GV70
Sure, I'll take some pictures when it's light out on the weekend.Good to know. I've bought the adapter but still haven't gotten a dash cam as yet. Can you please show your installation set up.
")
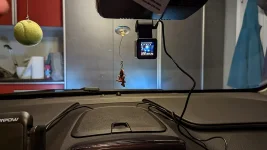
I would say the installation time was about 15 minutes - honestly, pretty simple! Once I ignored the Youtube video on how to access the mirror power adapter, it went a lot quicker. To save you some time, do NOT remove the entire shroud - you don't have to. Just remove the centre plate by pulling down at the top edge (nearest the headliner), not the bottom, rounded edge.
Then just find a good spot to mount on the windshield and stick it on and plug in the USB cable. I put mine to the right of the camera shroud (passenger side) just far enough away from it so that it doesn't appear in the dashcam video when the dash cam is set to "wide screen view".
 | ||||
| | | | | |
| | | |||
Great products:
- VIN Check
- Add more horsepower!
- Clean your leather!
- Safe Emergency Charging
- Windshield Repair Kit
- Chemical Guys HydroSpeed Ceramic Quick Detailer
- Chemical Guys HydroCharge High-Gloss Hydrophobic SI02 Ceramic Spray Coating
- Get a dash cam!
- Auto Buyers Market
- Foreign invaders vs USA gangs


Featured content
-

-
Thread 'Help us to keep helping you. Your support is essential to our survival.'
- Sal Collaziano
Replies: 27